AI Compute Pool (ACP)
Product Updates
| Version No. | Updated content | Update time |
|---|---|---|
| AI Compute Pool v2.7 | The AI Compute Pool is adapted to 910B and can run through the Pytorch framework single-machine and multi-machine training tasks; it supports unified command lines, safe POSIX, task event logs including information such as pod exception causes and trigger time, and foundation model exception detection & fault-tolerant system function optimization and iteration (add node information and supplement log details); | 2023-12-30 |
| AI Compute Pool v2.5 | AI Compute Pool (Classic) will be unavailable. Users cannot create or restart training jobs on the old version of Compute Pool. Checkpoint fault tolerance and recovery mechanisms are available at the job level. Support internationalization - English UI. The Worker monitoring page is optimized to add Pod IP and support quick search and location of abnormal workers by host IP. | 2023-11-30 |
| AI Compute Pool v2.4 | Provide fault tolerance logs and exception detection logs; allow workspace owners to adjust task priorities | 2023-10-30 |
| AI Compute Pool v2.3 | More AZ scenarios | 2023-09-30 |
| AI Compute Pool v2.2 | Fault tolerant function is available for training jobs | 2023-08-30 |
| AI Compute Pool v2.0 | Compute Pool 2.0 is released and can cooperate with cluster products to manage training jobs. (The entrance to the original compute pool is retained and renamed as AI Compute Pool (Classic) without affecting the original functions) | 2023-07-26 |
| AI Compute Pool v1.1 | Compute Pool 2.0 is released and can cooperate with cluster products to manage training jobs. (The entrance to the original compute pool is retained and renamed as AI Compute Pool (Classic) without affecting the original functions) | 2023-07-26 |
| AI Compute Pool GA | Optimized the presentation form of monitoring and logging functions, added task Worker events, and support for logging in to task Worker | 2023-03-31 |
| AI Compute Pool RC | Deliver compatibility with RoCE training network | 2023-02-28 |
| AI Compute Pool Beta | Users can unsubscribe from and renew AI Compute Pool | 2022-12-31 |
| AI Compute Pool Alpha2 | Added functions such as task monitoring and logging | 2022-10-31 |
| AI Compute Pool Alpha | Users can create AI Compute Pool and submit training jobs | 2022-09-30 |
Product Overview
AI Compute Pool (ACP) is an AI computing power platform featuring high performance, elastic scalability, security and stability, and intelligent scheduling based on SenseTime's many years of experience in R&D and operation of super-large AI supercomputing clusters, which can not only greatly improve the utilization of computing power resources and the efficiency of AI applications but also vigorously promote the growth of AI business.
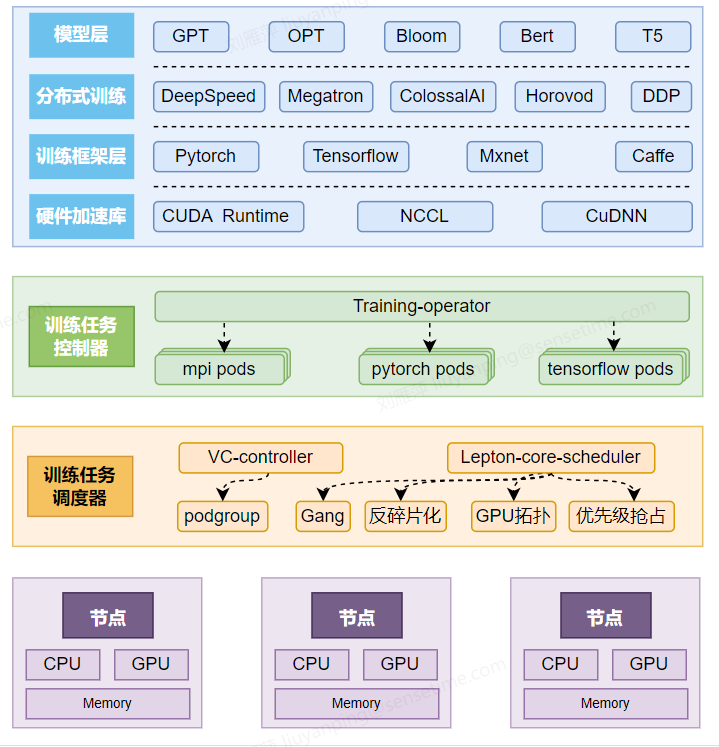
Product Architecture
Product Superiority
- Large-scale distributed training: an RDMA (IB/RoCE) network specially developed for model training connects each training node, realizing high-speed communication on the training network and improving the efficiency of large-scale distributed training;
- Multiple frameworks supported: support for multiple mainstream training frameworks and distributed architectures without the need of changing code adaptation, and realize access without any condition;
- All-link visual monitoring of training jobs: Support the monitoring of distributed training jobs across multiple machines and multiple GPUs, support monitoring, logging, and alarming at the task level, Worker level, and GPU level, and support multi-machine and multi-GPU training.
- Support fault tolerance and recovery mechanism of foundation model: In order to ensure the stable operation of large-scale distributed deep learning tasks, it provides task exception detection services, fault-tolerant rescheduling and recovery services for training jobs, and high-speed checkpoint services for distributed training jobs.
- Support multiple training acceleration architectures: For distributed training jobs, support training acceleration architectures including Parameter Server and All Reduce-DDP.
Product Features
- Commit training jobs: support for committing training jobs to the ACP via the Web side and SCC (Slurm Compatible CLI), where ACP is based on the RDMA (IB/RoCE) network, which provides fundamental guarantees for large-scale distributed training;
- Manage and monitor training jobs: support for the lifecycle management of training jobs, support for viewing monitoring and logs in training jobs, and support for viewing the details of Worker in training jobs;
About Billing
There will be no charge for committing training jobs in the AI Compute Pool, and only AI compute nodes are charged.
Quick Start
You can create an ACP on the console, and create a training task in the task list. Before creating a job, you need to save the dataset required for training into an AI file storage and prepare the image required for training (you can directly use the official image, or upload a private image to our image service). You also need to save the training code file into the AI file storage or into the image to start the job. When creating the job, in addition to selecting the image and mounting the AI file storage, you need to specify the resources required by Worker for the job to start. Finally, you need to enter the start command to start the training job.
Operation Guide
Create Job
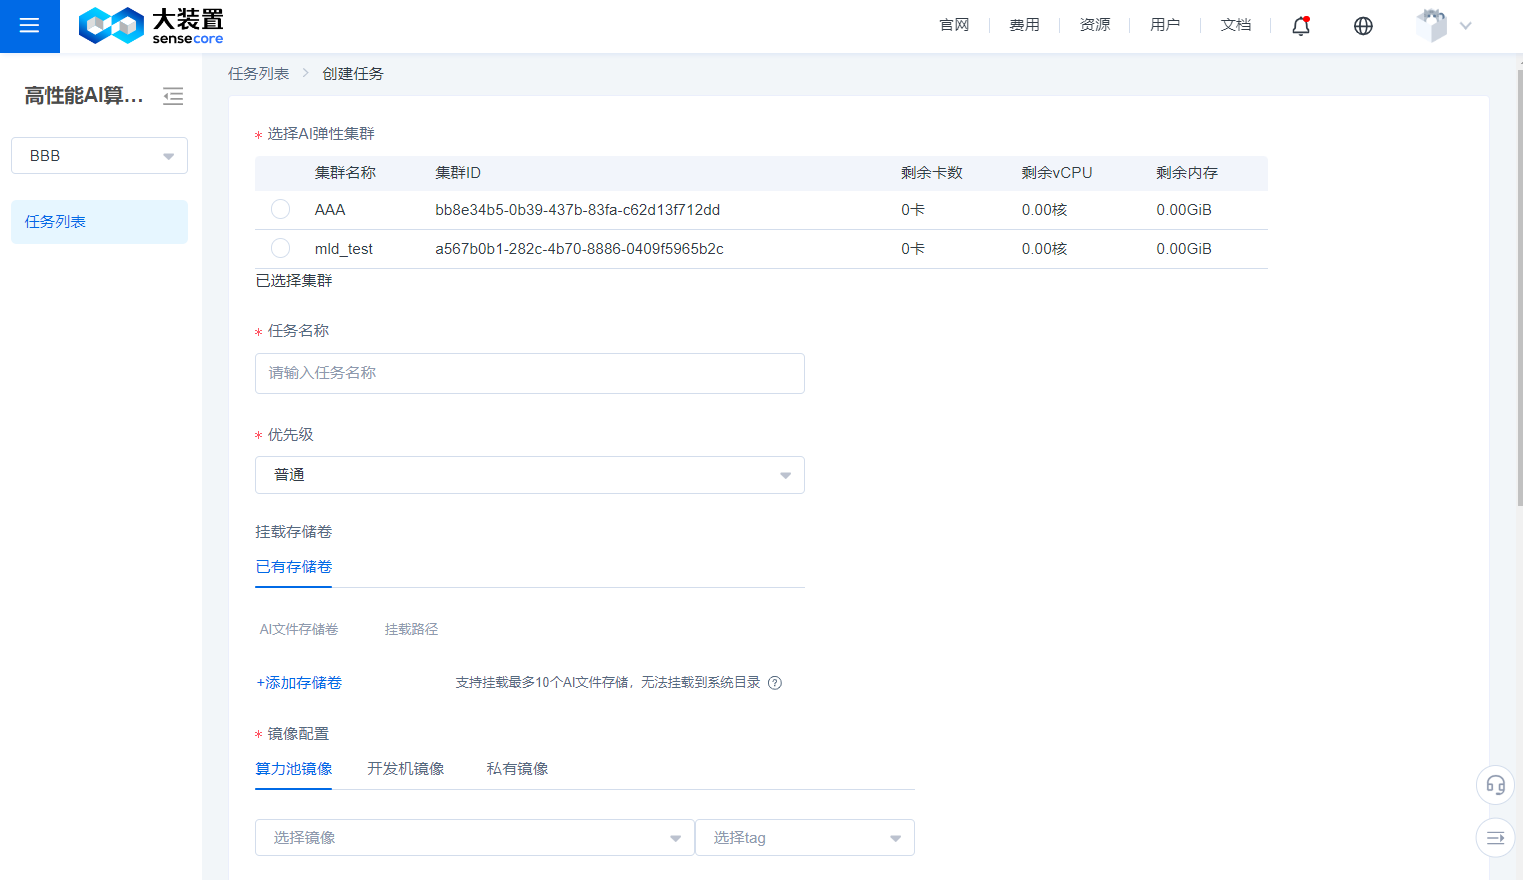
- On the Create Job page, items marked with * are required.
- You can select one of the created compute pools to create a job.
- You can customize the job name.
- You can also mount a storage volume from existing storage volumes. If there is no storage volume, you can create a new storage volume and add it.
- You must specify an image for the job, and official images are basic images provided by SenseCore, or you can upload and use your own image through the CCR service.
- The training tasks of the AI Compute Pool must be based on a workspace, and can only use nodes under the cluster associated with the workspace, so you need to choose to use the resources of a certain cluster.
- Workspace users can only create training tasks with normal priority; workspace owners or users with higher permissions can configure the training task priority to be high or highest; when there are high-priority tasks to be scheduled, the resource supply for unscheduled low-priority tasks will be blocked, but scheduled task resources will not be preempted by the high-priority tasks; and for training tasks with the same priority, the system will allocate multi-dimensional computing resources for scheduling.

- You need to specify the training framework and the distributed framework used for the job.
- You need to specify the resources required by Worker for the job.
- You need to add some start commands to start your job. **Enable the fault tolerance function: This function is specially designed for foundation model training. Once it is enabled, we will check the availability of GPU and network communication before the task starts, and once a problematic node is found, we will select another node to try to start the task. Meanwhile, you can also log in to the task worker via Webterminal at any time to manipulate the task process, even if you kill the task process, we will keep the worker's scene for you.
- Enable exception detection: Once exception detection is enabled, the system will judge whether the training task is in a normal running status through the analysis of worker logs and monitoring indicators, and will display the detection results on the Task Details page.
Task List
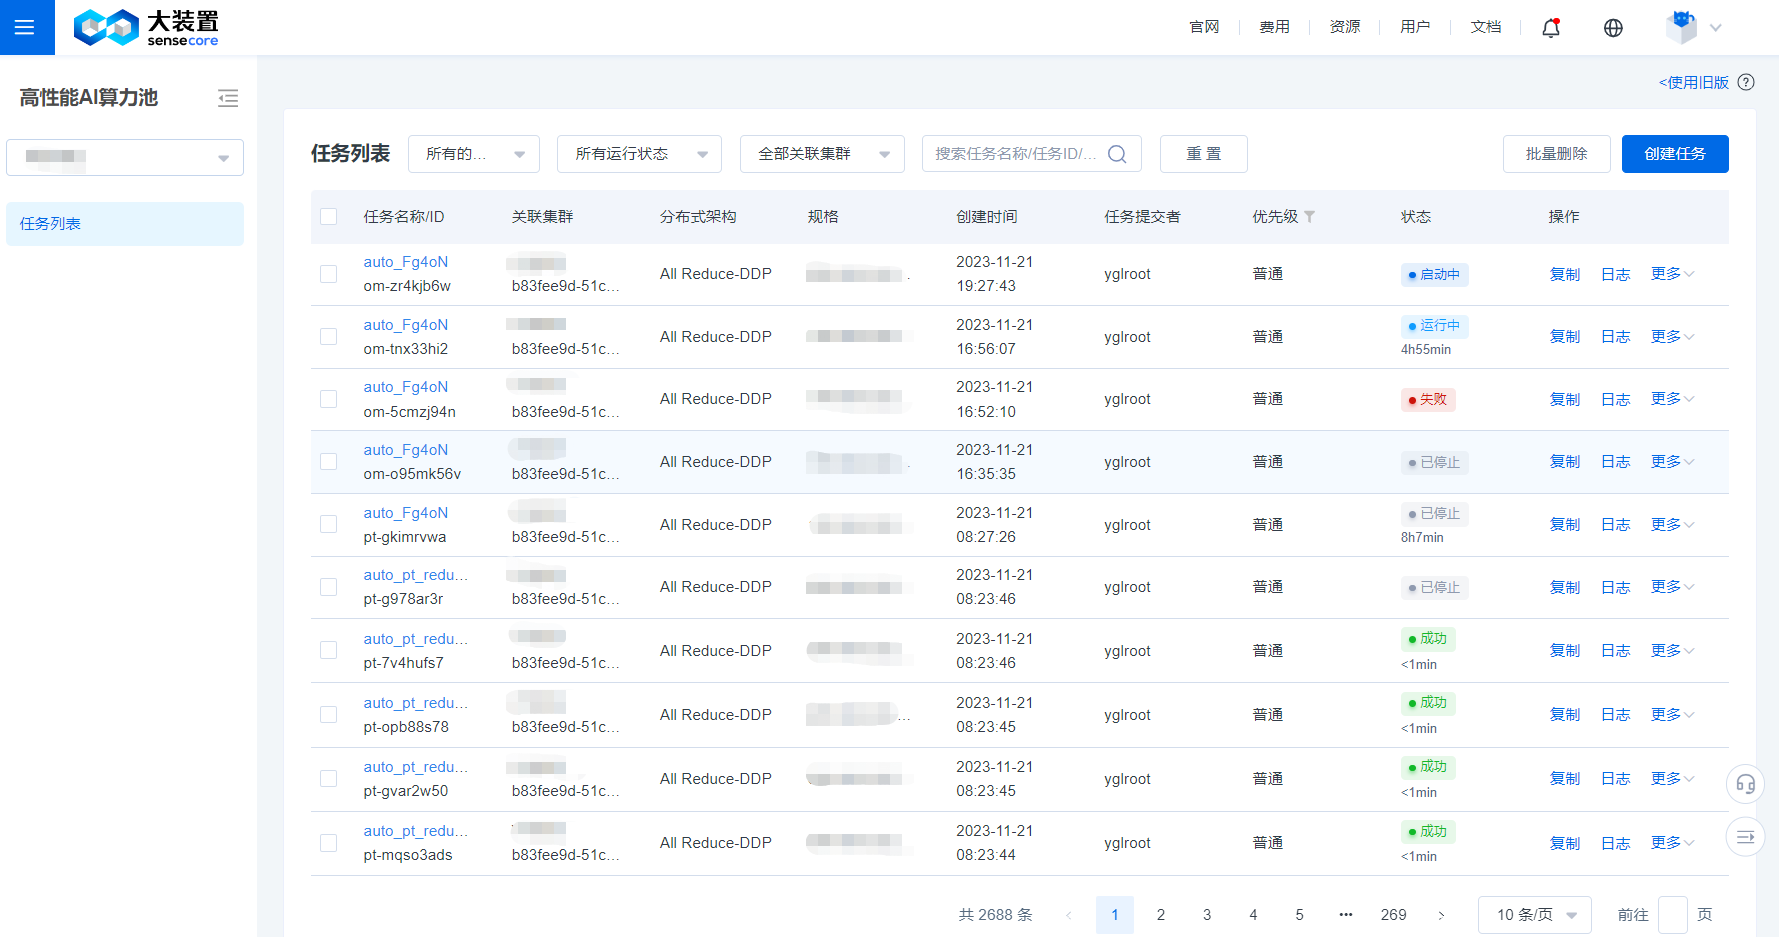
- You can view the name, status, image, compute pool (cluster in the new version), created time, committer, and other information of the created task on the Task List page.
- You can restart, delete, copy, and stop a task, and we have provided a shortcut to view task logs and task monitoring.
- When there are a large number of tasks on the Task List page, you can use the filter bar at the top of the list to quickly filter out the target task based on the task running status and task name/task ID.
Task Details

- By clicking the name of a task on the Task List page, you can enter the Details page of the task.
- The Home page of the Details page of a task displays the name, ID, committer, created time, associated compute pool, information stored in the mounted file, image, training mode, number of containers corresponding to the role, container resources, start command, and other related information of the task.
Job Log
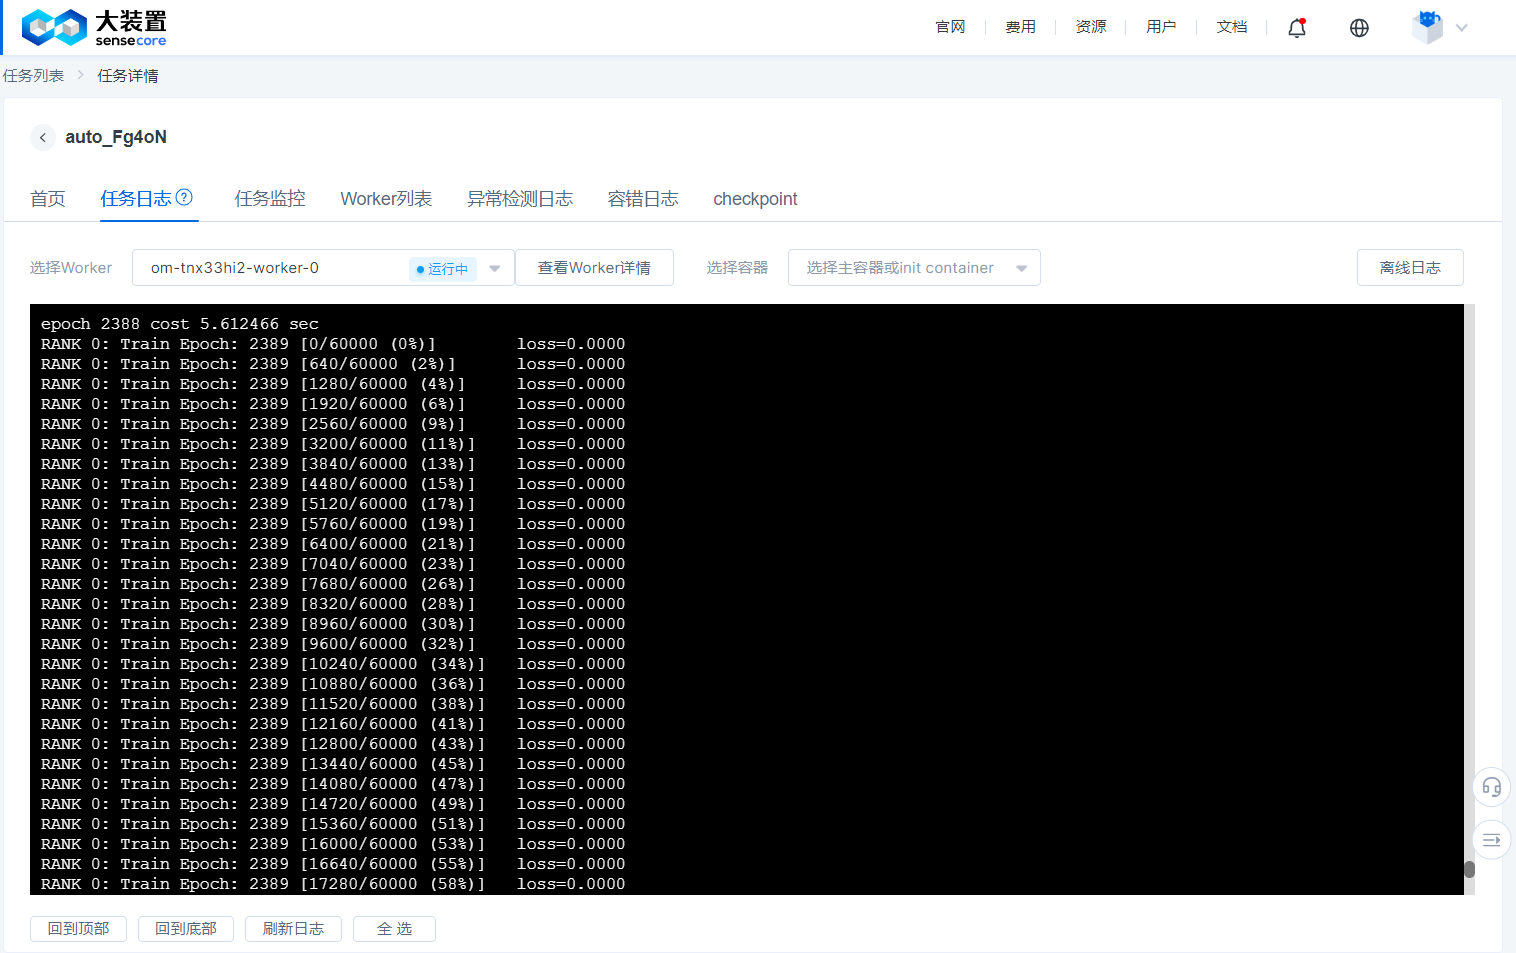
- The job log provides different Worker logs, and you must specify a Worker to view the logs.
- The job log is constantly refreshed as the job is running, and when the job succeeds or fails, we keep the log of the successful or failed Worker for a period of time, please view it within 48 hours. (Logs for jobs that are manually stopped are not retained on this page; if you wish to view them, please jump directly to the offline log)
Job Monitoring
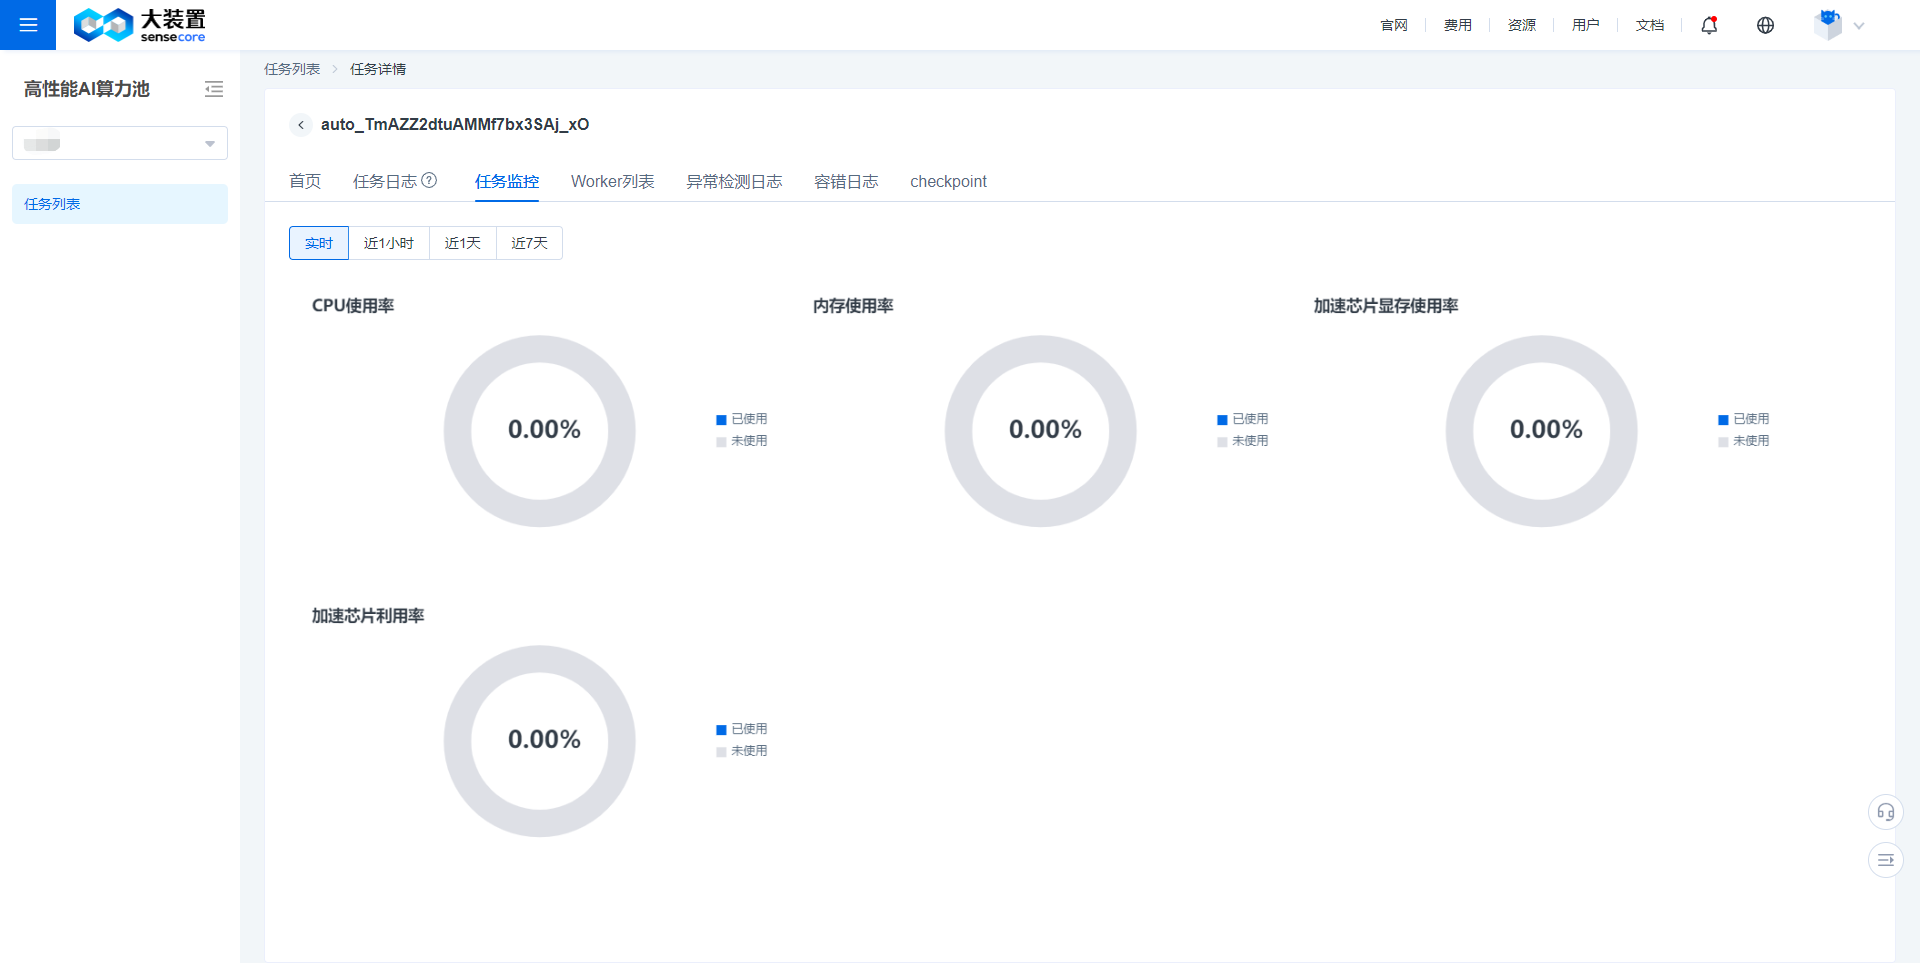
- Job monitoring provides monitoring data about CPU utilization, memory utilization, GPU utilization, and GPU memory utilization.
- It supports for real-time, 1-hour, 1-day, and 7-day monitoring data display.
Worker List
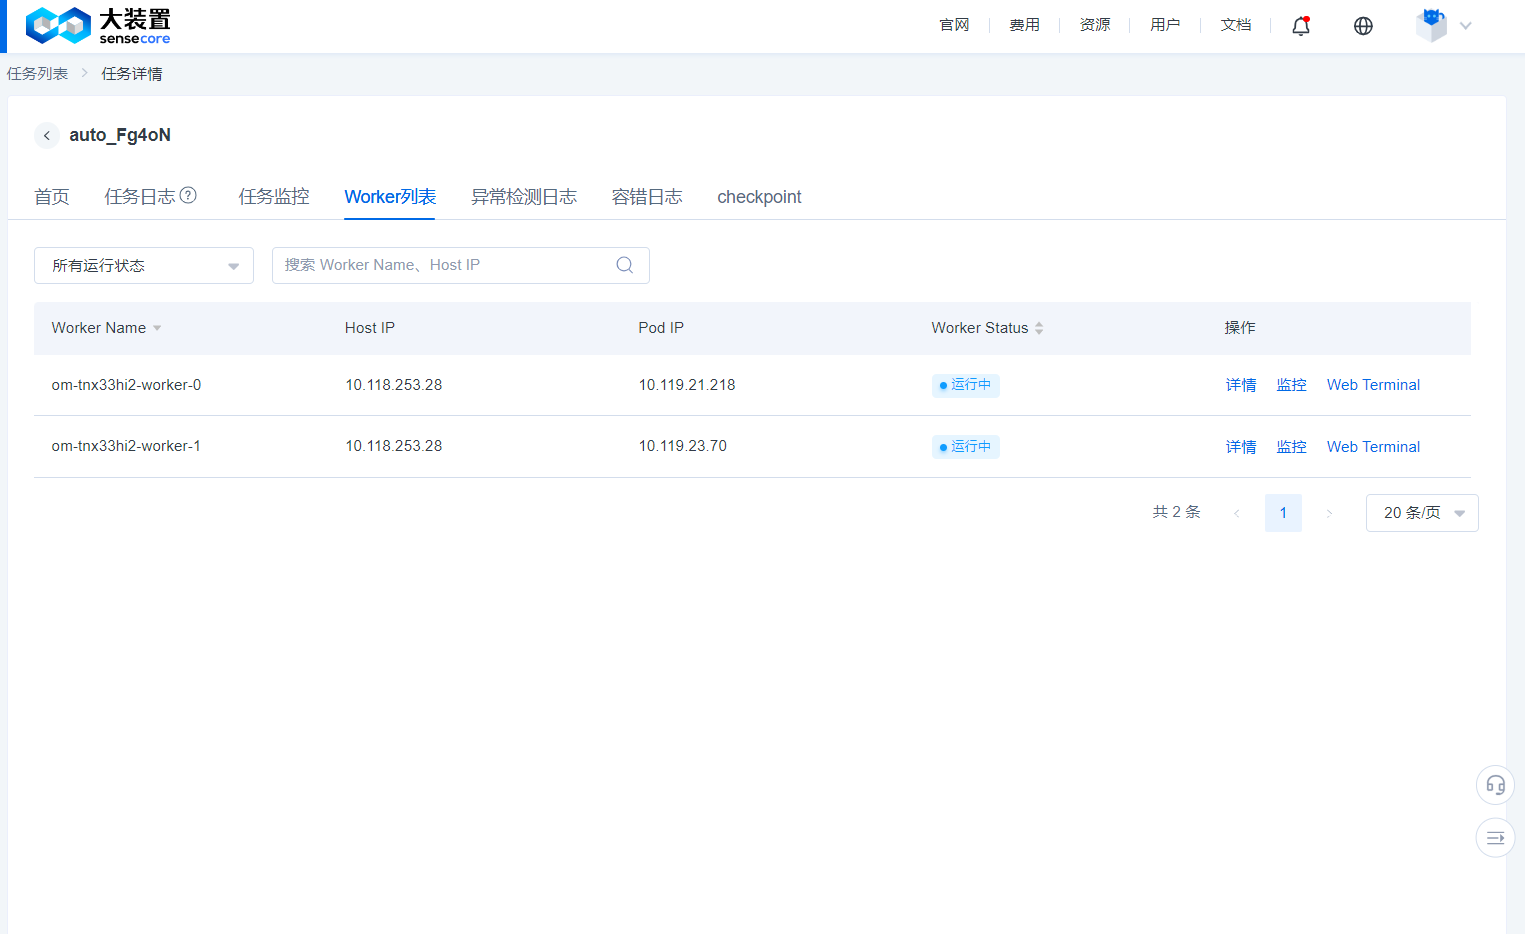
- You can view the underlying Worker name of the job, IP address and running status of the node to which the job belongs through the Worker list.
- You can log in to the running Worker to perform some debugging work.
Exception Detection Log
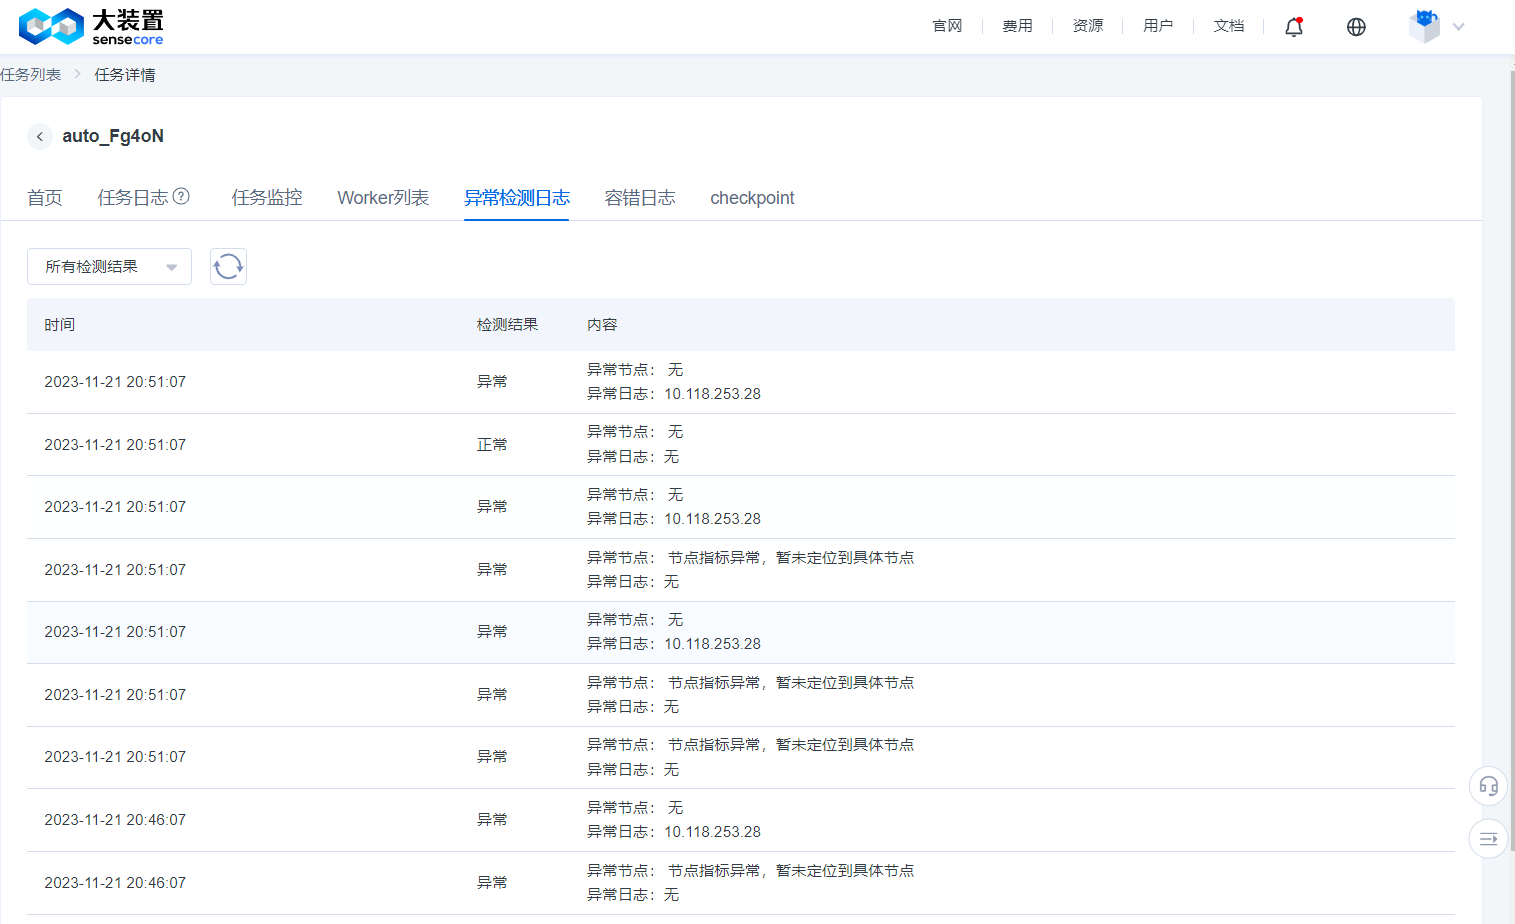
- When creating a task, after enabling fault tolerance and exception detection, the system will detect whether an exception may have occurred in the current training task based on logs and monitoring indicators at an interval of 5 minutes.
- The exception detection function is currently for trial without charging any fee and will not increase user-side resource overheads. If the detection result is abnormal, it is recommended to check the training progress to confirm if the task status has not failed but an exception has occurred in the actual training.
- Common exception detection results include: loaded GPU not running, abnormal NCCL communication, abnormal data reading and writing, etc.
Fault Tolerance Log
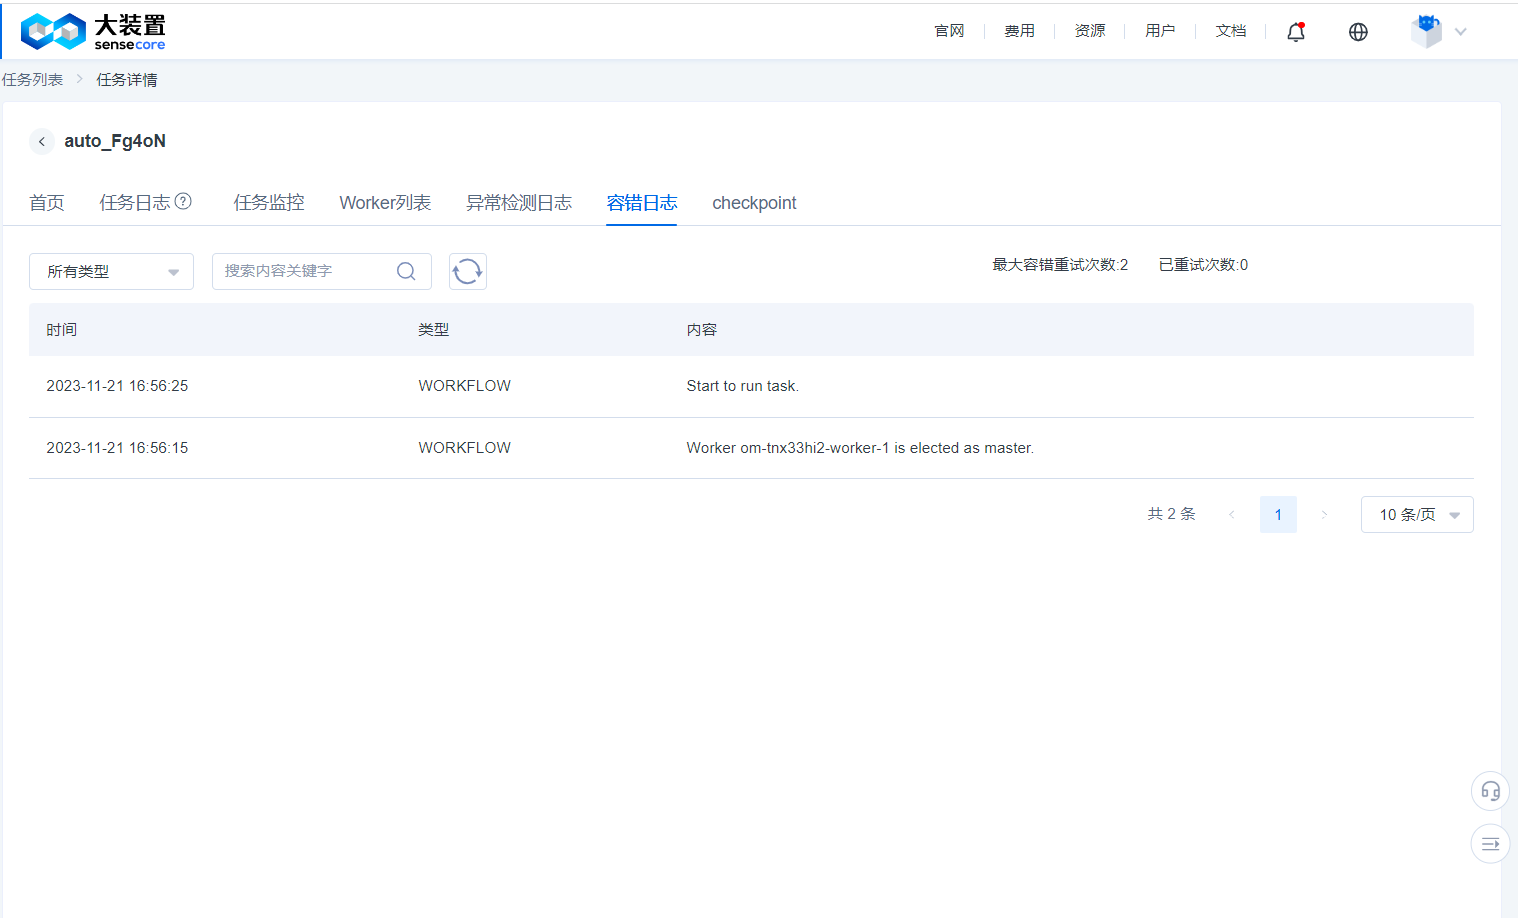
- When creating a task, after enabling fault tolerance, the system will detect the task running environment before the training task starts and when the task fails to run, and will remove the fault points and retry it. The detection results will be displayed as workflow in the fault tolerance log, and the debugging actions performed through the command line tool
jmtwill be recorded as usercall. - The fault tolerance log function is currently for trial without charging any fee and will not increase user-side resource overheads.
checkpoint
- When creating a job and enabling the fault-tolerant configuration, turn on the checkpoint acceleration function. The system caches the intermediate data of important nodes in the job. The cache result will be displayed on the checkpoint page. Users can follow the fault reporting points and select nodes to recover jobs.
- Users should reserve sufficient storage space for checkpoints to persistently store data at each stage of a training job. Otherwise, data recovery will fail.
Functional Description of Fault Tolerance of Foundation Model Training
If you submit training jobs with fault tolerance enabled, you can use the fault tolerance function of foundation model training.
This function will provide GPU BURN and NCCL TEST. We will check the hardware availability for you before a job is officially launched, and when the hardware is not available, we will select an idle node in your cluster to replace the current job. Both GPU BURN and NCCL TEST will be performed again after each replacement until all hardware is normal or the maximum number of tests you configure is reached (the default value is 3).
In addition, when your job fails, we will first perform GPU BURN and NCCL TEST to confirm whether the hardware problem causes the failure. If it does, we will repeat the above process and restart the job. (This will still consume the number of tests)
We also provide you with a command-line tool 'jmt' for manipulating jobs (only for jobs with fault tolerance enabled). The following shows the operation procedure:
You need to log in to a Worker from Task Details - Worker List - Webterminal
You need to configure the environment by using the following command
/opt/transom/bin/launcher --login
# The above command actually enters a Bash environment with the PATH environment variable. You can also manually configure the environment variable like this:
export PATH=/opt/transom/bin:$PATH
- Run a command to suspend the currently running job
jmt stop
- Check job status and confirm that the job is suspended (pending)
jmt status
- Run other jmt commands
Command:
  status      Show status                      Vies task status
  ssh         Simple SSH Client for transom    Run the command through the SSH channel of Transom (fault tolerance job) Launcher, for example, jmt ssh transom-job-0 hostname
  stop        Stop task                        Stop job (or stop the command executed by the run command)
  start       Start task                       Resume the running job (the job must be in stopped state)
  run         Run commands in all pods         Run one command in all Pods (the job must be in stopped state), for example, jmt run hostname
  kill        Kill pods by index               Kill Launcher with specified number (Pod will end accordingly. The job must be in stopped state), for example, jmt kill 1 2

The run command executes the default job command and checker (the job must be in stopped state) in addition to the specified commands:
jmt run -t task     Execute the default job command
jmt run -t checker  Execute the checker (GPU BURN+NCCL TEST)
It should be noted that jmt run is an asynchronous command for which the results of the commands executed need to be viewed in logs.
Best Practices for Distributed Training Jobs of Foundation Models
Commit a PyTorch DDP Distributed Job
For PyTorch DDP distributed jobs, we create two types of Pods: a Master and a Worker; wherein the Master provides the Worker with an accessible Master IP address, Master server-side port, and automatically outputs the total number of processes in the PyTorch job and the process ID of each Pod to the environment variable, when using PyTorch distributed training jobs, users can directly replace the Master IP, Master port, total number of processes and process ranking in the training script with the following environment variable names.
$MASTER_ADDR
$MASTER_PORT
$WORLD_SIZE
$RANK
For example:
python -m distributed.launch --nproc-per-node 2 --nnodes $WORLD_SIZE --node_rank $RANK --master_addr $MASTER_ADDR --master_port $MASTER_PORT mnist.py --backend nccl
For training jobs using RoCE's compute pool, the following environment variables can be added to the training script to obtain optimal performance:
Note: For compute pool jobs using the IB type, you do not need to add the two environment variables
NCCL_IB_TCandNCCL_IB_GID_INDEXas adding them may cause speed degradation
export NCCL_DEBUG=INFO     # This has nothing to do with performance, just to facilitate troubleshooting
export NCCL_IB_TC=106      # Specify the switch channel used by NCCL
export NCCL_IB_GID_INDEX=3    # Select the specified IB index
export NCCL_SOCKET_IFNAME=eth0   # Select the eth0 network when building the NCCL socket
export NCCL_CROSS_NIC=0       # Fix the connection channel for each network card

# When the scale of training reaches thousands of GPUs and above, the following environment variables can be added:
export NCCL_ALGO=TREE
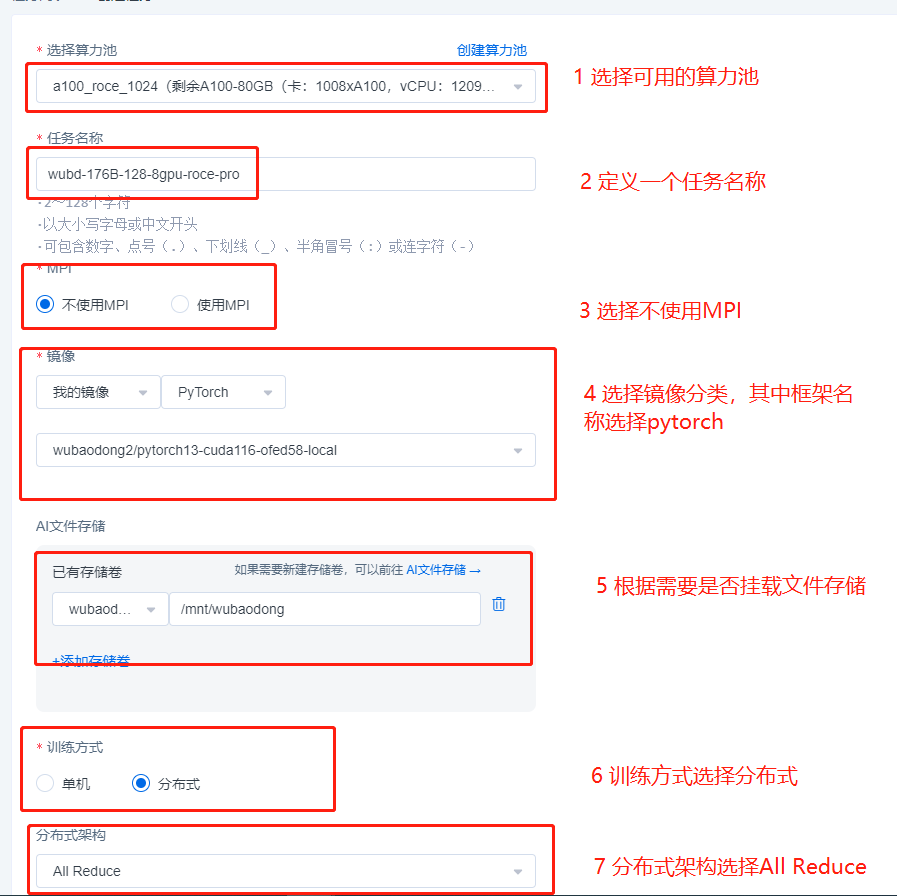
Example of Committing DDP Jobs on the UI Interface
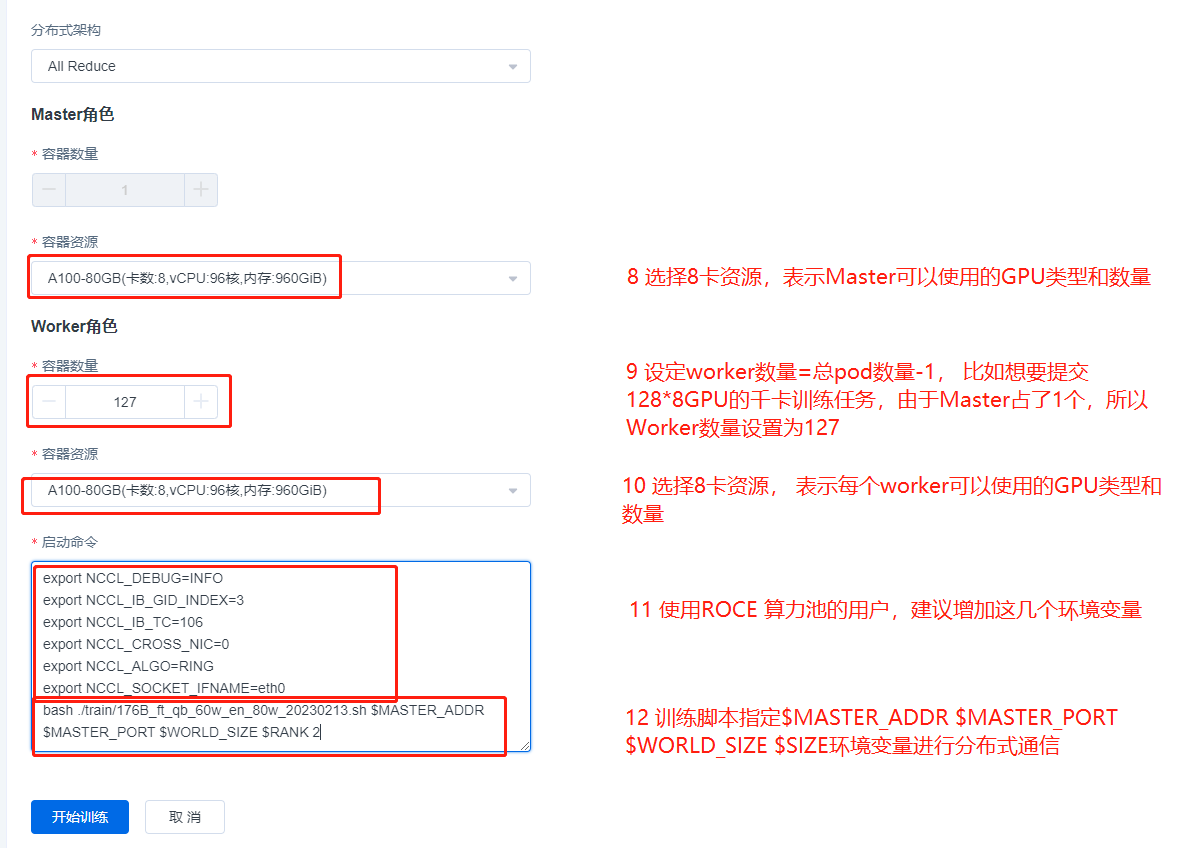
Start a DDP PyTorch training job with a total of 1024 GPUs (128 machines x 8 GPUs) on the a100_RoCE_1024 compute pool [RoCE type compute pool].
Start command is shown below:
export NCCL_DEBUG=INFO
export NCCL_IB_GID_INDEX=3
export NCCL_IB_TC=106
export NCCL_CROSS_NIC=0
export NCCL_ALGO=RING
export NCCL_SOCKET_IFNAME=eth0
bash ./train/176B_ft_qb_60w_en_80w_20230213.sh $MASTER_ADDR $MASTER_PORT $WORLD_SIZE $RANK
The upper content is an job example of a RoCE type compute pool, and if it is an IB type compute pool, the commit process is exactly the same, simply remove
export NCCL_IB_GID_INDEX=3
export NCCL_IB_TC=106
export NCCL_CROSS_NIC=0
these 3 environment variables from the start command.
Note: We have simplified the job commit process in the new version of the ACP, you only need to specify the number of roles and specifications. If you specify the number of n roles, we will automatically start the job for you with 1 Master role and n-1 Worker roles.
Commit an MPI Distributed Job
For the distributed job committed via MPI, we create a Pod with Launcher as a suffix and multiple Pods with Worker as a suffix, representing the start node and execution node of the MPI job, respectively, where Launcher is obviously both a start node and an execution node. Unlike the PyTorch DDP approach, mpirun does not provide master_addr and master_port. Instead, the process topological relation between containers is established via the MPI’s communication mechanism. Therefore, the start command for MPI distributed jobs must be a start command similar to mpirun or a script containing the mpirun start command. Common MPI distributed training jobs are:
- Pytorch+Horovod
- Pytorch +MPI
- TensorFlow+MPI
- TensorFlow+Horovod
The MPI job performs the following actions when it is started:
- Collect all Podnames from the current MPI job into the MPI Launcher Pod’s /etc/MPI/hostfile file, in the following format:
MPI-zjwghlra-launcher slots=8
MPI-zjwghlra-worker-0 slots=8
MPI-zjwghlra-worker-1 slots=8
MPI-zjwghlra-worker-2 slots=8
MPI-zjwghlra-worker-3 slots=8
MPI-zjwghlra-worker-4 slots=8
MPI-zjwghlra-worker-5 slots=8
MPI-zjwghlra-worker-6 slots=8
- Add the environment variable
OMPI_MCA_plm_rsh_agent=/etc/MPI/kubexec.shto the MPI Launcher Pod so that mpirun can use this proxy channel when establishing process communication without the need to establish an ssh connection; and the commands to be executed in the Launcher Pod are issued to each Worker through this proxy channel.
- Add the environment variable
OMPI_MCA_orte_default_hostfile=/etc/MPI/hostfileto the MPI Launcher Pod to set the default hostfile, and users do not need to specify the hostfile manually when executing the mpirun command.
In addition, for the MPI start command, some required items must be added to guarantee its correct execution as shown below:
mpirun --allow-run-as-root -bind-to none -map-by slot -mca pml ob1 -mca btl ^openib -mca plm_rsh_num_concurrent 300 -mca routed_radix 600 -mca plm_rsh_no_tree_spawn 1
Detailed definition:
mpirun \
 --allow-run-as-root \     ## It refers to allowing the root identity to execute programs, not allowed by default
 -bind-to none -map-by slot \   ## It is only used by openMPI, which means that the CPU core is not automatically bound. Hyper-threading can be used and mapped according to the set slot. The default slot for each node = the number of Pod GPUs set by the user
 -mca pml ob1 -mca btl ^openib \  ## openMPI is forced to use the ob1 PML method to establish a process socket, and does not use the IB network to establish a connection
 -mca plm_rsh_num_concurrent 300 \ ## openMPI specifies the number of plm_rsh_agent instances to be called simultaneously
 -mca routed_radix 600 \   ## To solve the problem of limiting the concurrent number of Pods, there is no need to add it when the number of MPI containers is less than 65. If it is greater than or equal to 65, you need to add it, otherwise it will be constrained by openMPI
 -mca plm_rsh_no_tree_spawn 1 \  ## openMPI specifies whether to use a tree-based topology to start the application, 1 means that it is allowed
 -np 1 \   ## It indicates the number of processes used by the training job. Its value is less than or equal to the total number of GPUs. For example, for 4 machines and 8 GPUs, 4*8=32; when np is less than the total number of GPUs, (the total number of GPUs-np) GPUs cannot be used.
For training jobs using RoCE's compute pool, the following environment variable can be added to the training script to obtain optimal performance, this environment variable needs to be written to the user’s job script or introduced to the process via mpirun -x’s parameter entry:
Note: For compute pool jobs using the IB type, you do not need to add the two environment variables
NCCL_IB_TCandNCCL_IB_GID_INDEXas adding them may cause speed degradation
export NCCL_DEBUG=INFO     # This has nothing to do with performance, just to facilitate troubleshooting
export NCCL_IB_TC=106      # Specify the switch channel used by NCCL
export NCCL_IB_GID_INDEX=3    # Select the specified IB index
export NCCL_SOCKET_IFNAME=eth0   # Select the eth0 network when building the NCCL socket
export NCCL_CROSS_NIC=0       # Fix the connection channel for each network card

# When the scale of training reaches thousands of GPUs and above, the following environment variables can be added:
export NCCL_ALGO=RING
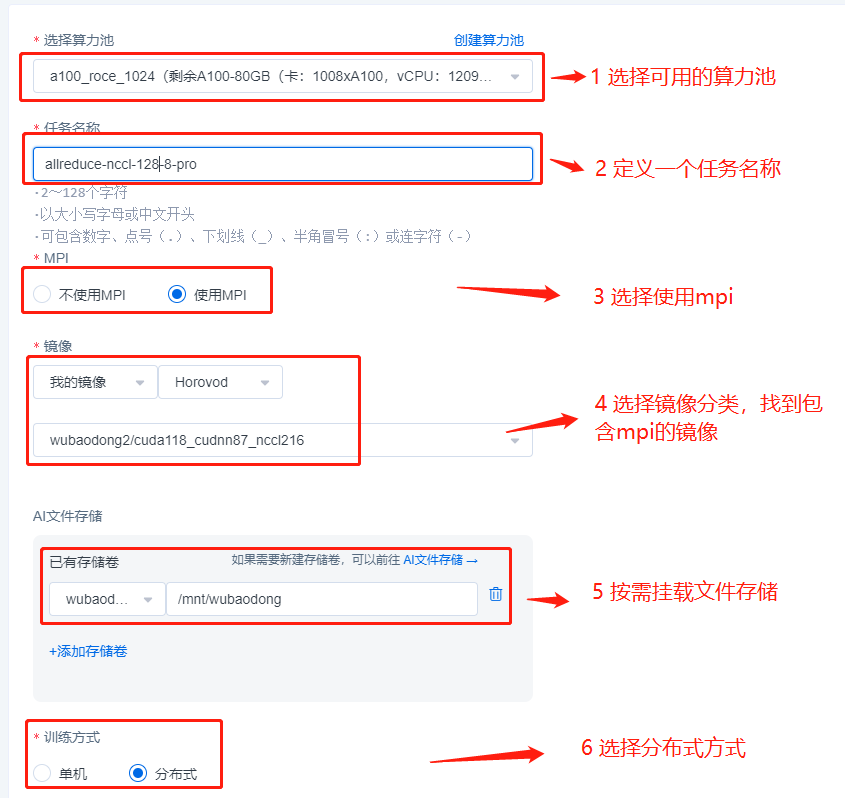
Example of Committing MPI Jobs on the UI Interface
Note: The current MPI job of the compute pool only supports openmpi!!! , the reason being that the community uses pre-configured nodes for parameters unique to the openmpi command, other MPI implementations may differ and are not yet supported. https://www.open-MPI.org/
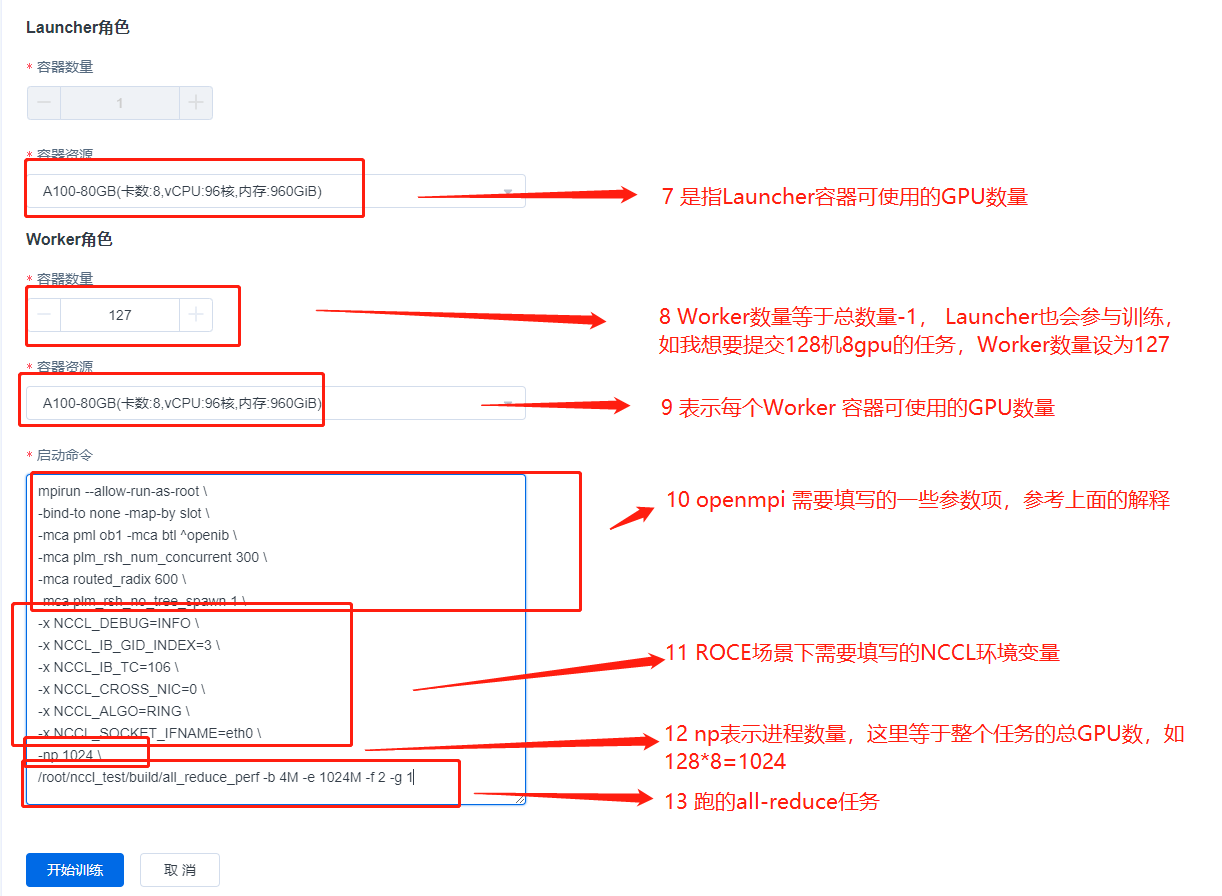
Start an NCCL-test job with a total of 1024 GPUs (128 machines x 8 GPUs) on the a100_RoCE_1024 compute pool [RoCE type compute pool]. Start command is shown below:
mpirun --allow-run-as-root \
-bind-to none -map-by slot \
-mca pml ob1 -mca btl ^openib \
-mca plm_rsh_num_concurrent 300 \
-mca routed_radix 600 \
-mca plm_rsh_no_tree_spawn 1 \
-x NCCL_DEBUG=INFO \
-x NCCL_IB_GID_INDEX=3 \
-x NCCL_IB_TC=106 \
-x NCCL_CROSS_NIC=0 \
-x NCCL_ALGO=RING \
-x NCCL_SOCKET_IFNAME=eth0 \
-np 1024 \
/root/nccl_test/build/all_reduce_perf -b 4M -e 1024M -f 2 -g 1
The above content is an MPI job example of a RoCE type compute pool. For an IB type compute pool, the commit process is exactly the same, simply remove
-x NCCL_IB_GID_INDEX=3
-x NCCL_IB_TC=106
these two environment variables from the start command.
Note: We have simplified the job commit process in the new version of the ACP, you only need to specify the number of roles and specifications. If you specify the number of n roles, we will automatically start the job for you with 1 Launcher role and n-1 Worker roles.
If you have any questions or suggestions about the ACP, please feel free to contact us. Your support and feedback are the greatest motivation for our progress!*