Bare Metal Server (BMS)
Product Overview
The Bare Metal Server (BMS) is a type of elastic and scalable cloud-based physical server providing the same computing performance as traditional physical servers including secure physical isolation. It can be delivered within minutes, allowing you to respond to diversified business needs in real time and providing excellent computing performance for enterprises' high-performance AI computing, deep learning, graphics rendering, and other businesses.
Product Superiority
- Ease of use: Support resource delivery within minutes, elastic scalability, fully automated operation and maintenance, and self-service resource lifecycle management;
- Security and reliability: Realize physical resource isolation, meet security and compliance requirements, and provide perfect monitoring services;
- Robust performance: Ensure no virtualization overhead and performance loss while having the characteristics of a physical server, and achieve 100% release of computing power resources.
Product Features
High-performance computing instances
Provide high-performance GPU computing instances including a variety of domestic chips; support resource delivery within minutes and downtime migration of all instances.
Parallel file storage
Support mounting parallel file storage in AI scenarios, and meet the data storage and RDMA network transmission requirements for large-scale training.
Cloud-init
Provide Cloud-init, an open source tool for initial configuration of the Linux-based operating system, which supports custom configurations such as NTP and hostname.
WebShell
Provide WebShell access instances, maintain and manage servers, and meet the requirements of highly autonomous and controllable development and O&M scenarios.
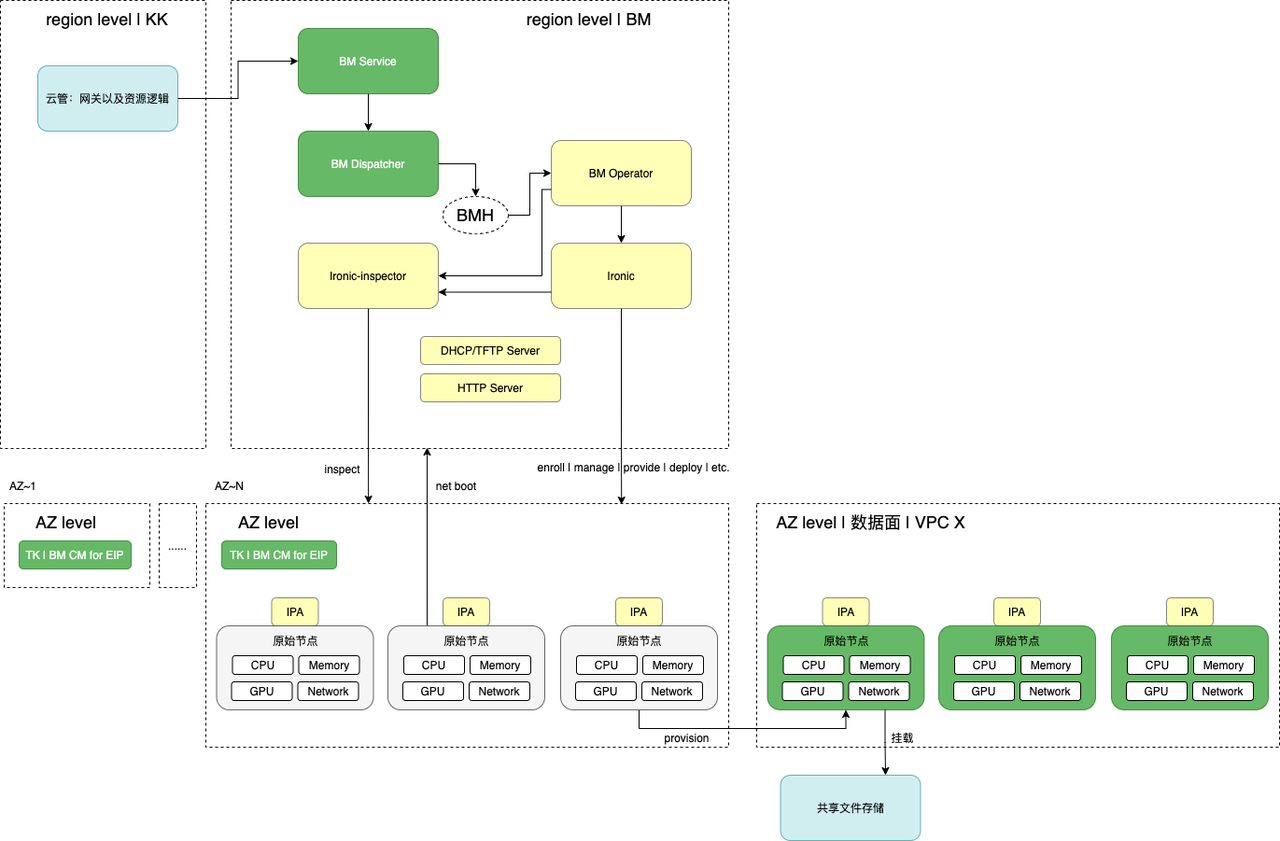
Product Architecture
Application Scenarios
High-performance AI computing
For scenarios such as supercomputing, large AI model training, and DNA sequencing, GPU computing-based bare metal servers can meet business requirements for high throughput, low latency, and high stability.
Deep learning
For deep learning scenarios, GPU computing-based bare metal servers provide excellent performance experience in the field of high-precision computing.
Graphics rendering
For graphics rendering scenarios, GPU computing-based bare metal servers can realize real-time rendering within seconds and the super graphics computing and acceleration capabilities of AR/VR.
Resource Specification
GPU-based: Nvidia 8 GPUs A100-80GB (CPU:Intel Xeon Gold 6348, 56 cores, memory: 1024GB: number of GPUs: 8)
GPU-based: NVIDIA 8xV100-32GB (CPU: Intel 6248R, 48 cores, memory: 768GB, number of GPUs: 8)
CPU based: G1sP-24GB (CPU: Intel Xeon Gold 6326, 32 cores, memory: 512GB, number of GPUs: 8)
GPU-based: Nvidia 8 GPUs H800-80GB(CPU: Intel Xeon Gold 6448Y, 64 cores, memory: 2048GB: number of GPUs: 8)
CPU-based: Intel Xeon Gold 6348 (frequency: 2.6 GHz, core: 56 cores, memory: 512 GB)
CPU-based: Intel Xeon Silver 4316 (frequency: 2.3 GHz, core: 40 cores, memory: 128 GB)
About Billing
The BMS uses the yearly/monthly subscription billing mode, and the standard product price can be checked in the console.
Quick Start

- Create a bare metal server instance by placing an order.
- View the created instance list and related details, and manage the instance, such as shutting down or restarting the running instance, changing the DNAT rules bound to the instance on the Details page, and resetting the instance password.
- Log in to the BMS instance for use, such as deploying training tasks.
Operation Guide
Create an instance
- Purchase information and resource configuration
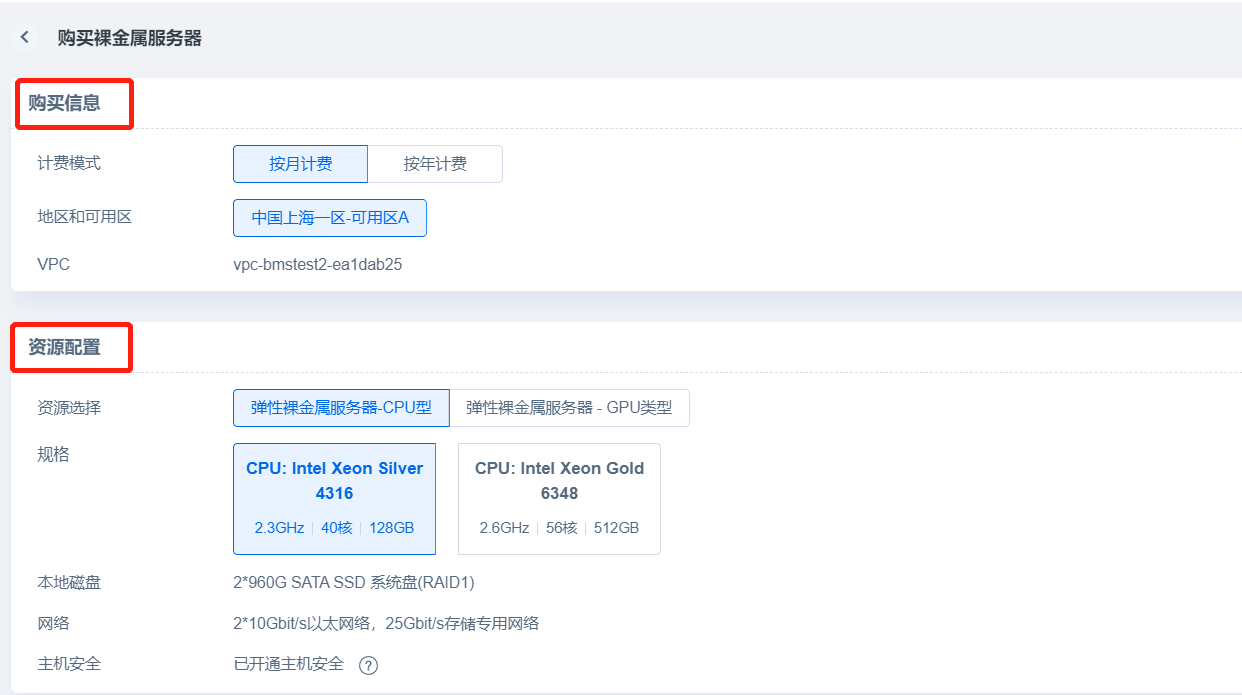
In the Purchase Information section of the Order page, you can select the yearly or monthly subscription billing mode. At present, support is only available for one region and availability zone where VPC can automatically be recognize the name; the Resource Configuration section displays information about resource specifications, local disks, and networks, Cloud Assistant is installed and host security is enabled by default, and you can choose the number of instances for bulk creation;
- Other configurations and basic information
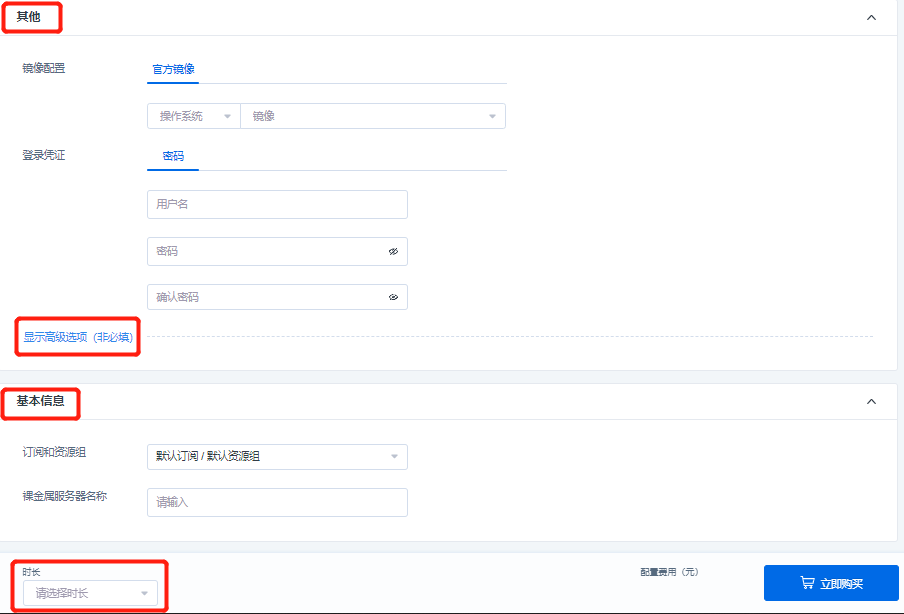
In other configurations, you can configure images, set the username password or secret key as login credentials, and also mount the AI file storages, bind the DNAT rules, and set the Cloud-init in the advanced options.
- For the username password setting of login credentials, the character length of the username must be 2 to 32 characters, starting with a lowercase letter or an underscore () and ending with a $ sign, and lowercase letters, numbers, underscores () and dashes (-) may be contained in the middle/end; the length of the password must be 8-30 characters and contain three of the following: uppercase letters, lowercase letters, numbers, and special symbols among ()`~!@#$%^&*_-+=|{}[]:;'<>,.?/).
- The login name of the key pair is root. Select the created key pair. If there is no available key pair, click [New Key Pair] to create one, and refresh the newly created key pair after creation.
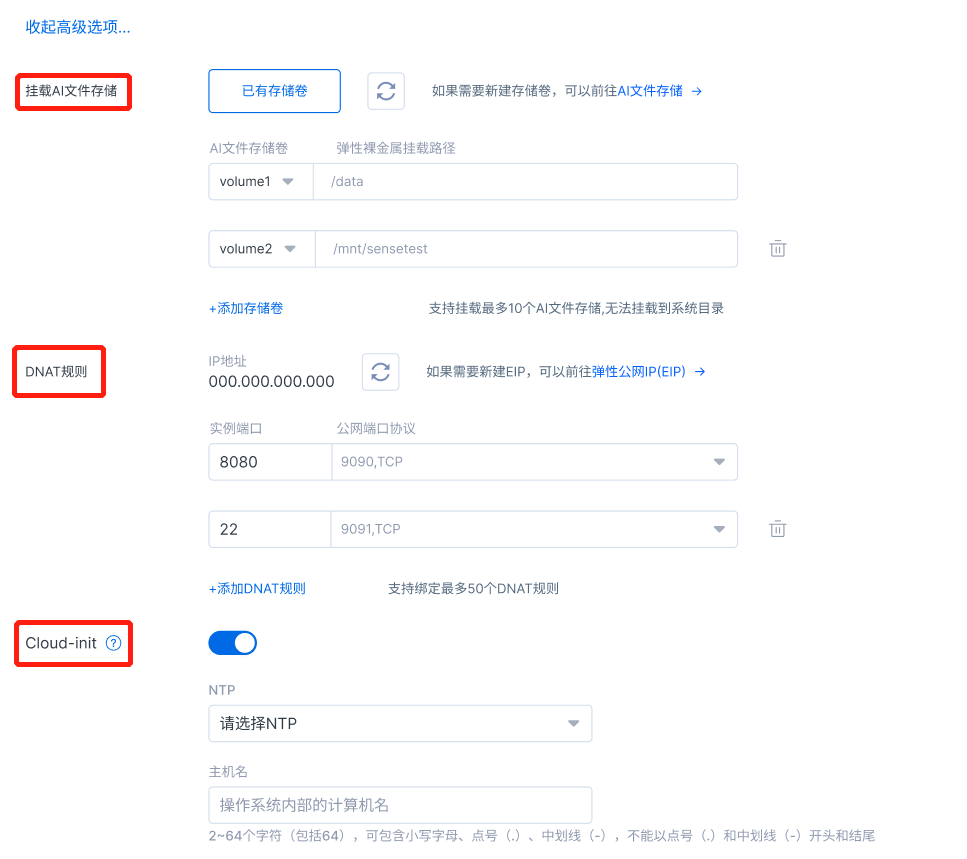
- In the advanced options, you can mount an AI file storage on the BMS instance, select an existing free storage volume from the drop-down list, fill in the mount path in the BMS instance, so as to mount the AI file storage in a product-based way through the console. If you don’t have a free storage volume, you can jump to the file storage console to create a new storage volume and then mount it;
In the advanced options, when an instance is supported, it supports binding the specified instance port with the public port protocol (see the instance details for modifying/unbinding the DNAT rules after creation). If your account does not have a DNAT rule that can be bound, you can click “Elastic IP (EIP)” to jump to the EIP Console List page on the network side to create an EIP and add a rule. The instance port is a legitimate port [port No.: 1 to 65535] that can be entered by users and is not occupied, the IP address is selected from the drop-down box, the public protocol is selected as TCP or UDP, the public port reads the existing and unused public port protocol on the EIP console, and offers support for binding up to 50 DNAT rules.
- In the advanced options, it also supports the Cloud-init function to complete the system initialization settings in the startup stage of the BMS instance, which is disabled by default. When this function is enabled, the NTP and hostname can be customized. The character length of the hostname must be 2-64 characters, including lowercase letters, dots (.), and dashes (-), and cannot start and end with dots (.) and dashes (-).
In the Basic Information section, you can select a pre-created subscription and resource group in the drop-down list to facilitate resource management. At the same time, you can customize the BMS name (1-63 characters, including Chinese characters, English letters, numbers, and the underscore “_” symbol, starting with a Chinese or English character or a number), which supports the system in automatically adding ordered suffixes to your instances during bulk creation, and finally check the total number of instances and select the subscription duration to complete the purchase.
Manage instances
- Instance list
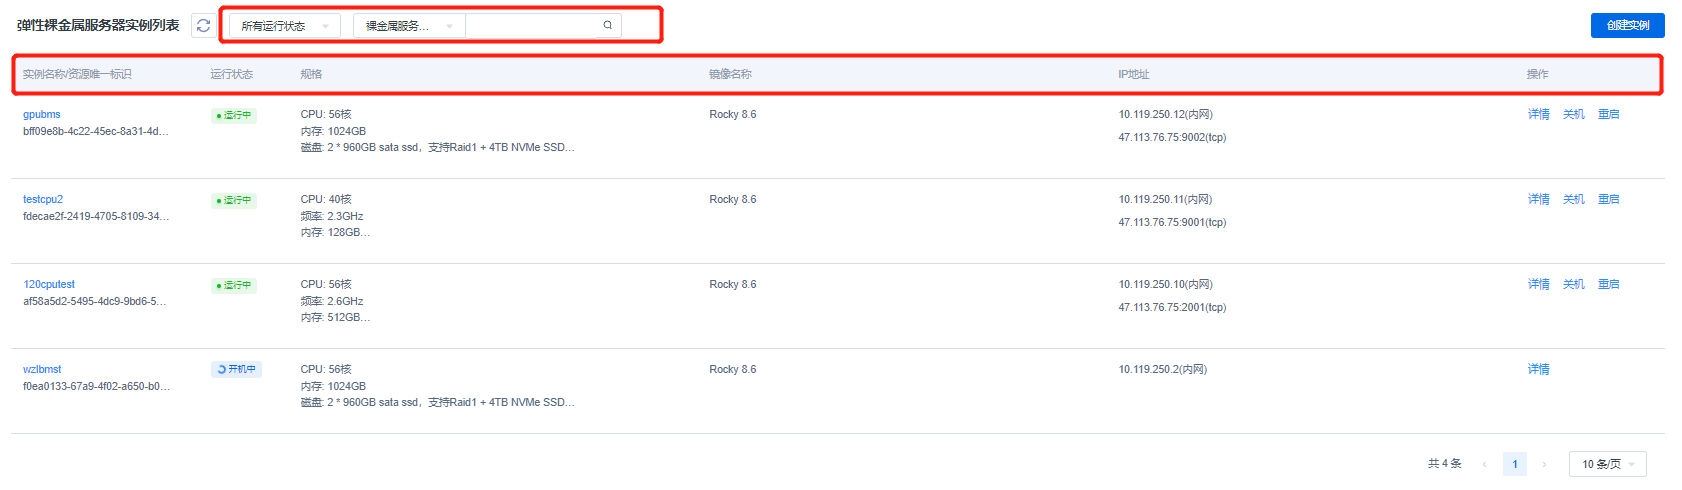 The Instance List page displays all created instance information, including the instance name/unique resource ID, running state, specification, image, IP address, and action bar. You can click the instance name to enter the Instance Details page (see the “Instance details” section below). There are 9 states in total, namely: creating, running, failure, shutdown, restarting, reinstalling, releasing, booting, and shutting down. The list will display the information according to the actual instance state. For a GPU-based instance in the specification, it will display the information of CPU, memory, disk, and network, and for a CPU-based instance, it will display the information of CPU, frequency, memory, disk, and network. For the image, it will display the image name selected when you create the instance. For the IP address, it will display the internal network IP and the external network IP (the external network IP will be displayed after an EIP is bound). You can also view the instance details in the action bar, the shutdown instance can be started with one click, and the running instance can be shut down or restarted. You can click "More" to release instances, view monitoring metrics and execute VNC login.
The VNC login function enables users to remotely connect to the bare metal server through a Web browser, and view the running status of the instance operating system during the startup, shutdown and restart process of the instance. In the monitoring module, users can view the usage of CPU, memory, GPU, and GPU memory of the instance, and the monitoring data is divided into different granularities including real-time, last 1 hour, last 1 day and last 7 days.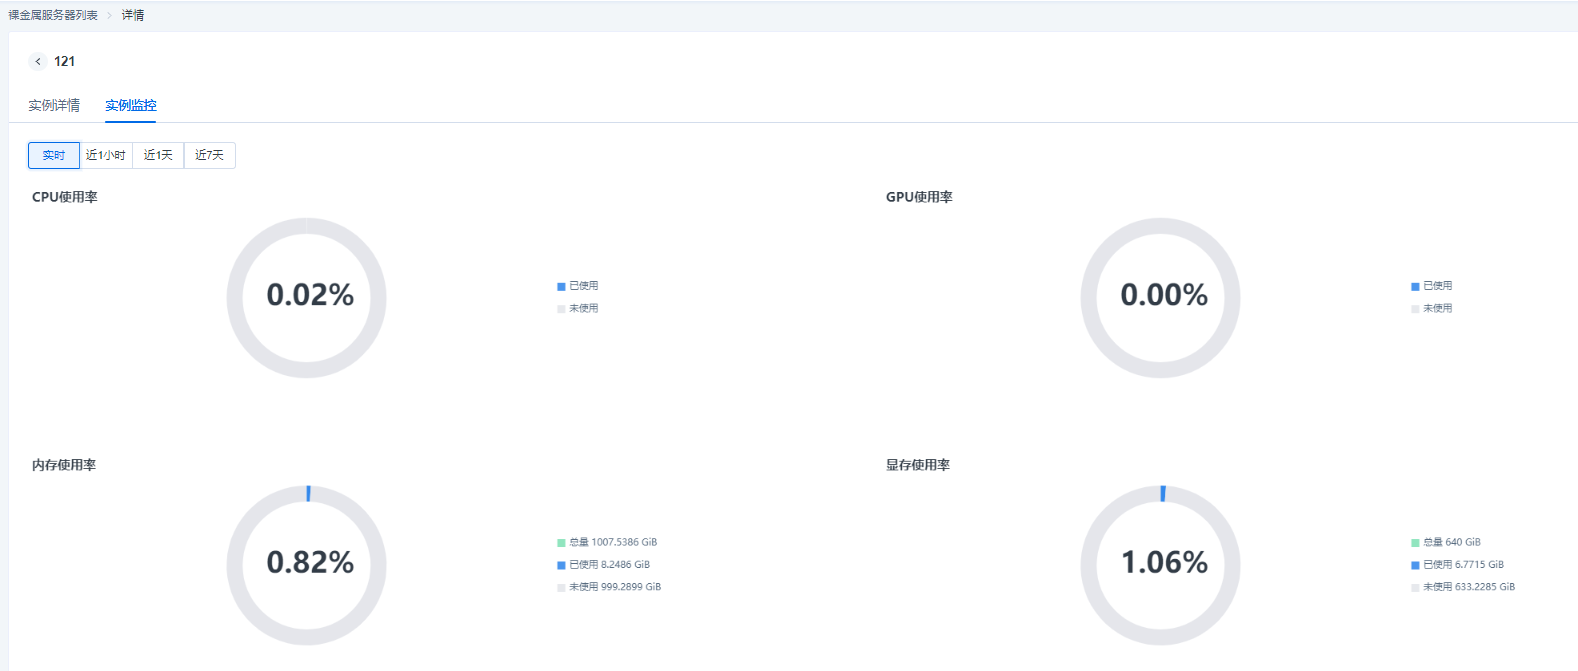
When there are a large number of instances in the list, you can use the filter bar at the top of the list to quickly filter out the target instance based on the instance running state and the keywords of the BMS name.
By clicking the checkbox in front of the instance list, you can select certain target instances in batches, and by clicking the bulk execution commands in the upper right corner, you can perform bulk execution commands for the selected target instances. - Instance details
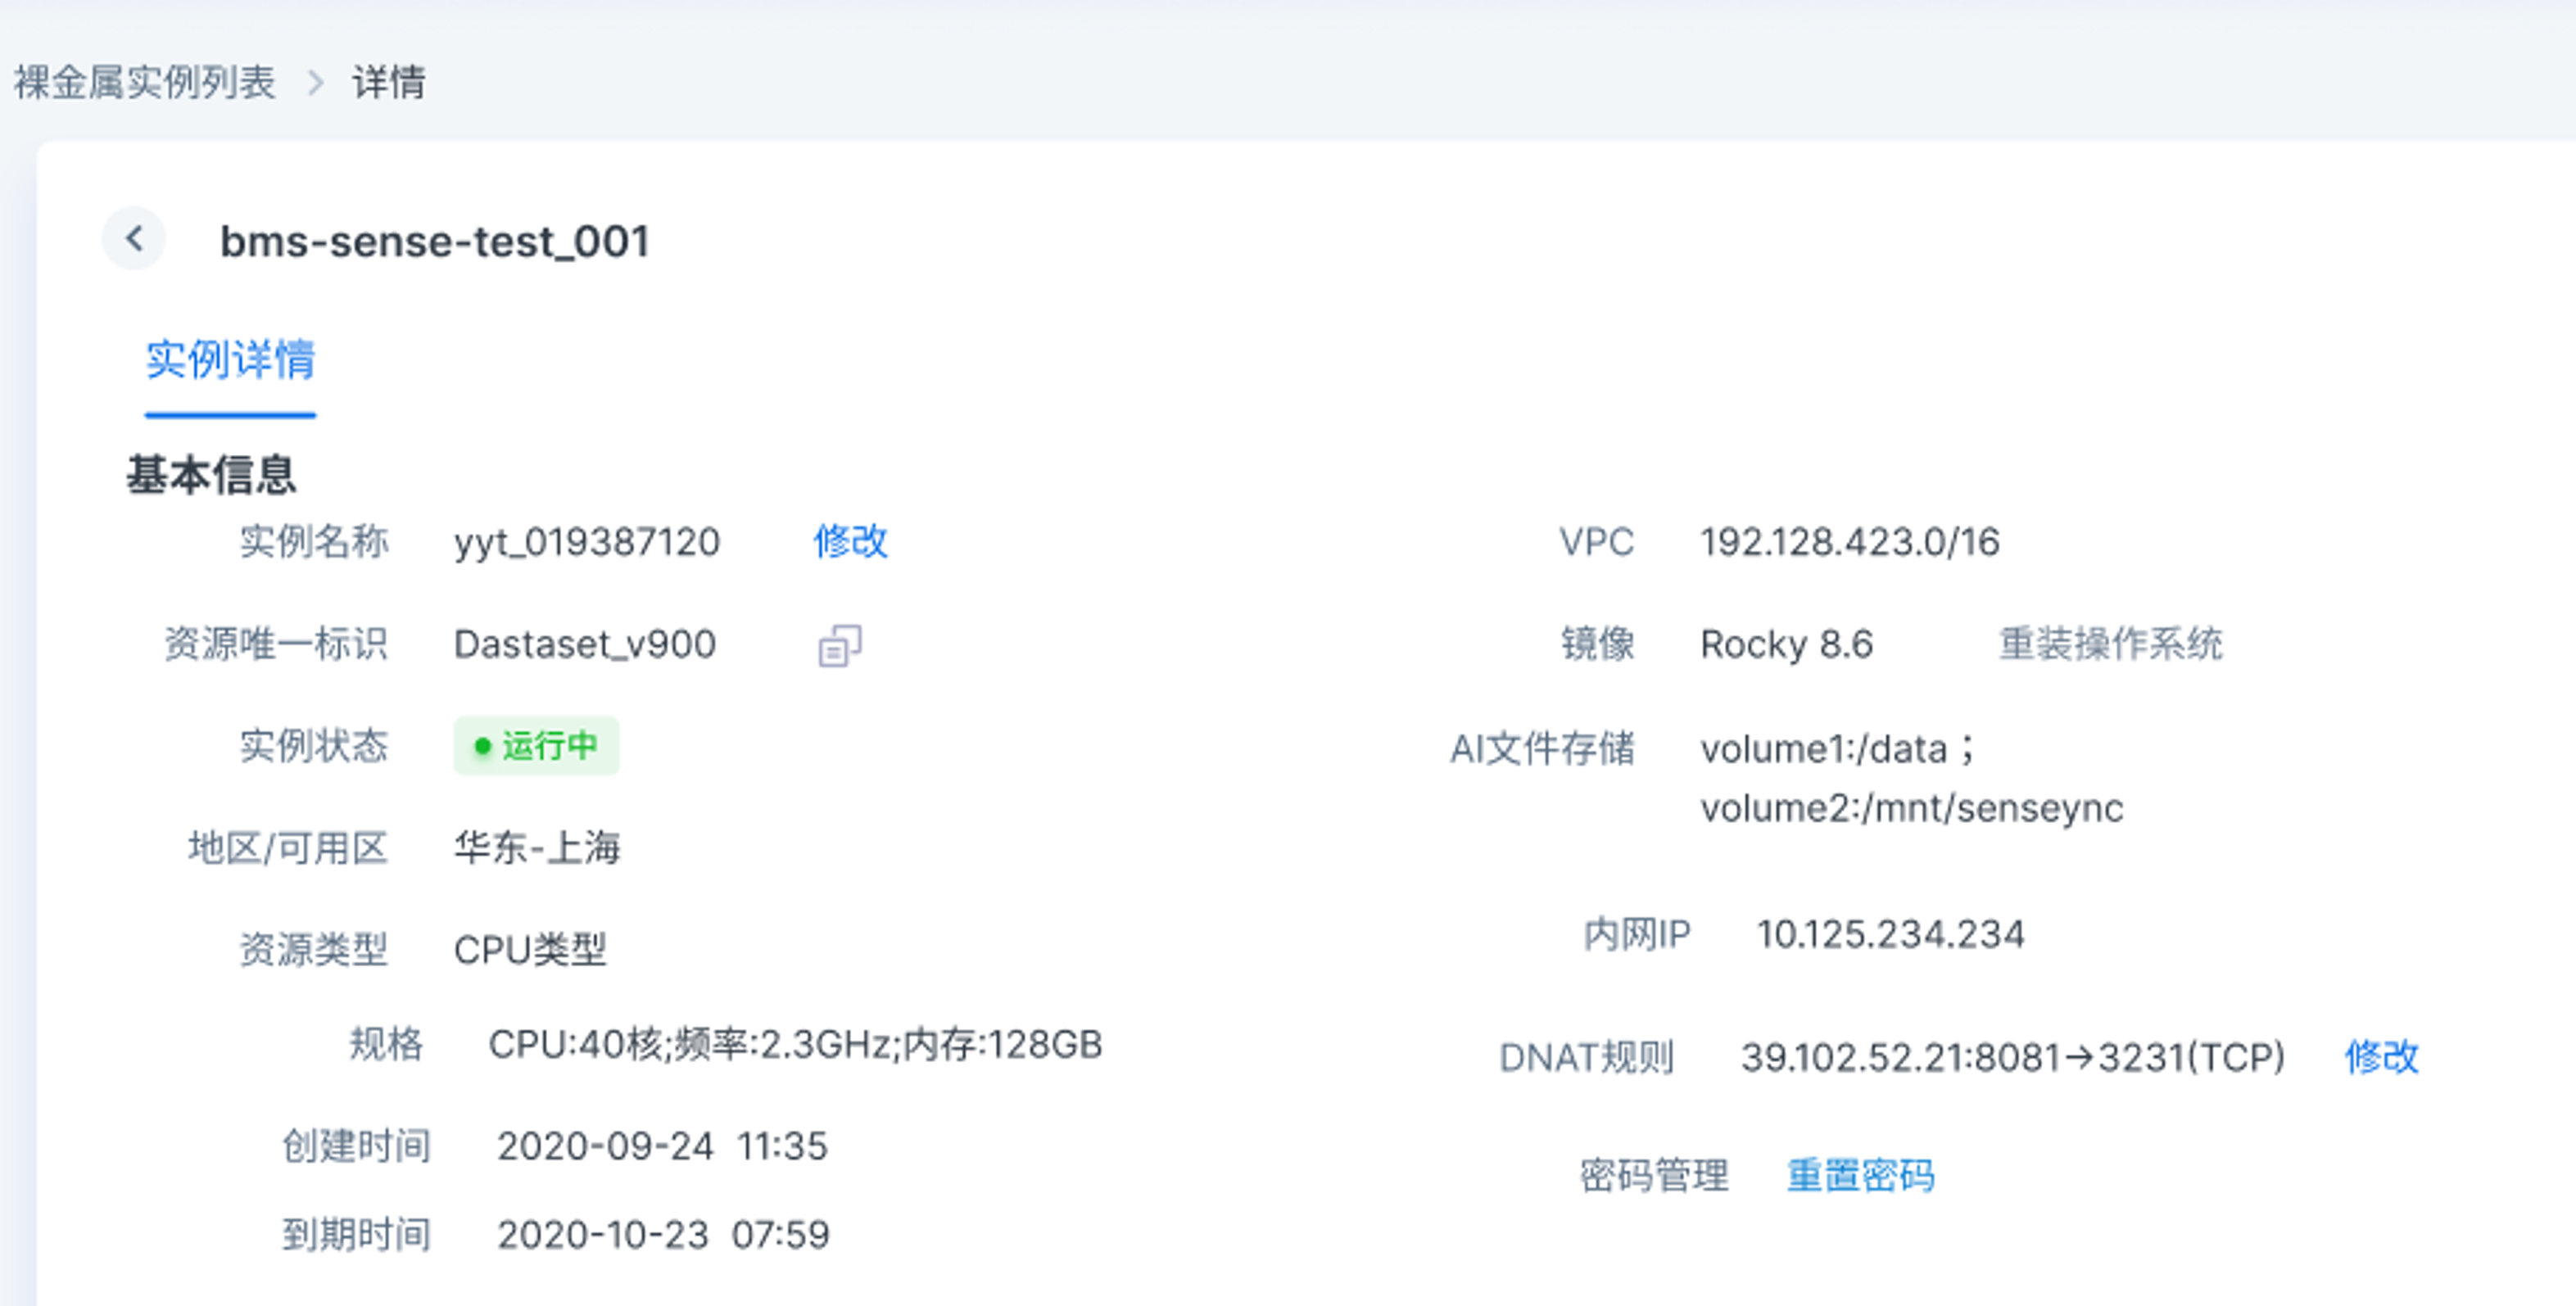
- As mentioned in the previous section, by clicking the instance name or viewing details in the operation, you can enter the Instance Details page, which will display basic instance information and Cloud Assistant information, among which the basic information includes the instance name, unique resource ID, running state, resource type, specification, instance creation time, expiration time, VPC, image, information about the mounted AI file storage (such as volume name and mount path), Intranet IP, and DNAT rule. In the page, you can also perform password management by resetting the instance password. If the instance is associated with a secret key, the name of the key pair will be also displayed. Cloud Assistant information will display whether Cloud Assistant is online along with the version model.
- Information modification
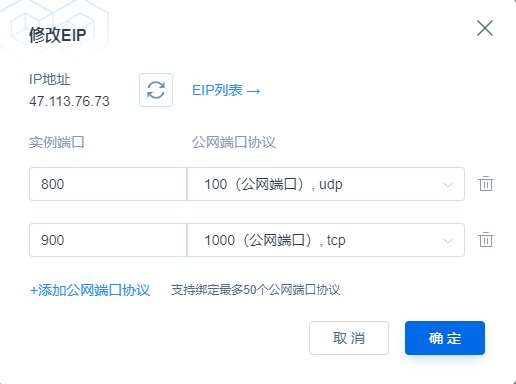
In the information displayed on the Details page, you can modify the instance name and reinstall the operating system for instances in the shutdown and failure states; the above figure shows the display of DNAT rule modification on the Details page. If the DNAT rule is not bound when the instance is created, it can be re-bound in the same way when the instance is created; and if the DNAT rule is bound when the instance is created, it can be unbound or bound to a new public port protocol on the Details page.
- Instance Cloud Assistant
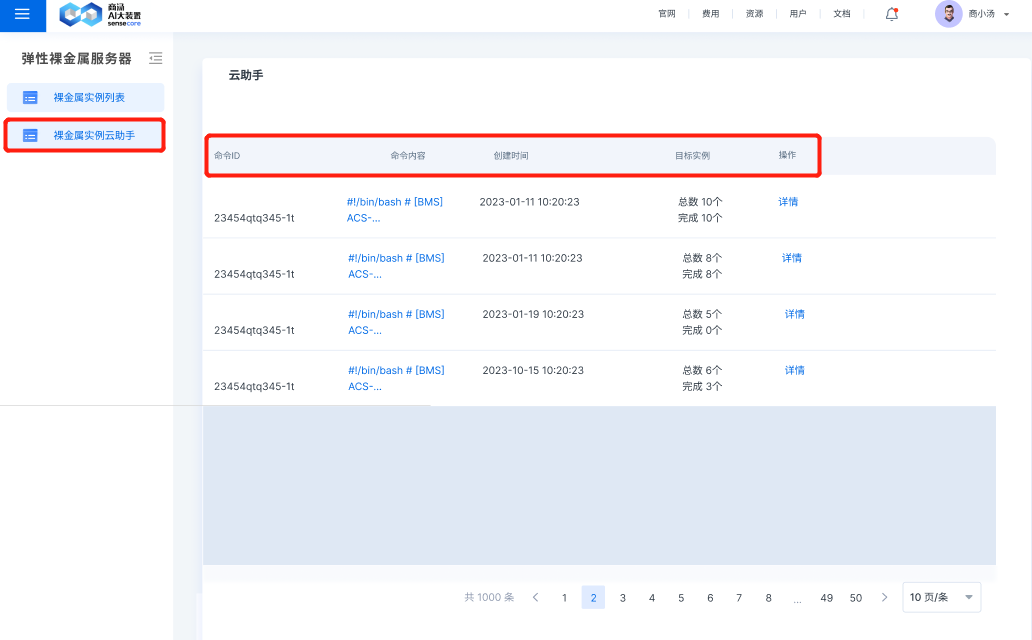
Through the BMS Instance Cloud Assistant page, you can view the results of bulk execution commands, view the command ID, command content, command creation time, target instances executed according to the command, and view the detailed results of execution commands from the dimension of target instances through action bar.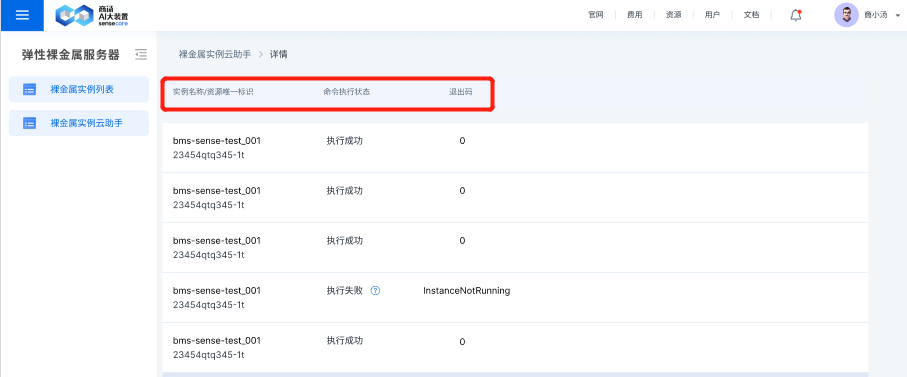
By clicking the details of action bar, the above display page will occur and display the execution details of a command on N target instances, including the name/unique resource ID of the N target instances, command execution status (including execution succeeded, execution failed and execution in progress) and the corresponding exit code, where the corresponding relationship of the exit code is shown below:
| Exit Code | Meaning |
|---|---|
| 0 | Execution succeeded |
| ClientNotRunning | Cloud Assistant Client offline |
| ClientNeedUpgrade | Cloud Assistant Client to be updated |
| TaskTimeout | Command execution timed out |
| ExitCodeNonzero | Command execution ended, but the exit code of the command process is non-zero |
- Secret key pair
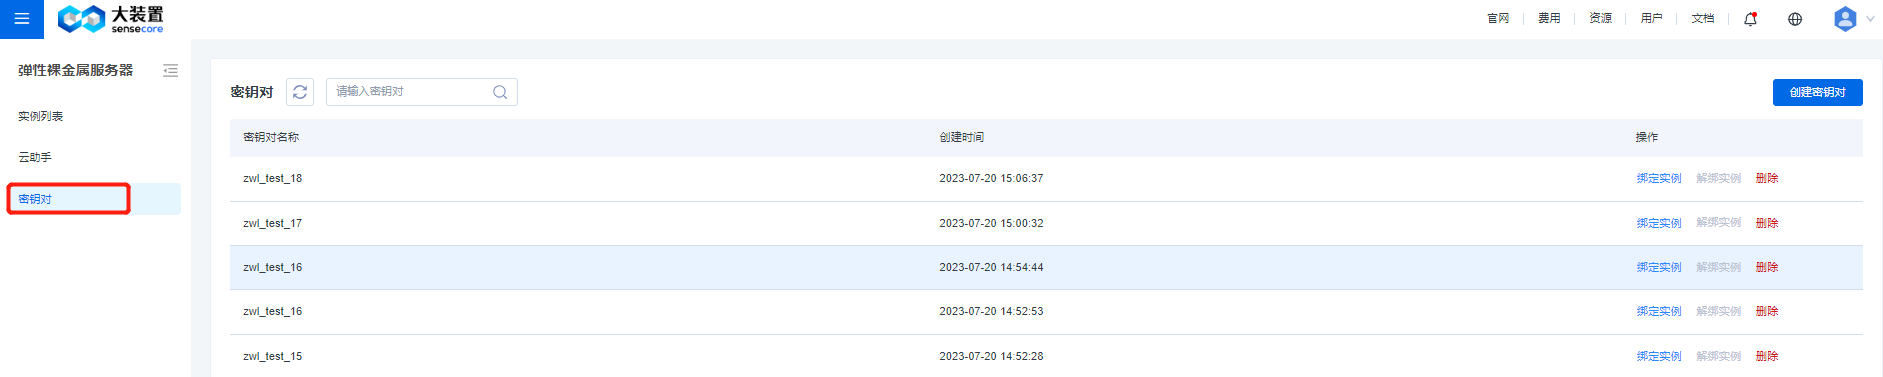
The key pair list page shows the name and creation time of the key pair. In the action column, you can bind, unbind, or delete key pair from an instance. There is a fuzzy search bar at the top to enable you to quickly filter and search for by names of key pair, and a button to create a key pair is set at the top right corner.
The Bind Instance page is shown in the following figure. The list on the left shows names of running instances and unique identifiers of resources. The search bar at the top enables users to quickly locate the target instance. Select the instance to be bound on the left and move it to the selected range on the right, and then click OK to bind the current key pair to the selected instance.
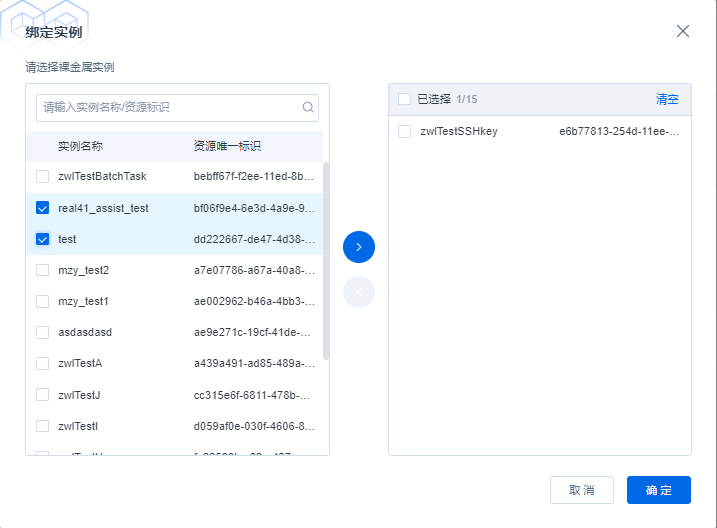
The function of binding the key pair and the instance is the same as the logic of binding, and a shuttle box is also used to unbind the current key pair from the instance. The action to delete key pairs will only apply to key pairs that are not bound to any instance. When deleting a key pair that can be deleted, you will be prompted with a confirmation dialog box to ask you to further check whether to delete it.
Use instances
You can use the SSH password to log in to the BMS instance, and deploy some training tasks on the instance.
Best Practices
1. MIG virtualization
Prerequisites
- The environment is the A100 BM instance provided by the BMS sub-product
- The GPU driver has not been uninstalled and is running normally
How to get started
Enable MIG
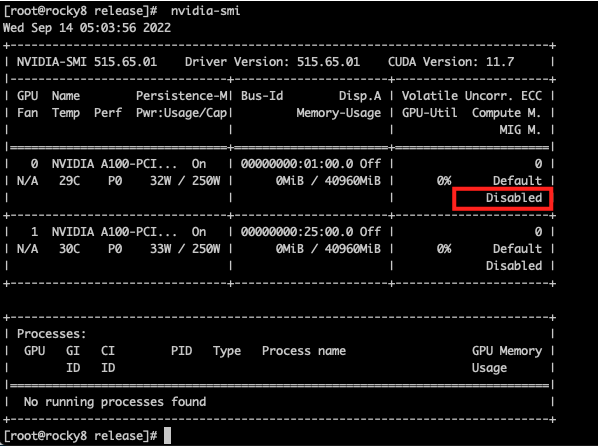
You can view the MIG enabling condition through the nvidia-smi command, and “Disabled” means it is not enabled
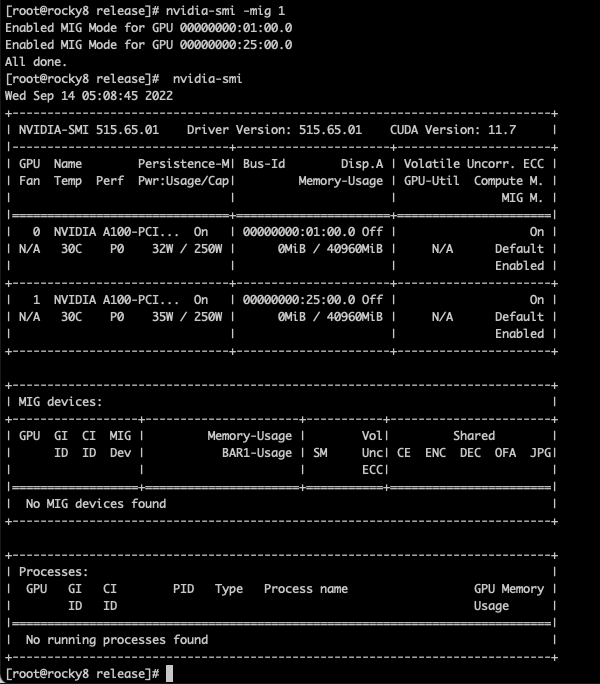
Enable/disable MIG
Nvidia-smi -mig 1 #, 0 if off
View MIG instances
View available sub-GPU types
[root@rocky8 ~]# nvidia-smi mig -lgip -i 0
+-----------------------------------------------------------------------------+
| GPU instance profiles:                                                      |
| GPU   Name             ID    Instances   Memory     P2P    SM    DEC   ENC  |
|                              Free/Total   GiB              CE    JPEG  OFA  |
|=============================================================================|
|   0  MIG 1g.5gb        19     7/7        4.75       No     14     0     0   |
|                                                             1     0     0   |
+-----------------------------------------------------------------------------+
|   0  MIG 1g.5gb+me     20     1/1        4.75       No     14     1     0   |
|                                                             1     1     1   |
+-----------------------------------------------------------------------------+
|   0  MIG 2g.10gb       14     3/3        9.62       No     28     1     0   |
|                                                             2     0     0   |
+-----------------------------------------------------------------------------+
|   0  MIG 3g.20gb        9     2/2        19.50      No     42     2     0   |
|                                                             3     0     0   |
+-----------------------------------------------------------------------------+
|   0  MIG 4g.20gb        5     1/1        19.50      No     56     2     0   |
|                                                             4     0     0   |
+-----------------------------------------------------------------------------+
|   0  MIG 7g.40gb        0     1/1        39.25      No     98     5     0   |
|                                                             7     1     1   |
+-----------------------------------------------------------------------------+
Description of the -lgip parameter: Lists GPU instance profiles, their availability and IDs. Profiles describe the supported types of GPU instances, including all of the GPU resources they exclusively control.
Create an instance with profile ID 9
- That is, the compute instance of MIG 3g.20gb
nvidia-smi mig -i 0 -cgi 9 -C
[root@rocky8 ~]# nvidia-smi mig -i 0 -cgi 9 -C
Successfully created GPU instance ID  1 on GPU  0 using profile MIG 3g.20gb (ID  9)
Successfully created compute instance ID  0 on GPU  0 GPU instance ID  1 using profile MIG 3g.20gb (ID  2)
[root@rocky8 ~]# nvidia-smi
Wed Sep 14 16:31:49 2022
+-----------------------------------------------------------------------------+
| NVIDIA-SMI 515.65.01    Driver Version: 515.65.01    CUDA Version: 11.7     |
|-------------------------------+----------------------+----------------------+
| GPU  Name        Persistence-M| Bus-Id        Disp.A | Volatile Uncorr. ECC |
| Fan  Temp  Perf  Pwr:Usage/Cap|         Memory-Usage | GPU-Util  Compute M. |
|                               |                      |               MIG M. |
|===============================+======================+======================|
|   0  NVIDIA A100-PCI...  On   | 00000000:01:00.0 Off |                   On |
| N/A   30C    P0    32W / 250W |     19MiB / 40960MiB |     N/A      Default |
|                               |                      |              Enabled |
+-------------------------------+----------------------+----------------------+
|   1  NVIDIA A100-PCI...  On   | 00000000:25:00.0 Off |                   On |
| N/A   30C    P0    33W / 250W |      0MiB / 40960MiB |     N/A      Default |
|                               |                      |              Enabled |
+-------------------------------+----------------------+----------------------+

+-----------------------------------------------------------------------------+
| MIG devices:                                                                |
+------------------+----------------------+-----------+-----------------------+
| GPU  GI  CI  MIG |         Memory-Usage |        Vol|         Shared        |
|      ID  ID  Dev |           BAR1-Usage | SM     Unc| CE  ENC  DEC  OFA  JPG|
|                  |                      |        ECC|                       |
|==================+======================+===========+=======================|
|  0    1   0   0  |     19MiB / 19968MiB | 42      0 |  3   0    2    0    0 |
|                  |      0MiB / 32767MiB |           |                       |
+------------------+----------------------+-----------+-----------------------+

+-----------------------------------------------------------------------------+
| Processes:                                                                  |
|  GPU   GI   CI        PID   Type   Process name                  GPU Memory |
|        ID   ID                                                   Usage      |
|=============================================================================|
|  No running processes found                                                 |
+-----------------------------------------------------------------------------+
Run a CUDA sample to view the instance state
- For downloading and compiling CUDA samples, refer to Install CUDA and GPU drivers manually/"Verify CUDA samples"
#   There is only one instance when you run devicequery
[root@rocky8 release]# ./deviceQuery
./deviceQuery Starting...

 CUDA Device Query (Runtime API) version (CUDART static linking)

Detected 1 CUDA Capable device(s)

Device 0: "NVIDIA A100-PCIE-40GB MIG 3g.20gb"
  CUDA Driver Version / Runtime Version          11.7 / 11.7
  CUDA Capability Major/Minor version number:    8.0
  Total amount of global memory:                 19968 MBytes (20937965568 bytes)
  (042) Multiprocessors, (064) CUDA Cores/MP:    2688 CUDA Cores
  GPU Max Clock rate:                            1410 MHz (1.41 GHz)
  Memory Clock rate:                             1215 Mhz
  Memory Bus Width:                              2560-bit
  L2 Cache Size:                                 20971520 bytes
  Maximum Texture Dimension Size (x,y,z)         1D=(131072), 2D=(131072, 65536), 3D=(16384, 16384, 16384)
  Maximum Layered 1D Texture Size, (num) layers  1D=(32768), 2048 layers
  Maximum Layered 2D Texture Size, (num) layers  2D=(32768, 32768), 2048 layers
  Total amount of constant memory:               65536 bytes
  Total amount of shared memory per block:       49152 bytes
  Total shared memory per multiprocessor:        167936 bytes
  Total number of registers available per block: 65536
  Warp size:                                     32
  Maximum number of threads per multiprocessor:  2048
  Maximum number of threads per block:           1024
  Max dimension size of a thread block (x,y,z): (1024, 1024, 64)
  Max dimension size of a grid size    (x,y,z): (2147483647, 65535, 65535)
  Maximum memory pitch:                          2147483647 bytes
  Texture alignment:                             512 bytes
  Concurrent copy and kernel execution:          Yes with 3 copy engine(s)
  Run time limit on kernels:                     No
  Integrated GPU sharing Host Memory:            No
  Support host page-locked memory mapping:       Yes
  Alignment requirement for Surfaces:            Yes
  Device has ECC support:                        Enabled
  Device supports Unified Addressing (UVA):      Yes
  Device supports Managed Memory:                Yes
  Device supports Compute Preemption:            Yes
  Supports Cooperative Kernel Launch:            Yes
  Supports MultiDevice Co-op Kernel Launch:      Yes
  Device PCI Domain ID / Bus ID / location ID:   0 / 1 / 0
  Compute Mode:
     < Default (multiple host threads can use ::cudaSetDevice() with device simultaneously) >

deviceQuery, CUDA Driver = CUDART, CUDA Driver Version = 11.7, CUDA Runtime Version = 11.7, NumDevs = 1
Result = PASS
Destroy instances
[root@rocky8 ~]# nvidia-smi mig -dgi -gi 1 -i 0
Unable to destroy GPU instance ID  1 from GPU  0: In use by another client
Failed to destroy GPU instances: In use by another client
Reset destroyed instances
[root@rocky8 ~]# nvidia-smi --gpu-reset
Error encountered during reset of GPU 00000000:01:00.0: Unknown Error
GPU 00000000:25:00.0 was successfully reset.

1 device did not complete reset successfully, and may be in an unstable state. Please reboot your system.

Warning: persistence mode is disabled on device 00000000:25:00.0. See the Known Issues section of the nvidia-smi(1) man page for more information. Run with [--help | -h] switch to get more information on how to enable persistence mode.
[root@rocky8 ~]# nvidia-smi
Wed Sep 14 16:36:26 2022
+-----------------------------------------------------------------------------+
| NVIDIA-SMI 515.65.01    Driver Version: 515.65.01    CUDA Version: 11.7     |
|-------------------------------+----------------------+----------------------+
| GPU  Name        Persistence-M| Bus-Id        Disp.A | Volatile Uncorr. ECC |
| Fan  Temp  Perf  Pwr:Usage/Cap|         Memory-Usage | GPU-Util  Compute M. |
|                               |                      |               MIG M. |
|===============================+======================+======================|
|   0  NVIDIA A100-PCI...  Off  | 00000000:01:00.0 Off |                   On |
| N/A   31C    P0    34W / 250W |      0MiB / 40960MiB |     N/A      Default |
|                               |                      |              Enabled |
+-------------------------------+----------------------+----------------------+
|   1  NVIDIA A100-PCI...  Off  | 00000000:25:00.0 Off |                   On |
| N/A   32C    P0    36W / 250W |      0MiB / 40960MiB |     N/A      Default |
|                               |                      |              Enabled |
+-------------------------------+----------------------+----------------------+

+-----------------------------------------------------------------------------+
| MIG devices:                                                                |
+------------------+----------------------+-----------+-----------------------+
| GPU  GI  CI  MIG |         Memory-Usage |        Vol|         Shared        |
|      ID  ID  Dev |           BAR1-Usage | SM     Unc| CE  ENC  DEC  OFA  JPG|
|                  |                      |        ECC|                       |
|==================+======================+===========+=======================|
|  No MIG devices found                                                       |
+-----------------------------------------------------------------------------+

+-----------------------------------------------------------------------------+
| Processes:                                                                  |
|  GPU   GI   CI        PID   Type   Process name                  GPU Memory |
|        ID   ID                                                   Usage      |
|=============================================================================|
|  No running processes found                                                 |
+-----------------------------------------------------------------------------+
[root@rocky8 ~]# nvidia-smi mig -dgi -gi 1 -i 0
No GPU instances found: Not Found
Disable MIG
nvidia-smi -mig 0
FAQ
- Why is the SSH login to the instance automatically disconnected after a period of inactivity? How to solve it?
Cause analysis: According to community feedback, the tcp connection corresponding to ssh will be automatically disconnected after a certain period of inactivity.
Suggested solution: BMS products do not customize and adjust the sshd behavior in BM instances by default. Current users can adjust relevant parameters as needed to maintain idle ssh connections.
Adjustment method:
Modify the file: /etc/ssh/sshd_config

Add a line, meaning that sending a keepalive signal to the client every 60 seconds, with an adjustable interval
For details, see SSH Manual (man sshd_config)
ClientAliveInterval  60
If the connection is disconnected after no feedback is received from the client for more than 3 times, the interval can be adjusted separately. 0 means no limit.
For details, see SSH Manual (man sshd_config)
ClientAliveCountMax  3

Restart SSHD service
sudo systemctl restart sshd

Login via SSH again
Supplementary note:
The server-side link keep-alive solution may not be applicable to all scenarios, and the disconnection of ssh is also affected by other factors, for example
- Other factors cause the client or server to actively disconnect SSH
- Objective reasons such as network disconnection lead to the disconnection of SSH
- The network traffic is too high, resulting in multiple consecutive timeouts or failures
- What is Cloud Assistant? How to install Cloud Assistant Client?
Cloud Assistant serves as an automation tool to manage software lifecycle, manage instances in batches, assist in automated operations and maintenance, etc.
Installation steps:
# Select a download package according to the zone where the instance is located and OS type
ASSIST_PKG=""

# Download the Cloud Assistant installation package
wget ${ASSIST_PKG} -O /tmp/assist_pkg

# Uninstall and install the service
systemctl is-active lepton-baremetal-assist-client && systemctl stop lepton-baremetal-assist-client
if which rpm >/dev/null 2>&1
then
  rpm -qa |grep -q lepton-baremetal-assist-client && rpm -e lepton-baremetal-assist-client
  rpm -ivh /tmp/assist_pkg
else
  dpkg -l |grep -q lepton-baremetal-assist-client && dpkg -r lepton-baremetal-assist-client
  dpkg -i /tmp/assist_pkg
fi
rm -rf /tmp/assist_pkg

# Check whether the service is started
systemctl is-active lepton-baremetal-assist-client
# If it is active, the service is started
- What to do if Cloud Assistant is offline?
# Check whether the Cloud Assistant service survives
systemctl is-active lepton-baremetal-assist-client
# If it is active, the service is started

# Check the log for abnormalities
tail /var/log/lepton-baremetal-assist-client/lepton-baremetal-assist-client.log
- Common errors:
| Error | Meaning | Additional Information |
|---|---|---|
| Not working with the service network | Check the configuration file (/etc/lepton-baremetal-assist-client/config.yaml) to ensure that the ASSIST_CLIENT_SERVER_ADDRESS value is correct | Cloud Assistant server address Shanghai: https://10.118.0.154:51808 Guangzhou: https://10.115.0.154:51808 |
| Security verification failed | Check the configuration file (/etc/lepton-baremetal-assist-client/config.yaml), ASSIST_CLIENT_ACCESSKEY, ASSIST_CLIENT_SECRETKEY, ASSIST_CLIENT_UUID is correct | ASSIST_CLIENT_ACCESSKEY and ASSIST_CLIENT_SECRETKEY are ak and sk of the tenant ASSIST_CLIENT_UUID can be located on the SenseCore Console: "Resources" -> "Resource Management" -> (specific to an instance) "View Details" -> "Resource UUID" |
- How to install/update Cloud Assistant Client?
- Check whether the signature file on the system exists:
# Whether it exists
file /etc/sensecore/uuid.jwt

# If the signature file exists, please contact the BMS technical support
- Install and start Cloud Assistant Client in the [Ubuntu] system
# Uninstall the older version of the service
dpkg -l |grep -q sensecore-telemetry-bms && dpkg -r sensecore-telemetry-bms

# Install and run
wget https://bms-monitor.aoss.cn-sh-01.sensecoreapi-oss.cn/monitor/latest/sensecore-telemetry-bms.deb -O /tmp/sensecore-telemetry-bms.deb
dpkg -i --force-overwrite /tmp/sensecore-telemetry-bms.deb
rm -rf /tmp/sensecore-telemetry-bms.deb

# Check whether the service is normal
systemctl is-active sensecore-telemetry-bms
- Install and start Cloud Assistant Client in the [Rocky] system
# Uninstall the older version of the service
rpm -qa |grep -q sensecore-telemetry-bms && rpm -e --nodeps sensecore-telemetry-bms

# Install and run
wget https://bms-monitor.aoss.cn-sh-01.sensecoreapi-oss.cn/monitor/latest/sensecore-telemetry-bms.rpm -O /tmp/sensecore-telemetry-bms.rpm
rpm -ivh --force /tmp/sensecore-telemetry-bms.rpm
rm -rf /tmp/sensecore-telemetry-bms.rpm

# Check whether the service is normal
systemctl is-active sensecore-telemetry-bms
Problems with enabling the VNC function on delivered nodes
When the multi-copy version of ironic was released, the console interface function was also released. Nodes registered before the multi-copy version are not configured with console_interface, and nodes registered after the multi-copy version are configured with ipmitool-socat by default.
Nodes registered before the multi-copy version
$ bm node show dfd37739-5f28-4e85-ade6-91c3014d6f8b --column console_interface
Nodes registered after the multi-copy version
$ bm node show acebeab3-a3d4-4cc3-95ac-ede785395723 --column console_interface
For nodes registered before the multi-copy version and already delivered, to enable the VNC function, the following problems need to be solved:
BIOS configuration
It depends on the BIOS.
console_interface node update
This action will not interrupt node services, but it is recommended to be done together with BIOS configuration.
- active node
# operator will coordinate unset maintenance
bm node maintenance set <NODD_UUID>
bm node set <NODD_UUID> --console-interface ipmitool-socat
bm node maintenance unset <NODD_UUID>
- available node
bm node set <NODD_UUID> --console-interface ipmitool-socat
Use the delivered node of the Ubuntu 20.04 image, update the kernel parameters, and then restart the system
# Switch to the root user for execution and require a restart.
rm -rf /etc/default/grub.d
grub-mkconfig -o /boot/grub/grub.cfg
grub-mkconfig -o /boot/efi/EFI/ubuntu/grub.cfg
reboot
Recommended sequence of actions
- For Ubuntu20.04 system users, tell them to update the kernel parameters and then restart the system
- Configure console_interface
- Configure BIOS
OFED Driver
Uninstalling OFED Driver
[root@real-46 ~]# ofed_info -s
MLNX_OFED_LINUX-5.6-2.0.9.0:

Upload file: yeanhua ➜ scp -P 9004 MLNX_OFED_LINUX-5.6-2.0.9.0-rhel8.6-x86_64.tgz root@47.113.76.75:/root/

# cd /tmp && wget http://eyes.sensetime.com:9999/IB/MLNX_OFED_LINUX-5.6-2.0.9.0-rhel8.6-x86_64.tgz

cd /root/

tar -zxvf MLNX_OFED_LINUX-5.6-2.0.9.0-rhel8.6-x86_64.tgz

cd MLNX_OFED_LINUX-5.6-2.0.9.0-rhel8.6-x86_64/ && ./uninstall.sh --force -q

reboot

# bond1 can still be ping through after the OFED driver is deleted
6: bond1: <BROADCAST,MULTICAST,MASTER,UP,LOWER_UP> mtu 1500 qdisc noqueue state UP group default qlen 1000
    link/ether 10:70:fd:6d:d7:5a brd ff:ff:ff:ff:ff:ff
    inet 10.119.241.172/27 brd 10.119.241.191 scope global noprefixroute bond1
       valid_lft forever preferred_lft forever
    inet6 fe80::1270:fdff:fe6d:d75a/64 scope link
       valid_lft forever preferred_lft forever
[root@real-46 ~]# ping -c 2 10.119.241.172
PING 10.119.241.172 (10.119.241.172) 56(84) bytes of data.
64 bytes from 10.119.241.172: icmp_seq=1 ttl=64 time=0.013 ms
64 bytes from 10.119.241.172: icmp_seq=2 ttl=64 time=0.011 ms

--- 10.119.241.172 ping statistics ---
2 packets transmitted, 2 received, 0% packet loss, time 1024ms
rtt min/avg/max/mdev = 0.011/0.012/0.013/0.001 ms
Reinstalling OFED Driver
# The following applies to [GPU instance and CPU instance]
# cd /root && wget http://eyes.sensetime.com:9999/IB/MLNX_OFED_LINUX-5.8-1.1.2.1-rhel8.6-x86_64.tgz
# Upload from a local directory, local TGZ package can be downloaded from the link above
scp -P 9004 ./MLNX_OFED_LINUX-5.8-1.1.2.1-rhel8.6-x86_64.tgz root@47.113.76.75:/root/

cd /root/ && tar -zxvf MLNX_OFED_LINUX-5.8-1.1.2.1-rhel8.6-x86_64.tgz

yum install tk gcc-gfortran tcsh kernel-rpm-macros python36-devel -y

yum install kernel-rpm-macros python36-devel  kernel-devel-4.18.0-425.3.1.el8.x86_64 kernel-headers.x86_64 kernel-tools.x86_64 kernel-tools-libs.x86_64 -y --allowerasing
Note: The kernel-tools-libs-devel-4.18.0-425.3.1.el8.x86_64 package will be removed

cd /root/MLNX_OFED_LINUX-5.8-1.1.2.1-rhel8.6-x86_64 &&  ./mlnxofedinstall --add-kernel-support --skip-repo --force
systemctl enable openibd

# Reboot the system after finishing: You can see that the openibd service is in active state after the system is rebooted
reboot
[root@real-46 ~]# systemctl is-active openibd
active

# View the version command of the OFED driver and ensure that the version number is the same as that in the previous installation package file
[root@real-46 ~]# ofed_info -s
MLNX_OFED_LINUX-5.8-1.1.2.1:


# Check whether ib state and RoCE action are normal. Passed
RoCE connectivity - gateway: Ensure successful ping
ping -c 2 10.119.241.161
RoCE connectivity - dual-machine ib_read_lat: Ensure successful execution
server: [root@real-46 ~]# ib_read_lat
client: [root@real-119 ~]# ib_read_lat -d mlx5_1 -a --report_gbits 10.119.241.172
GPU Driver
Uninstalling GPU Driver
[root@real-46 ~]# systemctl stop nvidia-fabricmanager
[root@real-46 ~]# nvidia-uninstall -q -s

WARNING: Your driver installation has been altered since it was initially installed; this may happen, for example, if you have since installed the NVIDIA driver through a mechanism other than nvidia-installer (such as your
         distribution's native package management system).  nvidia-installer will attempt to uninstall as best it can.  Please see the file '/var/log/nvidia-uninstall.log' for details.
Reinstalling GPU Driver
# Install the GPU driver
# cd /tmp/ && wget http://eyes.sensetime.com:9999/IB/gpu_driver_new/NVIDIA-Linux-x86_64-515.65.01.run
scp -P 9004 ./NVIDIA-Linux-x86_64-515.65.01.run root@47.113.76.75:/tmp/
cd /tmp/ && chmod +x NVIDIA-Linux-x86_64-515.65.01.run
# NVIDIA-Linux-x86_64-515.65.01.run requires the execution permission
cd /tmp && ./NVIDIA-Linux-x86_64-515.65.01.run -a -s -Z

# Use the following installation method if an error is reported when the above-mentioned one used
cd /tmp && ./NVIDIA-Linux-x86_64-515.65.01.run --kernel-source-path /usr/src/kernels/4.18.0-425.3.1.el8.x86_64

# The one-time PM mode setting is normal
/usr/bin/nvidia-smi -pm 1

# Start FM
systemctl restart nvidia-fabricmanager

# Adjust /etc/rc.local as needed and reboot to check the effect of PM
# The PM setting is effective. Method to view this setting:
nvidia-smi

# Verify the functionality of CUDA
Reference: https://sco-aiiaas.feishu.cn/wiki/wikcnvTScTIY01IJjmErSHEDT1u
git clone https://github.com/NVIDIA/cuda-samples.git

cd cuda-samples
make -j
# For A100, use make -j SMS="80"

# Enter the successfully compiled bin/..../release and execute the following use case
cd bin/x86_64/linux/release/
[root@localhost release]# ./vectorAdd
[Vector addition of 50000 elements]
Failed to allocate device vector A (error code system not yet initialized)!
[root@localhost release]# ./deviceQuery

# mig setting: successful
Reference: https://sco-aiiaas.feishu.cn/wiki/wikcnqaNHEXrVVOucJkwAhoPXfi
# Execution opened successfully
[root@real-46 release]# nvidia-smi -mig 1
# Execution closed successfully
[root@real-46 release]# nvidia-smi -mig 0