Cloud Container Instance (CCI)
Product Overview
Cloud Container Instance (CCI) provides container resources under a serverless architecture. Serverless is a cloud-native development model that allows developers to build and run applications without having to manage servers. It is easy for users to configure and use the CCI, reducing both deployment and O&M costs.
Product Superiority
- O&M free: With the serverless architecture, you don't need to care about the underlying server and can focus on your business.
- Low cost: Simple configuration and easy operation helps reduce both deployment and O&M costs, and the ready-to-use features avoid waste of resources.
Product Features
Different specifications for option
Support different specifications of GPU computing resources by selecting different clusters when creating an application.
Multiple storage volume mounts
Support mounting various cloud storage services provided by SenseCore. Users can mount the created storage volumes when creating an application or change the mounting of storage volumes on the application's Details page.
Various state monitoring
Provide various monitoring dashboards to help users view the CCI running state in a timely manner. Currently, the available monitoring metrics include CPU utilization, memory utilization, GPU utilization, and GPU memory utilization.
Web Terminal Login
Support automatic login via Web Terminal. After selecting a container instance, users can log in to the container in one click without needing to record the account password.
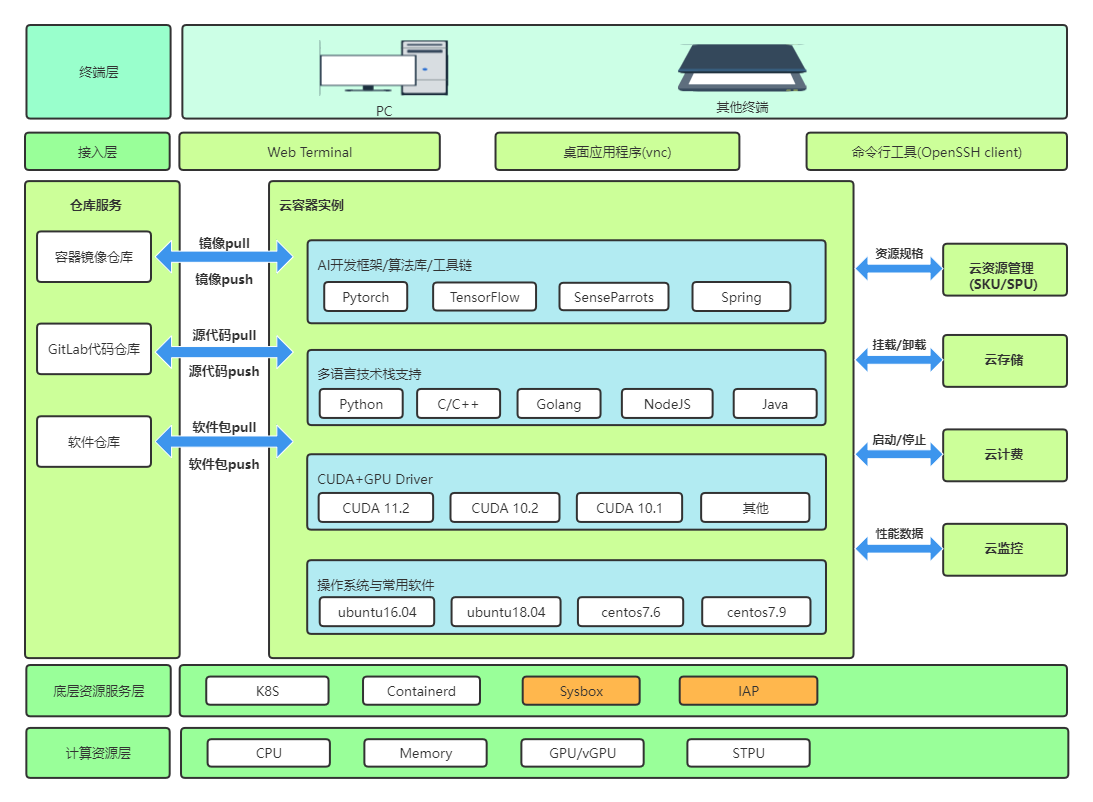
Product Architecture
Application Scenarios
AI training and inference
CCI supports applications such as AI training and inference to run in containerized mode, and provides hardware acceleration capabilities such as high-performance network and storage to help you use resources flexibly on demand:
- Based on the cloud-native container technology, realize creation and use in seconds, and provide security isolation between users
- By adapting and customizing container images, support various hardware specifications such as GPU and domestic chips
- Through the software and hardware state monitoring and alarm mechanism, support the business layer's timely perception of underlying exceptions and further decision-making
Flexible business
CCI can achieve flexible scaling according to business traffic fluctuations provide the pay-as-you-go billing mode:
- One-click to open and use it via Web Terminal
- Support user-defined services
About Billing
If you choose to create applications with an AI compute cluster, it is free of charge. If it involves purchasing the AI Compute Node, the charges will vary with the specifications of compute nodes.
If you choose to create applications with a public cluster, it will be charged on a Pay Per Use basis. Different instance specifications are billed differently. Please see the product console for specific charges.
Quick Start
- Create an application: Users can create an application through the application creation page of the console, which involves customizing the name of the application, selecting an Elastic Compute Cluster for the application, specifying the priority of the application, selecting the specifications and number of container instances in the application, configuring multiple containers for the instances, selecting an image for the containers, assigning resources, and customizing start commands for services, as well as mounting AFS/configuration items/key for containers and setting environment variables in the advanced configuration.
- View information: In the application list, users can view the basic information about an application, and click the application name to go to the details page to view more specific information, application logs, monitoring information, and container configuration information.
- Modify configurations: On the application details page and container configuration page, users can modify the configuration of the created application, and activate the port for Internet access to the container service based on DNAT rules.
- Login to container: On the application details page, users can log in to an instance in the container instance list through the Web Terminal.
Operation Guide
Create an Application
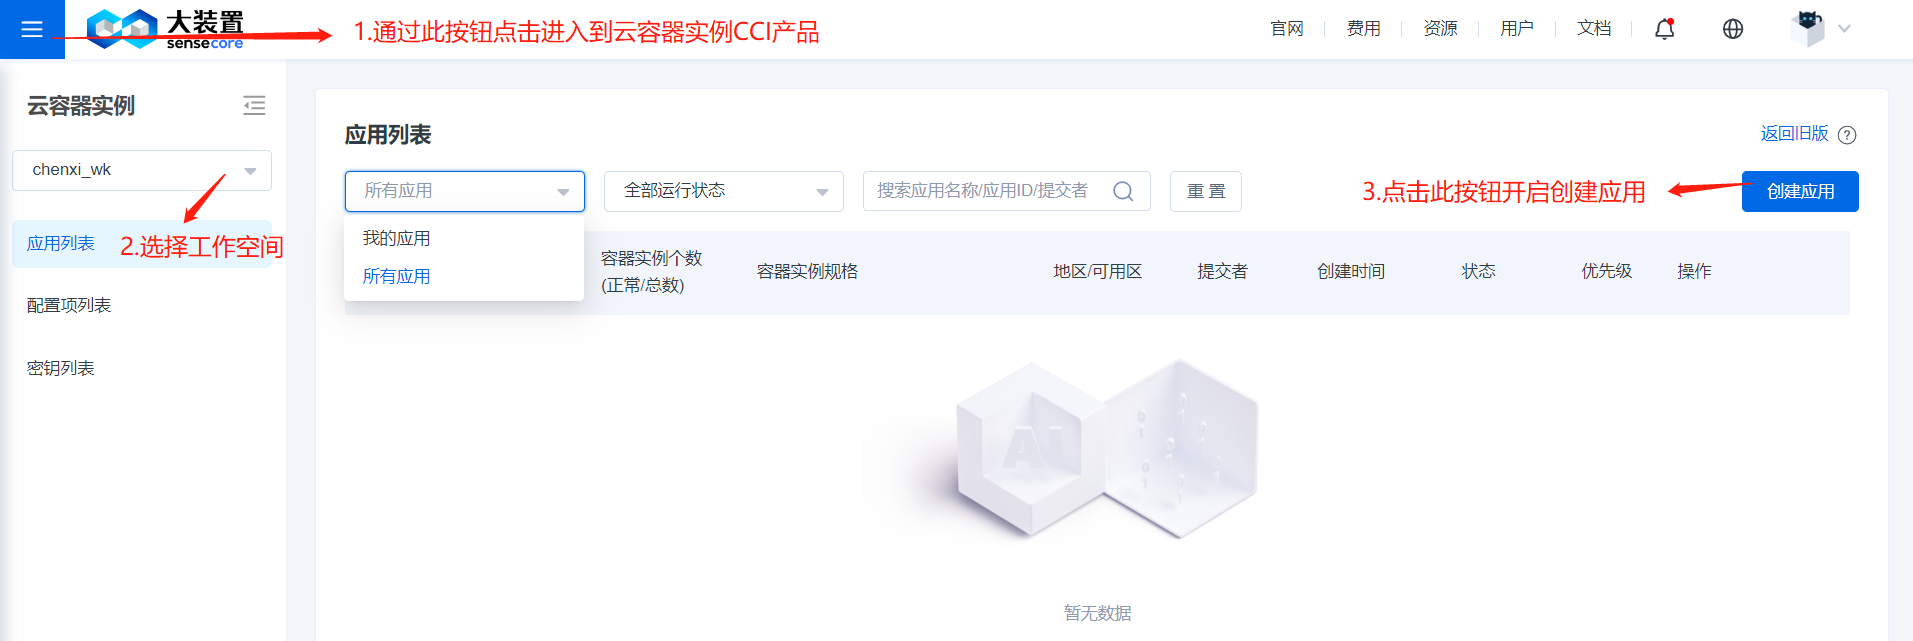
Firstly, users can enter the cloud container instance product through the console. A list page will appear. Users can select different workspaces in the filter box on the left, and then click the [Create Application] button in the upper right corner to start the creation process.
According to the display sequence on the Create Application page, users need to customize the application name, select the AI compute cluster, specify the priority for the application, select the container instance specification and the number of container instances, configure the container, and enter the port and the for the application.
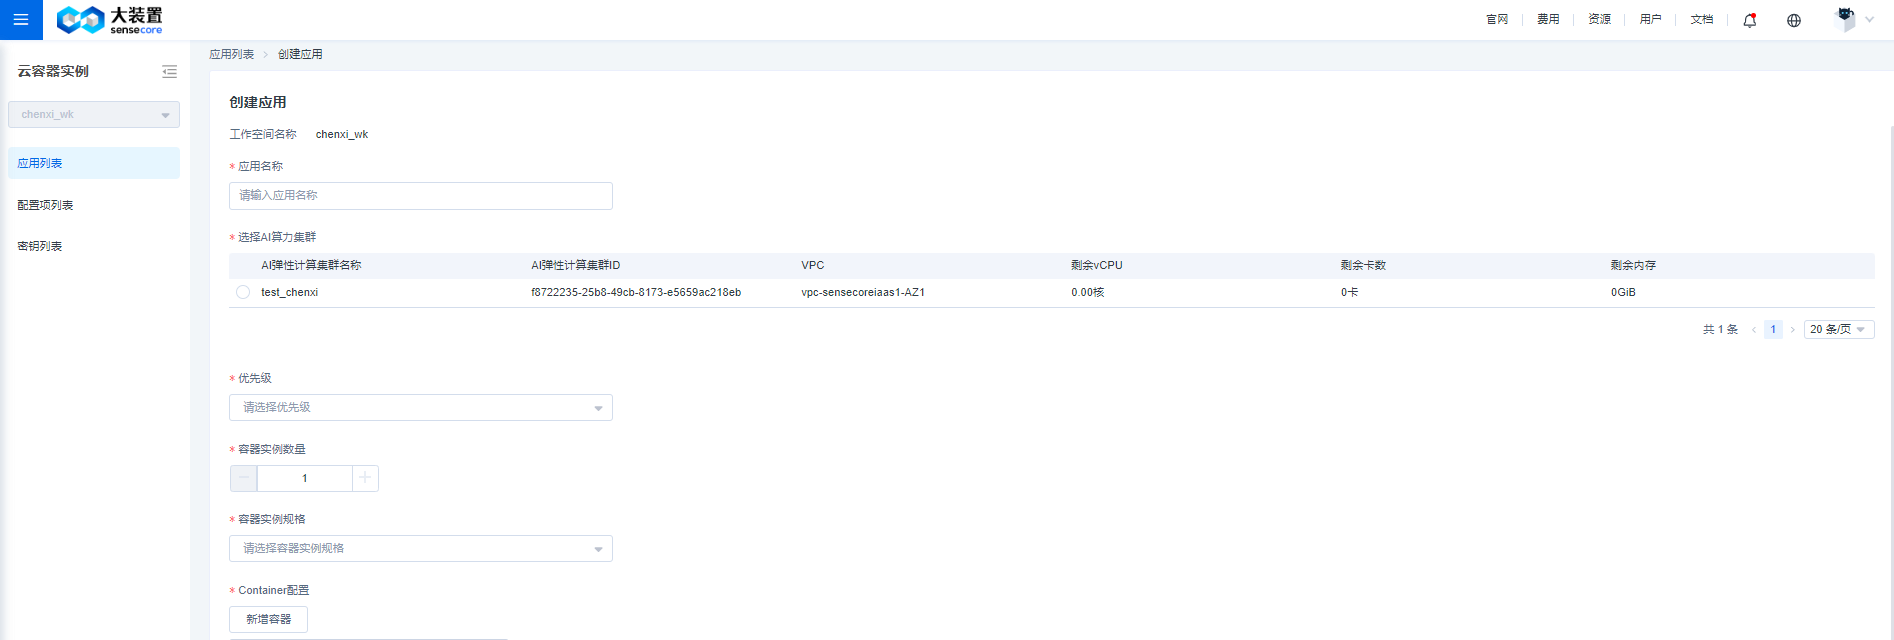
- Application Name Users can customize a name consisting of 2-128 characters and starting with uppercase and lowercase letters or Chinese characters, and the combination can contain numbers, periods (.), underlines (_), half-width colons (:) or hyphens (-). A customized name can be replicated.
- Select AI Compute Cluster Users can select one from the created clusters. The console will display the resource specifications of the created cluster, including VPC, remaining available vCPU, remaining number of GPUs, and remaining memory. Users can select an appropriate cluster based on their needs.
- Priority Including normal, high, and highest, which are available according to your role. If you are a workspace owner, you have the highest priority. If you are a workspace user or container application user, you have the high priority. For specific role permission control, go to [AI Elastic Compute Cluster] - [Workspace Management] - [Bound Members] to add member binding roles.
- Number of Container Instances It is equivalent to the number of pod copies in the application, and users can select the number of container instances according to their needs.
- Container Instance Specification It is equivalent to the specification of the pod in the application, and users can select the appropriate container instance specification according to their needs. Currently, 1, 2, 4, and 8 GPU specifications are supported.
- Container Configuration Users can set multiple different containers for a container instance. Users can add a container by clicking the [Add Container] button. Users can add up to 5 containers for the time being. Users can set the name and image and allocate GPU/vCPU/memory resource individually for each container and can also fill in the corresponding start command for containers. In the advanced configuration, users can mount AI File Storage, set environmental variables, and mount configuration items and key for containers.
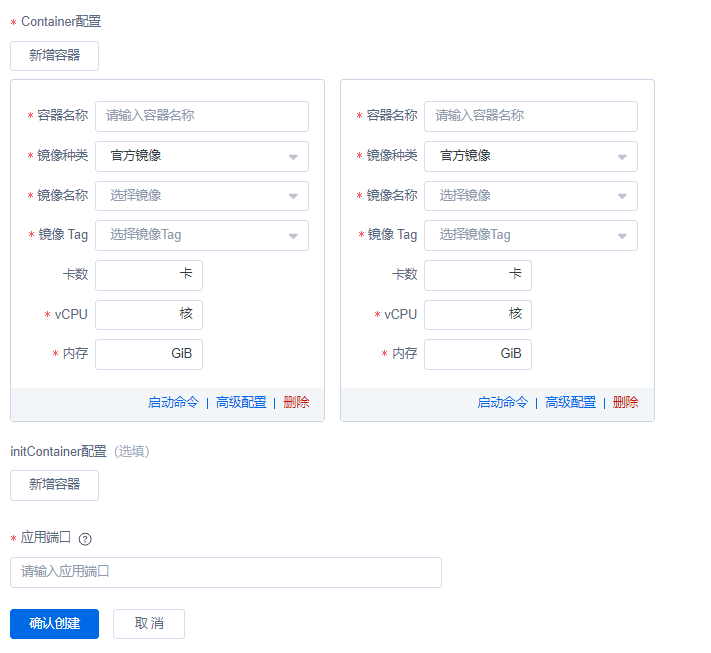
- Container NameUsers can customize a name consisting of 1-63 characters and starting and ending with uppercase or lowercase letters or Chinese characters, and the combination can contain hyphens (-).
- *Image Type Including official image and private image. Official ImageTwo official images are available for the time being and an image name will contain Ubuntu, PyTorch and CUDA and other version information. Private ImageYou can upload your image through the Cloud Container Registry (CCR) product and choose it for use. Select an image name and image tag from the drop-down box as required. Number of GPUs, vCPU, and Memory** Users need to enter the corresponding amount of resources allocated to each container and ensure that the total amount of resources allocated to each container must not exceed the selected container instance specifications.
- Start Command Users customize commands for containers as needed. If an official image is selected, a start command is required to ensure that an application can be normally created.
- Advanced Configuration Provides the flexibility for you to mount a storage volume, add an environment variable, and mount configuration items and keys to your containers. Users can configure these options as needed.
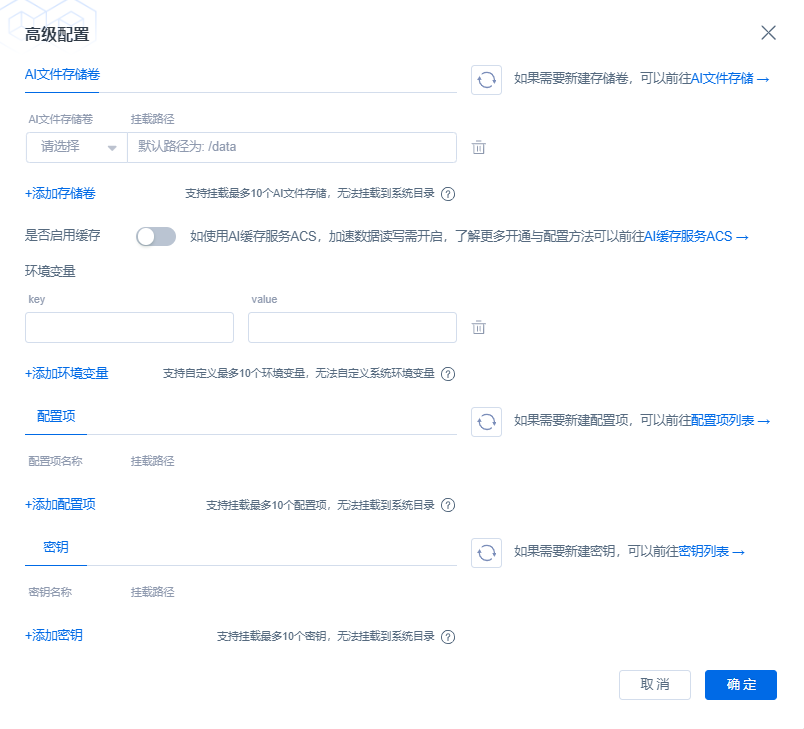
Wherein, for Mount AI File Storage, users can mount up to 10 storage volumes. If there is no available storage volume, users can jump to the AI file storage product to create a storage volume.
The mount path needs to follow the following restrictions:
1. Up to 10 storage volumes can be mounted currently.
2. The following path cannot be used as a container path to mount a storage volume: /usr /boot /cdrom /dev /etc /media /opt /proc /Quarantine /run /snap /srv /swapfile /sys /var.
3. Different volumes cannot be mounted on the same path or on a parent-child path.
Environment Variable Similarly, users can customize up to 10 sets of key-value pairs. The key field cannot be:
HOSTNAME, SHELL, HISTSIZE, PERL5LIB, USER, PATH, PWD, LANG, HOME, LDLIBRARY_PATH, PYTHONPATH, devmachine_id, DEV_USER, DEV_GROUPS, ROOTABLE, HOSTNAME, NAMESPACE, PUBLIC_KEYS, SSHD_PASSWORD, VSCODE_PORT, VSCODE_PASSWORD, JUPYTERLAB_PORT, COMMAND, RESOURCE_TYPE and any environment variables starting with AILAB, custom, and frp;
Configuration Items and KeysUsers can create up to 200 configuration items and the mount path cannot be the same; the creation of configuration items supports two methods: manual key-value filling and file uploading; the creation of keys supports key-value creation;
file format requirements for creating configuration items by uploading files:
- json format: the file name is configmap.json and the configuration example is as follows:
{
  "kind": "ConfigMap",
  "apiVersion": "v1",
  "metadata": {
    "name": "nginxconf",      (required)
  },
  "data": { (required)
    "nginx.conf": "server {\n    listen       80;\n    server_name  localhost;\n\n    location / {\n        root   html;\n        index  index.html index.htm;\n    }\n}"
  }
}
- yaml format: the file name is configmap.yaml and the configuration example is as follows:
kind: ConfigMap
apiVersion: v1
metadata:
  name: nginxconf (required)
data: (required)
  nginx.conf: |-
    server {
        listen       80;
        server_name  localhost;

        location / {
            root   html;
            index  index.html index.htm;
        }
    }
- initContainer Configuration Similar to the Container configuration, it can be used for some preparations before running the main container.
- Application Port Users need to enter a port number ranging from 1 to 65535, of which ports 8002 - 8010 are occupied by system services and cannot be used for application service release; it currently supports settings of up to 10 ports;
View Information
- Application List
You can view application-related information through [Application List] and select a workspace from the drop-down box on the left. The list on the right will display the applications under the workspace, including the application name/ ID, associated clusters, number of container instances in the application, container instance specification, region/availability zone, application committer, created time, application status, and priority, and you can start, stop, copy, or delete applications by using the Delete button in the Action column. At the same time, you can view the event details of applications by clicking [Event].
There is a filter box above the list for users to select the scope and running status of the application, and to perform fuzzy search based on the application name so as to quickly locate the target application from the list.
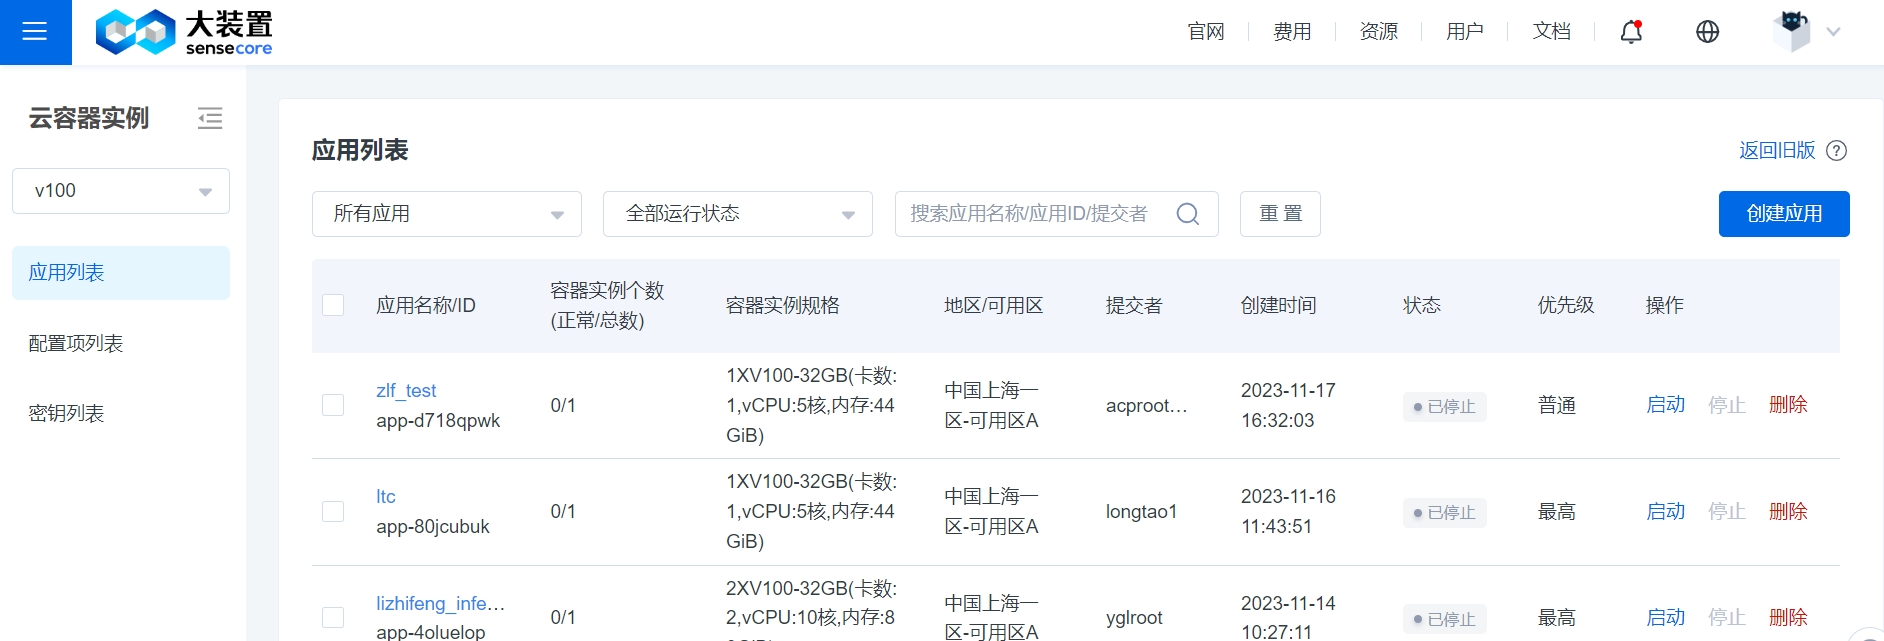
Users can click the application name to enter the application Details page, where Basic Information, Application Log, Monitoring and Container Configuration sections are displayed.
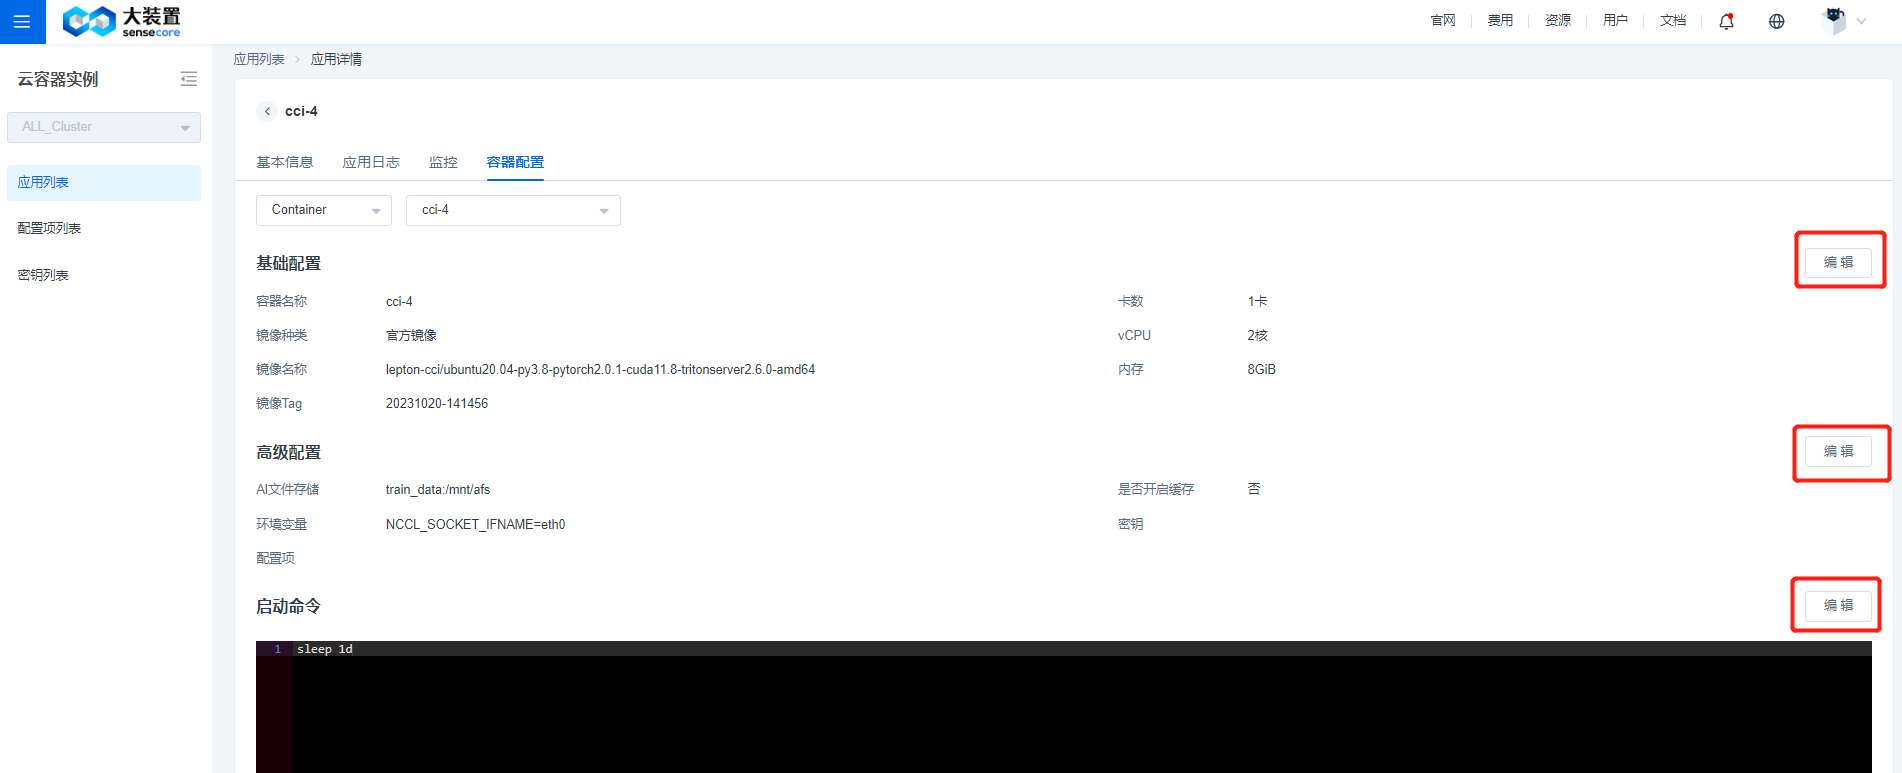
The Basic Information section will display application information, and in Application Log, users can select container instances and containers. Users can view the real-time logs for a running application and can also view offline logs for other applications.
Monitoring Users can view monitoring metrics in real time or by setting a custom time range. Monitoring metrics include CPU, GPU, memory, and GPU utilization.
Container Configuration Displays details of each container in an instance.

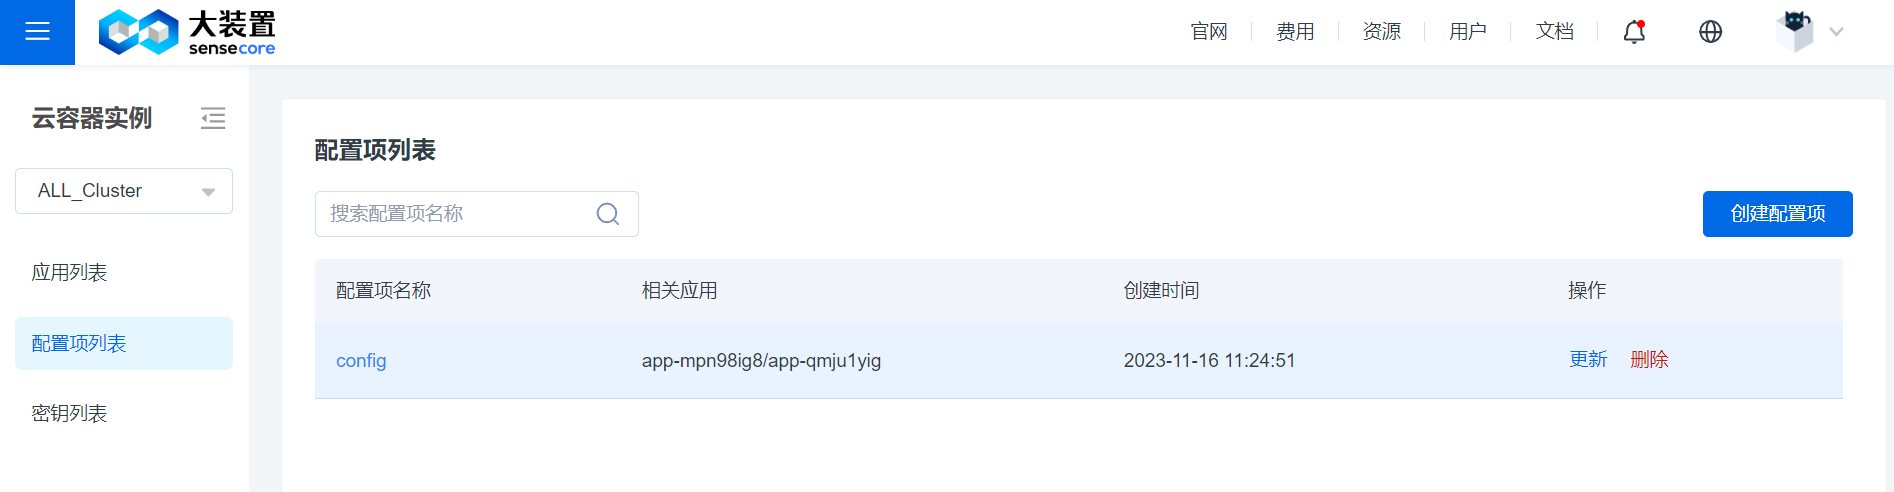
- List of Configuration Items and Keys
In the List of Configuration Items and Keys, you can view the configuration items and keys that you have created. You can quickly search by name at the top of the list, click a name to view details, and update or delete them.
- List of Configuration Items and Keys
Modify Configuration
- On the Application Details page, you can modify the application name, priority, application port, and number of copies, and configure DNAT rules.
- You can change the container name, image, and allocated resources on the Container Configuration page. You can also modify advanced configurations such as environment variables, configuration items, and keys. You can also edit start commands again.
Login to Container
You can log in to the container via Web Terminal. Go to the List of Container Instances on the application’s Details page, click Web Terminal in the Actions column, and then select the container to log in directly to the corresponding container.
Best Practices
The following describes the best practice by taking deploying an inference service through a container instance as an example. The following example uses the official text generation inference image and the LLaMA 2-7B-chat model, and has the following preconditions:
(1) A storage volume is created in the AFS (AI File Storage) to store the model file (in this example, the storage volume is named llm), and the model file can be accessed by mounting the same storage volume between container and initcontainer.
(2) EIP is created in the EIP (elastic IP) product to bind DNAT rules and expose the deployed inference service.
- Create an application according to the steps given in Create Application. An initcontainer is configured as model preparation before running the main container. This configuration can be skipped if you do not need it in practice. The AI file storage volume llm is mounted in the advanced configuration to the mount path /data.
The start command of the initcontainer container is shown below, and is used to download the LLaMA-2-7B-chat model. Under the /data path is the file storage you mount. The model file is always stored in the file storage system. The application container, when started and mounted with the same llm, can access the model file.
mkdir -p /data/models
wget https://cci-demo.aoss.cn-sh-01.sensecoreapi-oss.cn/LLaMA/llama-2-7b-chat-hf.tar
tar xvf llama-2-7b-chat-hf.tar -C /data/models/
For the application container, the storage volume named llm is also mounted in the advanced configuration. The start command is shown below. Start the service through tgi and bind the port of the inference service to the application port you enter. Here 9091 is taken as an example:
text-generation-launcher --model-id /data/models/llama-2-7b-chat-hf --dtype float16 --sharded false --port 9091
- If the inference service is accessed from Internet, the service is exposed by binding DNAT rules on the Details page. Click [DNAT Rules] on the Details page to go to EIP for rule configuration. The destination port where the destination address translation rule is added must be the same as the application port of the application you create.
- The following shows the Details page of the application you create

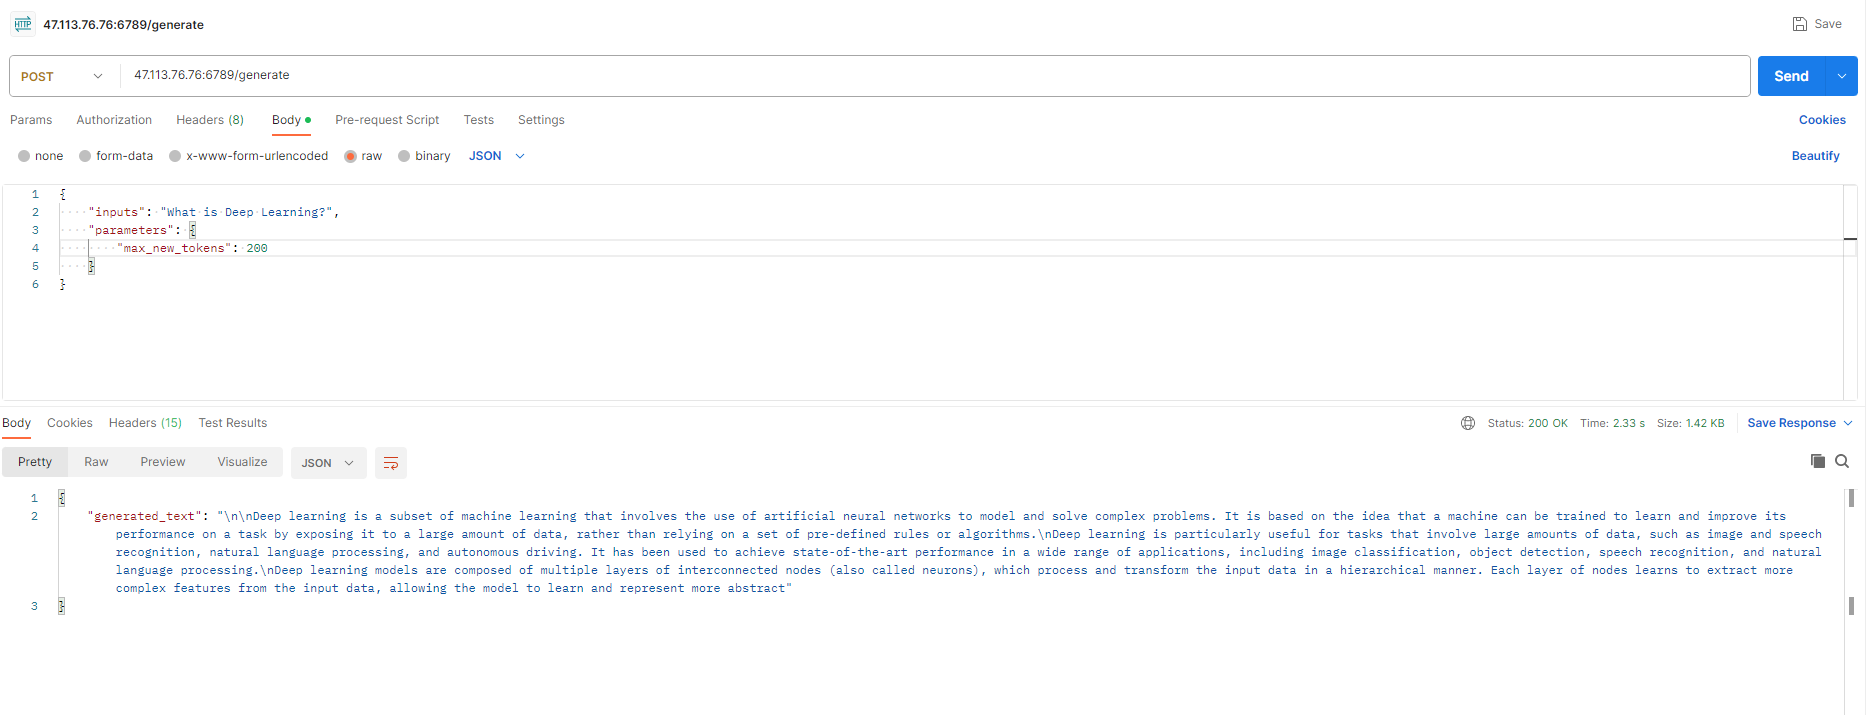
- Access the inference request from the Internet. The inference service request command is shown below. You need to replace DNAT_IP and DNAT_PORT to real values (in this example, replace IP and port number with 47.113.76.76:6789). -d is the content of the request, of which the data field in inputs is the content of the inference request.
cur DNAT_IP:DNAT_PORT/generate \
    -X POST \
    -d '{"inputs":"What is Deep Learning?","parameters":{"max_new_tokens":200}}' \
    -H 'Content-Type: application/json'
The following figure shows the inference service request and returned result:
FAQ
- How to add and use bash command in a private image?
Before using the method below to modify the dockerfile, you need to install the corresponding package management tool apt-get/yum or apk for your private image.
- Ubuntu or Debian base image:
RUN apt-get update && apt-get install -y bash
- CentOS base image:
RUN yum install -y bash
- Alpine base image:
RUN apk add --no-cache bash
Taking Alpine image as an example, the complete example is shown below
# Use Alpine Linux as base image
FROM alpine:latest

# Install Bash in the image
RUN apk update && apk add --no-cache bash

# Add other dependency and command here

# Set container entry as Bash
CMD ["/bin/bash"]