Model Mnagement
You complete four steps - “Create Model Space -> Generate Key -> Create Model -> Operate Model File” - to experience a comprehensive Quick Start.
1.Create Model Space
Model space is the space wherein you need to purchase a quota for use in model storage.
(1)Prepare for creation
Please ensure that you have the AI Model Space Creator permission. please refer to How to authorize users. You need to request the Tenant Administrator to add the AI Model Space Creator role for you.
(2)Create Model Space
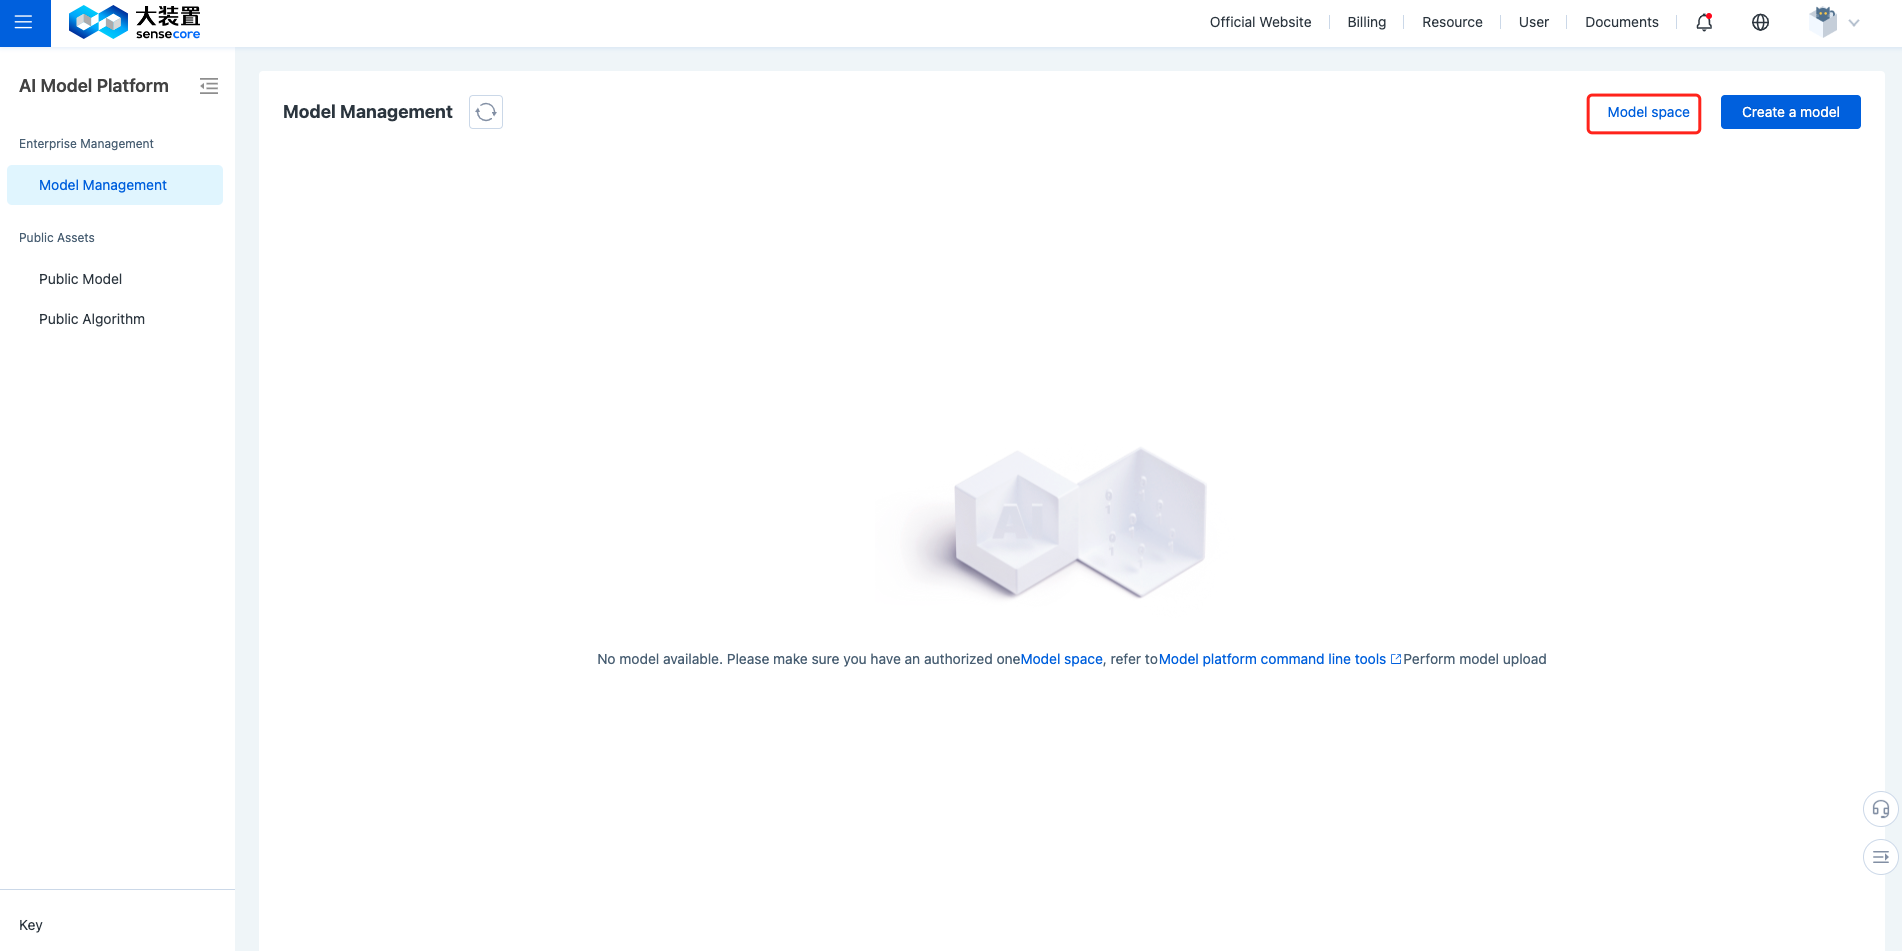
After you have obtained the Creator permission, click [Model Space] in the upper right corner of the Model Management page to enter the Model Space Management page.
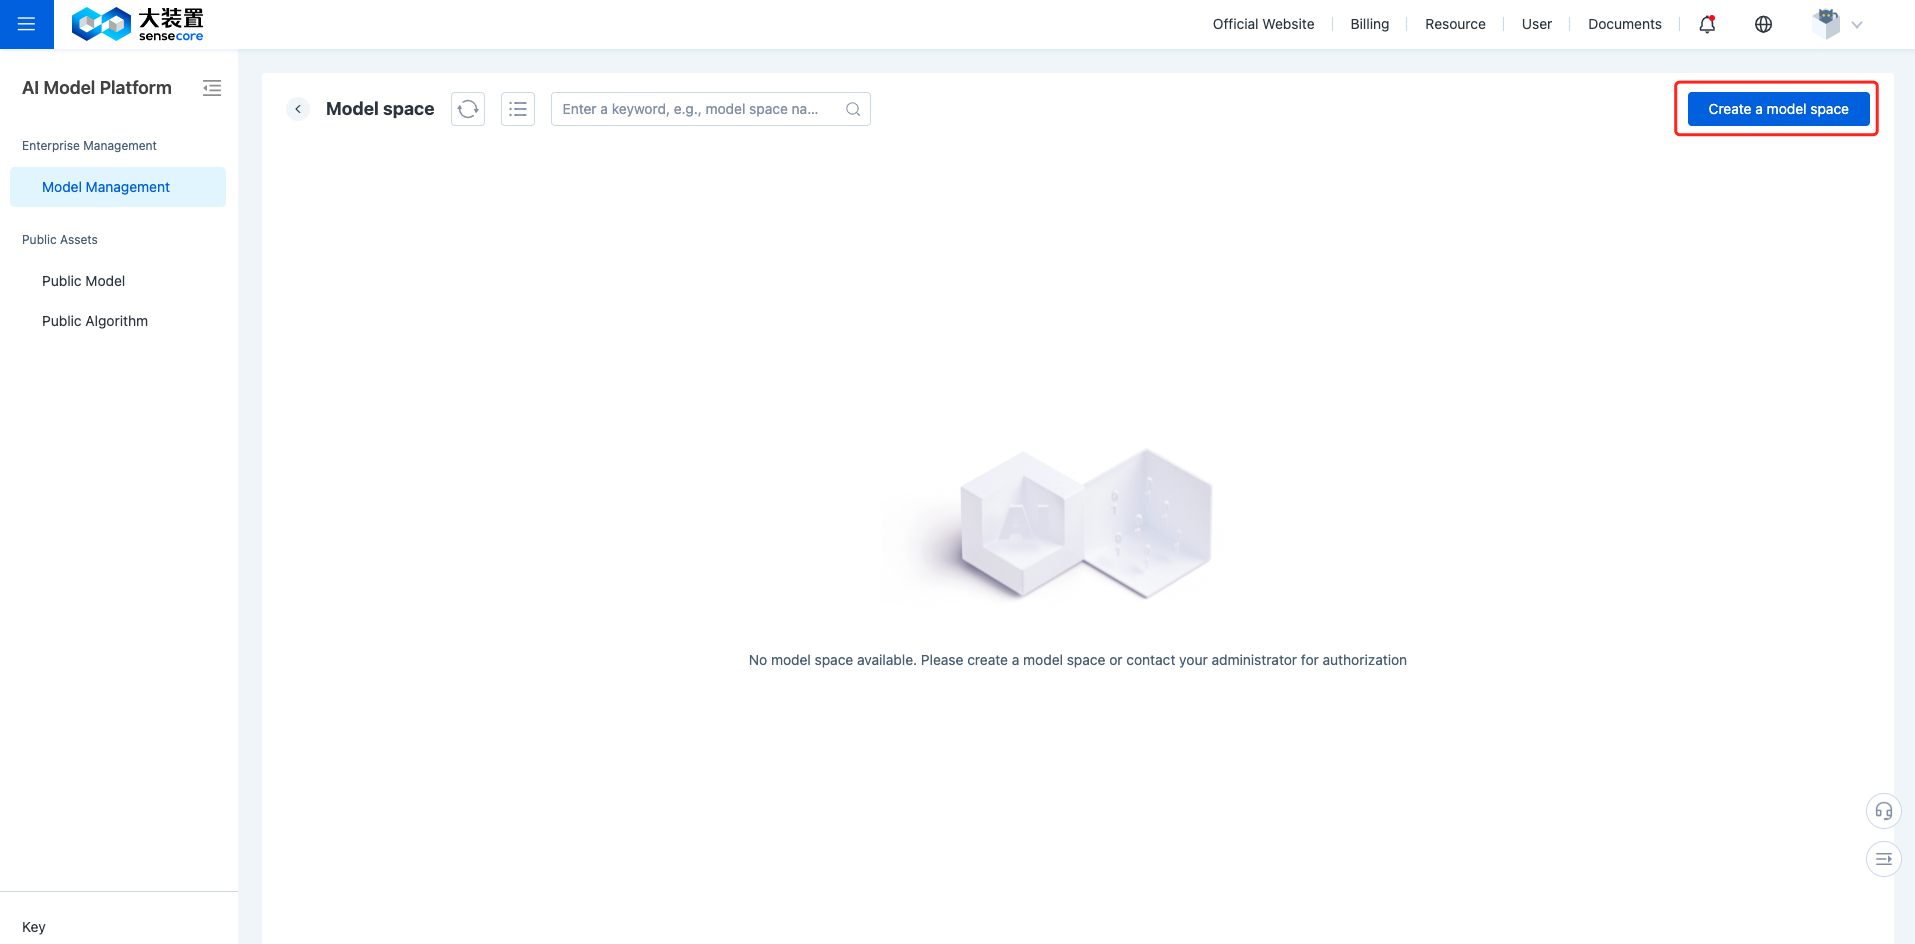
Click [Create Model Space] in the upper right corner of the Model Space Management page to enter the “Order” page.
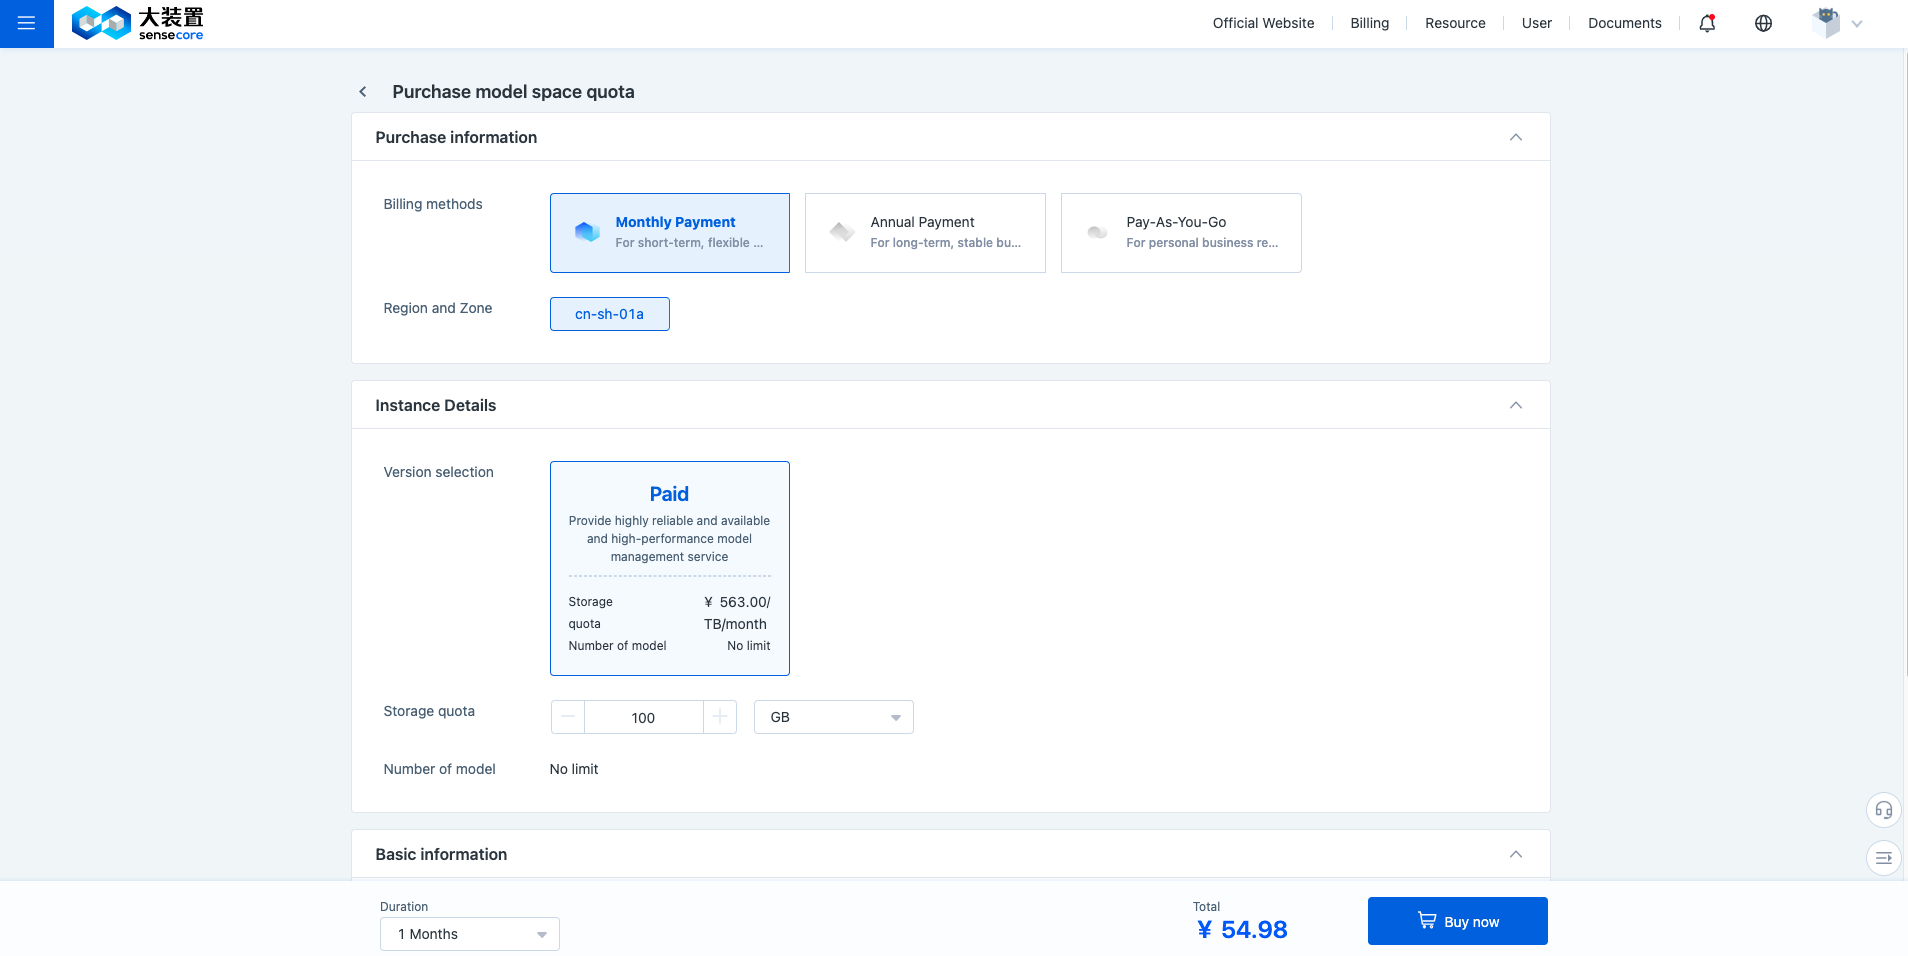
- Billing Mode: The options include "Monthly Subscription", "Yearly Subscription", and "Pay-as-you-go".
- Edition Option: Select "Paid"
- Storage Quota: The minimum purchase unit is 10 GB. You can switch the unit to TB/PB for purchase.
- Basic Information - Model Space Name: Enter the model space name, e.g., “Large-scale Language Model Special Space”
Click [Buy Now] to successfully create the model space and automatically jump to the Model Management page to facilitate direct model creation.
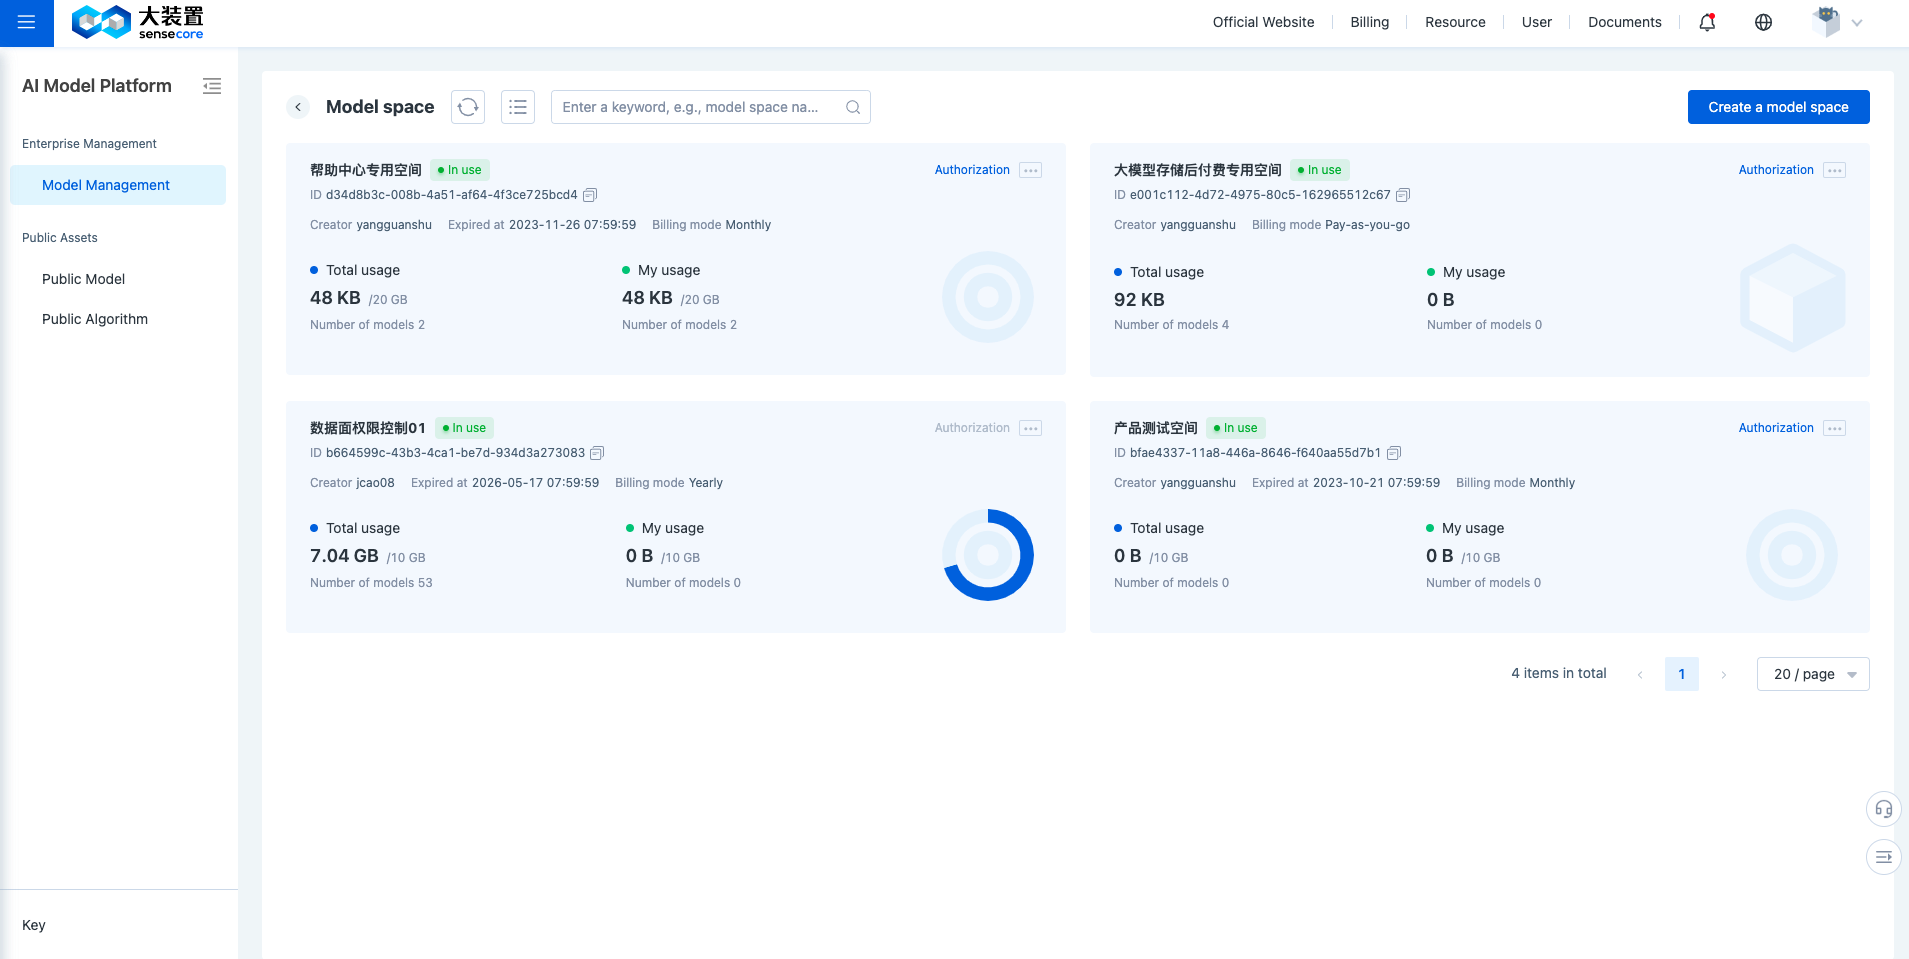
(3) Model space overview
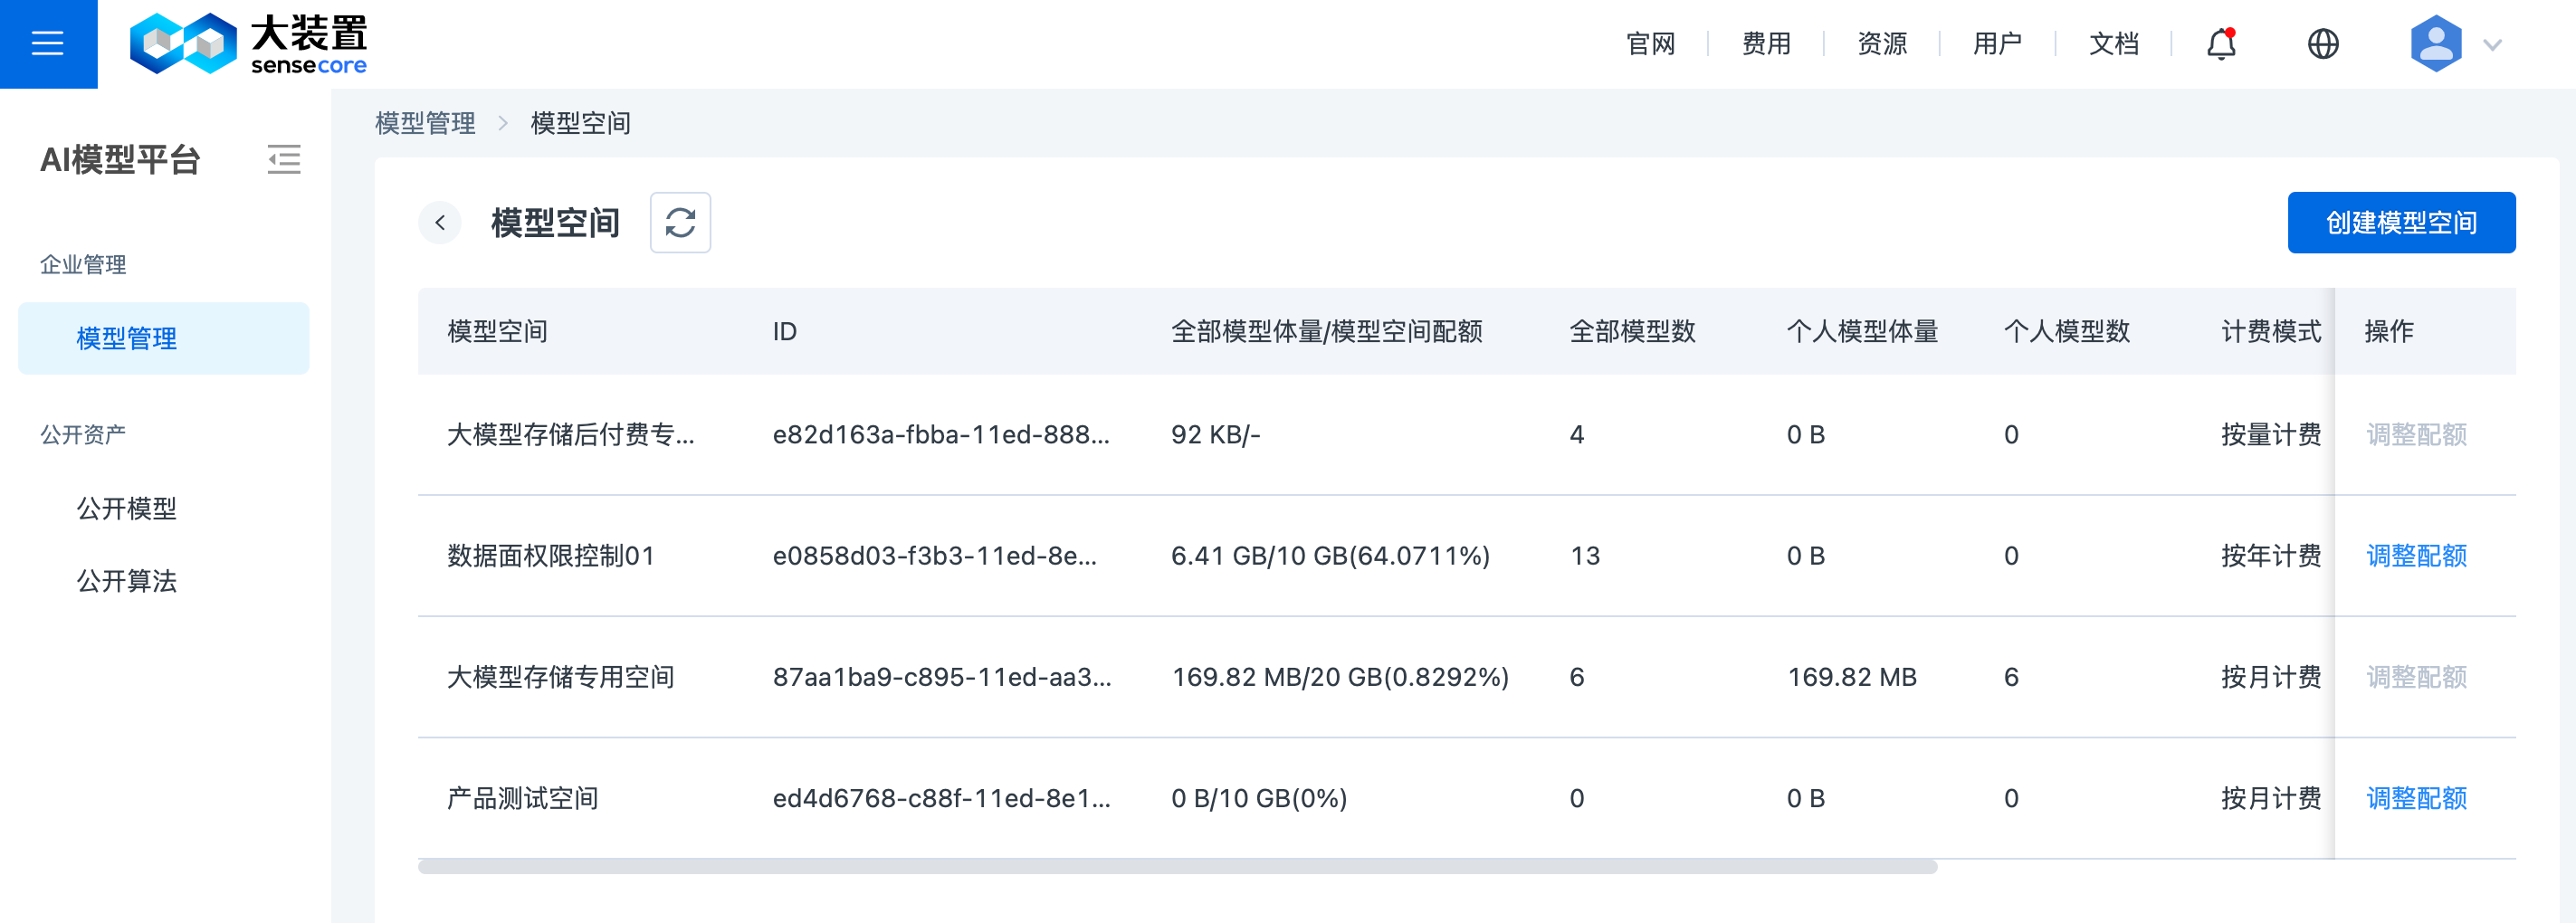
Click [Model Space] in the upper right corner of the Model Management page to enter the Model Space Management page, which can display the list of model spaces you are authorized to use, Field descriptions are shown below:
- Model Space: Displays the name of the model space specified at the time of creation.
- ID: The system automatically generates an ID to uniquely identify the model space.
- Total model size/model space quota: Displays the total storage size/total space quota used by all users in the current space
- Total number of models: Displays the total number of models created by all users in the current space
- Personal model size: Displays the total storage size used by login users in the current space
- Number of personal models: Displays the total number of models created by login users in the current space
- Billing Mode: Displays the billing mode for the order of the current model space. The options include "Monthly Subscription", "Yearly Subscription", and "Pay-as-you-go".
- Status: Displays the order status of the current model space, that is, "in use"/"grace period"/"retention period".
- Expiration Time: Displays the order expiration time corresponding to the current model space.
- Creator: Displays the name of the space creator.
(4)Model space authorization
When you are the owner/maintainer of a specific model space instance, you can manage the model space.
- Authorize: Authorizes the current model space to other users for use or management. For specific role descriptions. please refer to Permission Settings
- Adjust quota: Modify the capacity of the current model space. This is supported only in pre-payment mode.
- Renewal: Extend the lifetime of the current model space. This is supported only in pre-payment mode.
- Unsubscription: Unsubscribe from and release space resources.
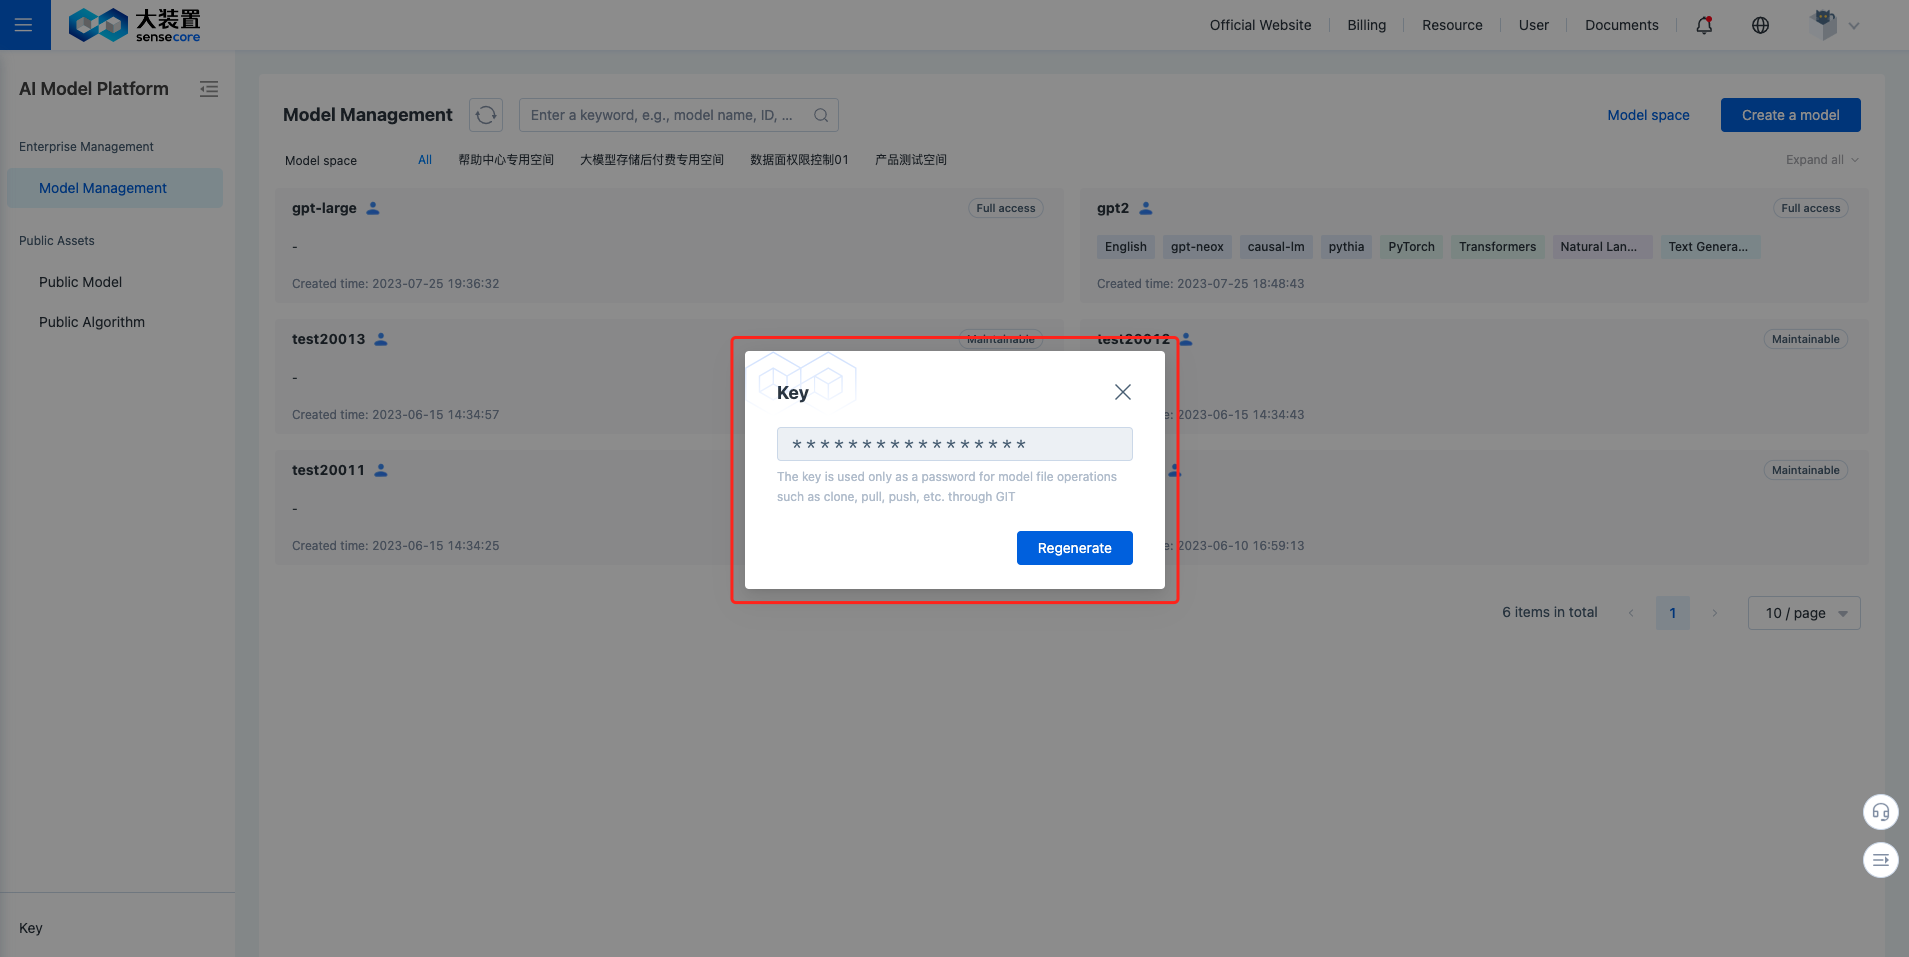
2.Generate Key
The key is the only authentication credential you can use to operate the model file via Git CLI, please store it in a safe location.
Click the [Key] below the left navigation bar. A dialog box will pop up. Click [Generate] to download your key locally, which can be regenerated through the platform once it is leaked or lost, and the old version of the key will expire immediately.
3.Create Model
Model is a repository you can use to store and manage model files after model creation, and possesses a unique remote address.
Click [Create Model] in the upper right corner of the Model Management page to enter the Configuration page.
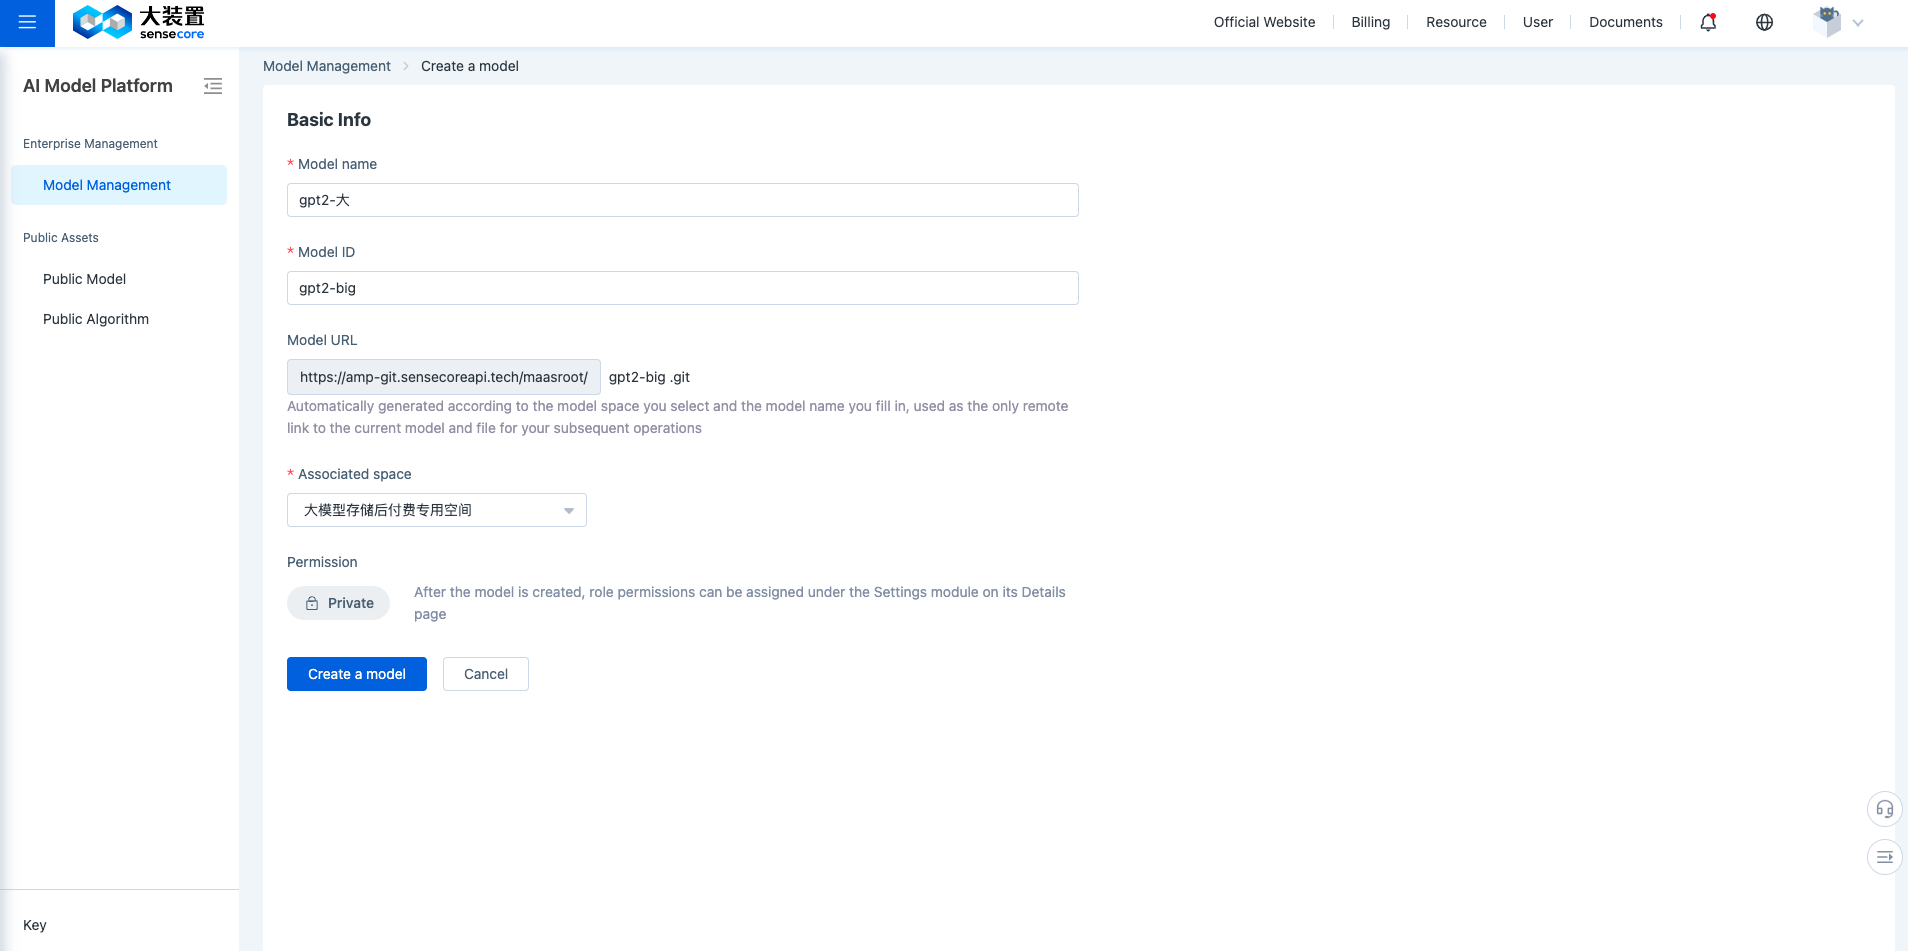
- Model Name: Enter the model name, e.g., "gpt2-大" (Chinese is supported), which is used for model name display, and can be used for name-based model search and retrieval.
- Model ID: Enter the model ID, e.g., "gpt2-big" (Chinese is NOT supported), which is used for model remote address generation and cannot be modified.
- Model: This is the model remote address, which is unique and automatically generated.
- Space: Select the model space where you have permission to store the model from the drop-down list.
- Permission: After a model is created, you can assign permissions to roles in the Settings tab on the Details page.
Click [Create Model] to enter the Model Details page, and the master branch will be created automatically during initialization.
4.Operate Model Files
You can use the native Git CLI command to upload model files and view the uploaded files on the Model Details page.
| Tips:You can click [How to Operate Model] on the Model Details page to check step description. |
(1)git clone
Please ensure that you have Git installed on your computer and prepare any local folder as a save location for the clone model. You can view the model URL on the front end of the model platform, click [Copy]

Please use your familiar command-line terminal to enter
$ git lfs install #install lfs
$ git clone https://amp-git.sensecoreapi.dev/sensetime/gpt2-large.git #Replace with the model URL that you generated when you created the model
Follow the prompts to enter the key generated in Step 3. After a successful clone, you can view the initialized file lists in the local folder.
| Notes: Large File Storge (LFS) is an open-source Git large file version control solution and tool set and can be used to manage large files. |
(2)git push
Add the model files to be uploaded in the local folder
$ git add . #Add all files in the current directory to the staging area
$ git commit -m "first commit" #Commit the contents in the staging area to the repository
$ git push origin master #Upload to the remote site for merging
After uploading, click [Refresh] to refresh the file lists on the web to view the model files.
(3)git pull
$ git pull origin master #Pull codes from the remote site and merge them locally
5.Model Details
Model is a repository you can use to store and manage model files after model creation, and possesses a unique remote address.
(1) Model overview
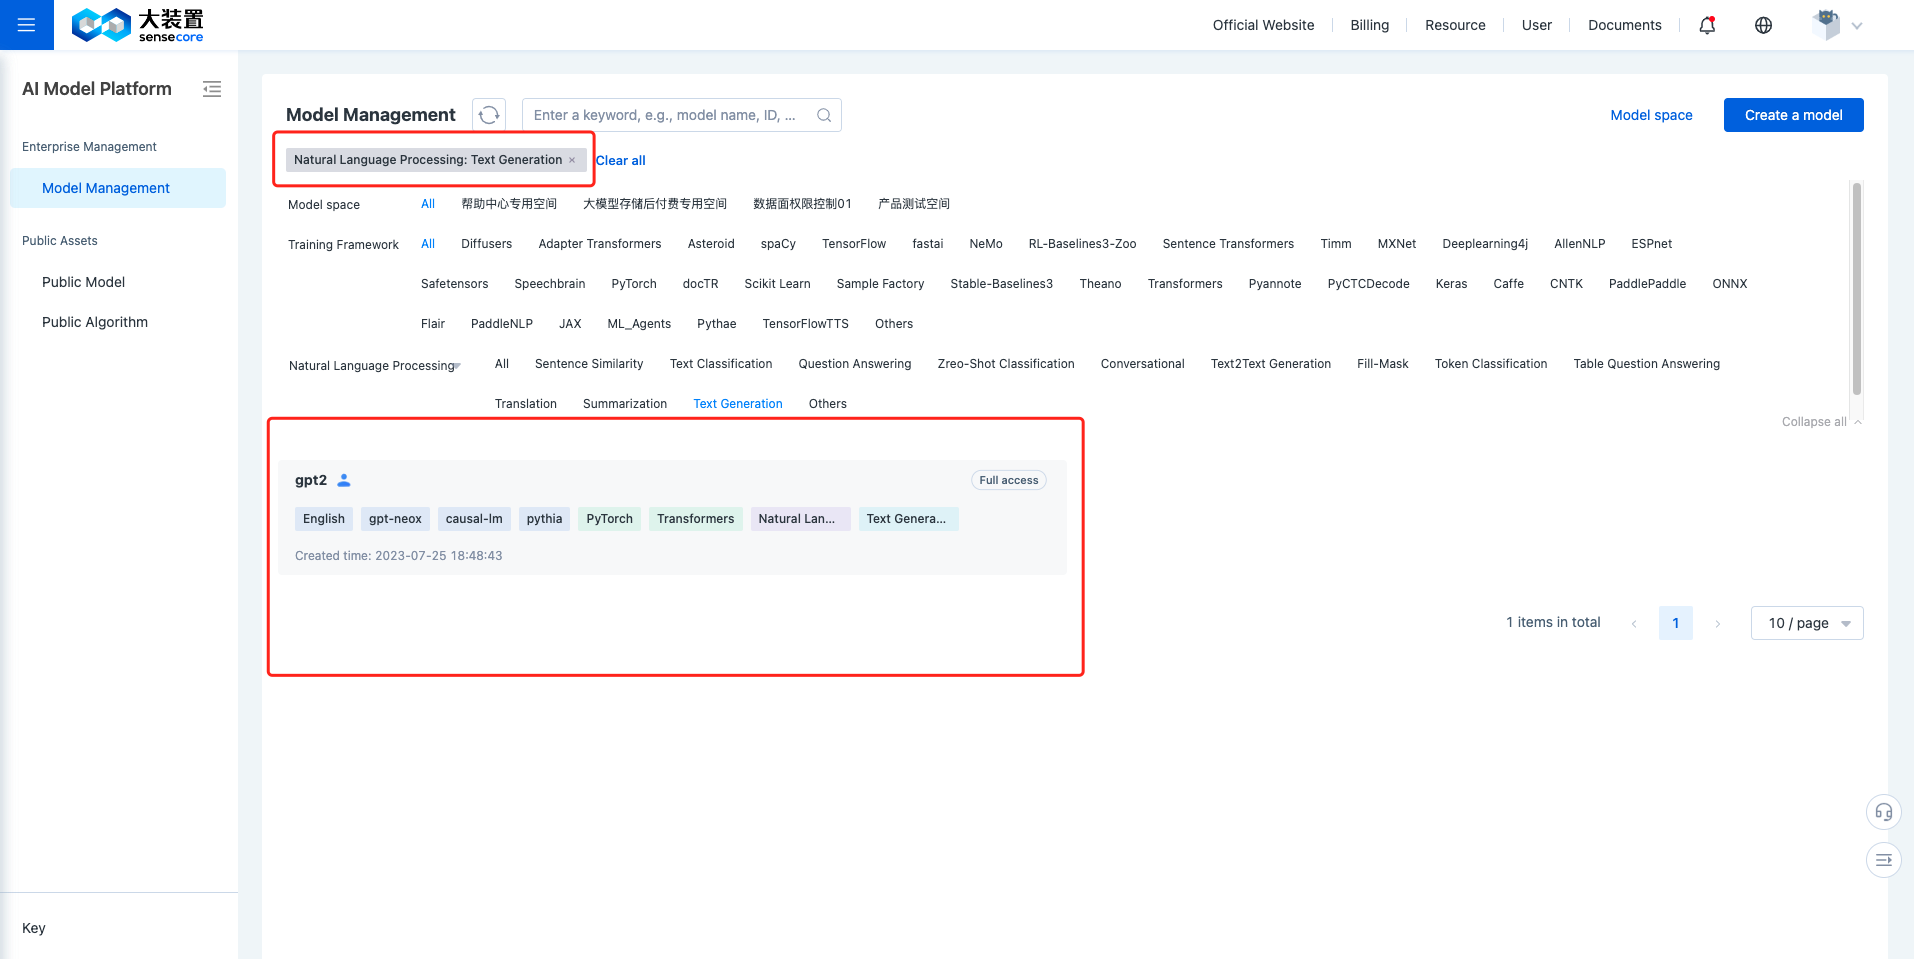
The Model Management page supports the display of models of which the users have permissions, displaying them in the form of cards. The Field descriptions displayed in the form of cards are shown below:
- Model Name: The model name you enter when creating the model.
- Username: The name of the user who creates the model.
- Performance Information: The model performance information parsed from the model’s master/README.md. If a dataset link is specified, you can directly click the dataset name to jump to the dataset for viewing. For specifications, please refer to Model Description File.
- Tag Information: The tag information parsed from the model’s master/README.md. For specifications, please refer to Model Description File.
- Permission Information: The permission of login user to operate the model.
The platform supports model filtering, you can click [Expand All] to filter the models from the dimensions of model space, training framework, and task type.
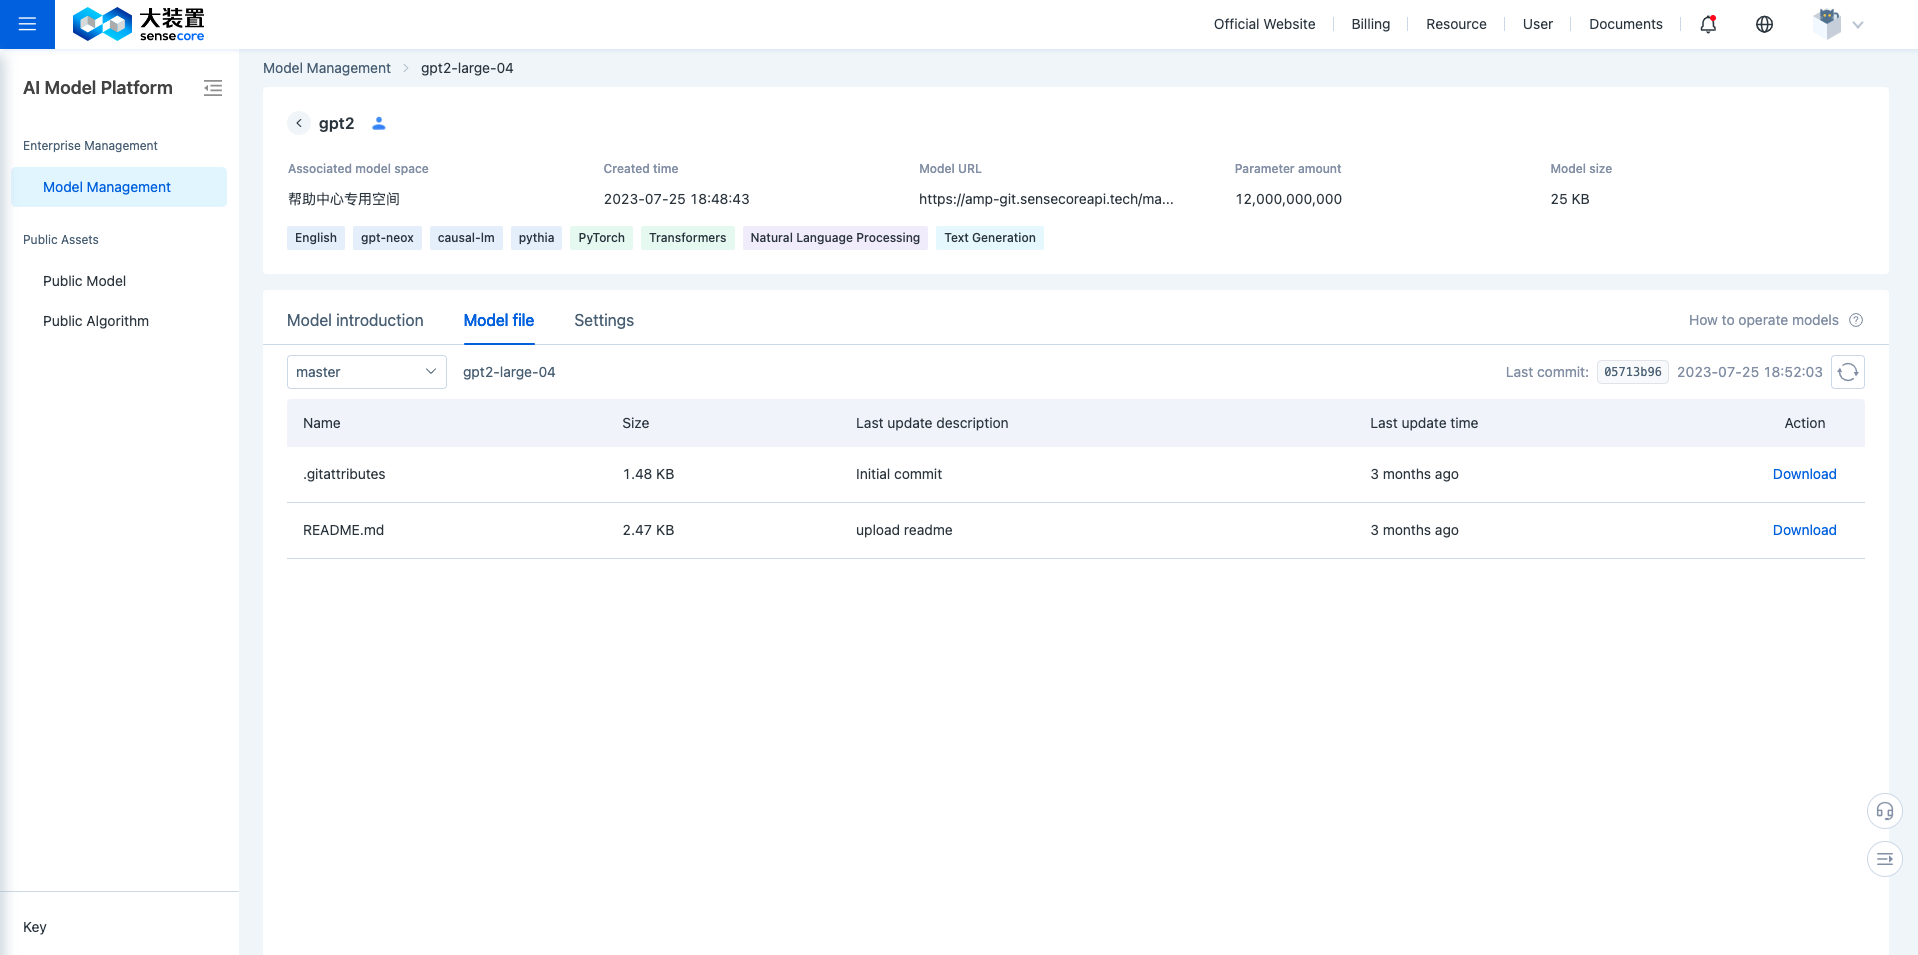
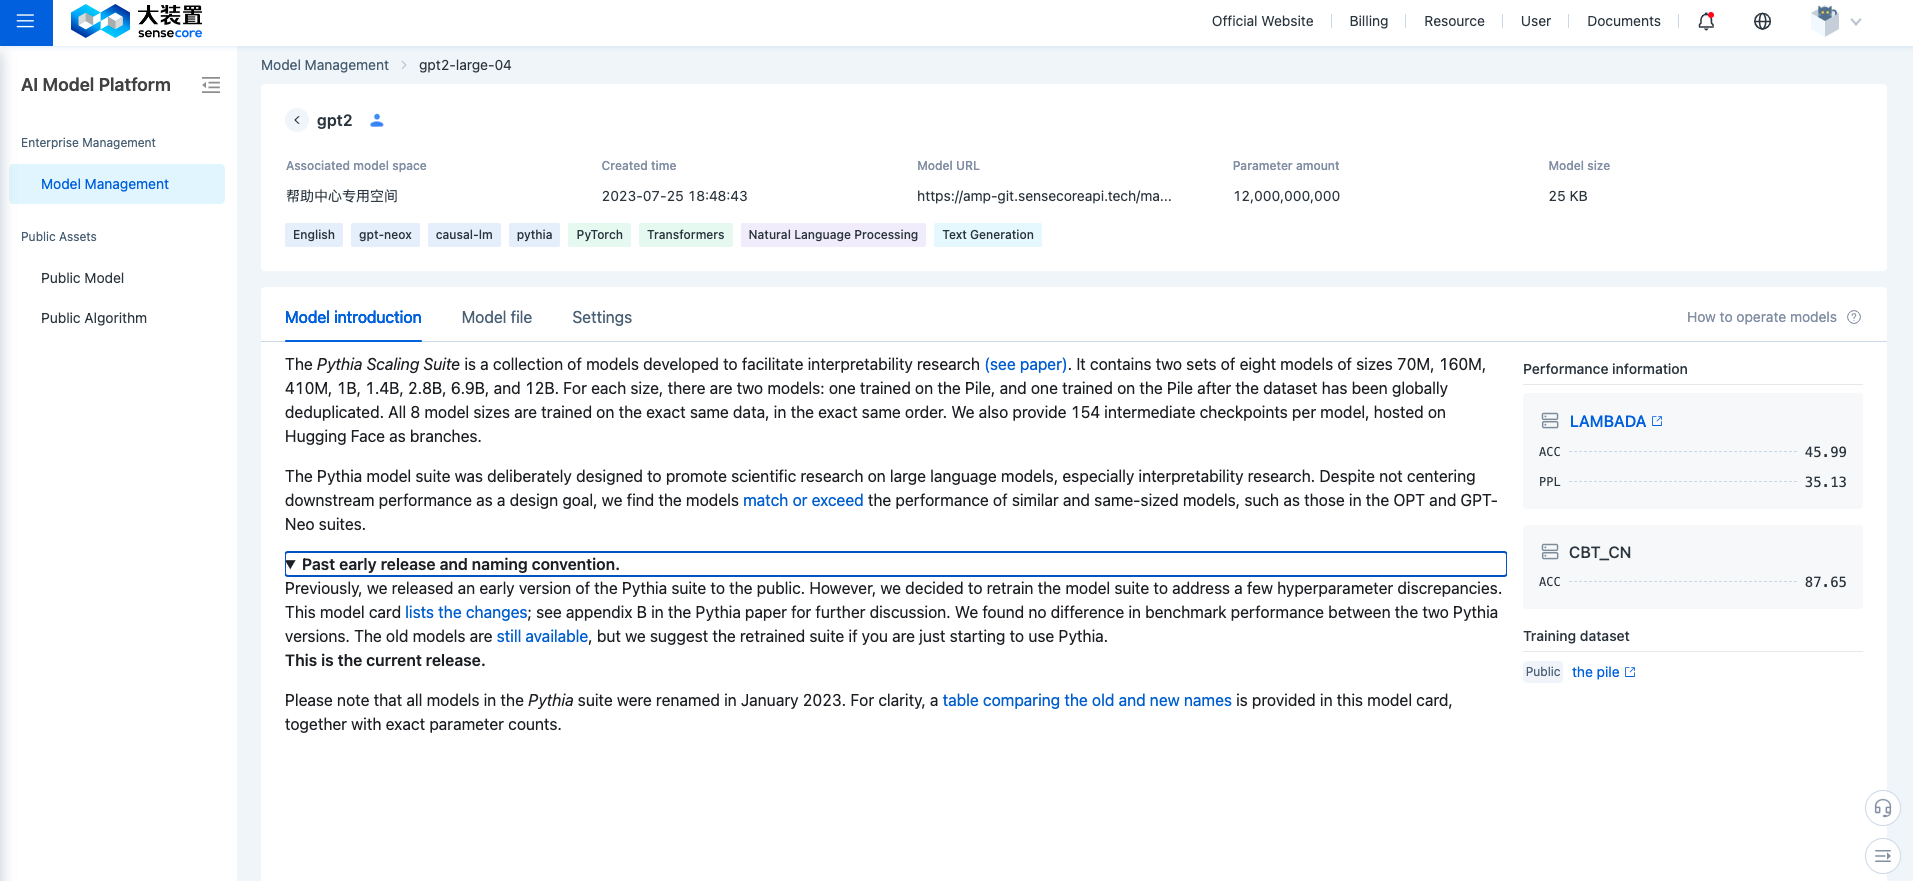
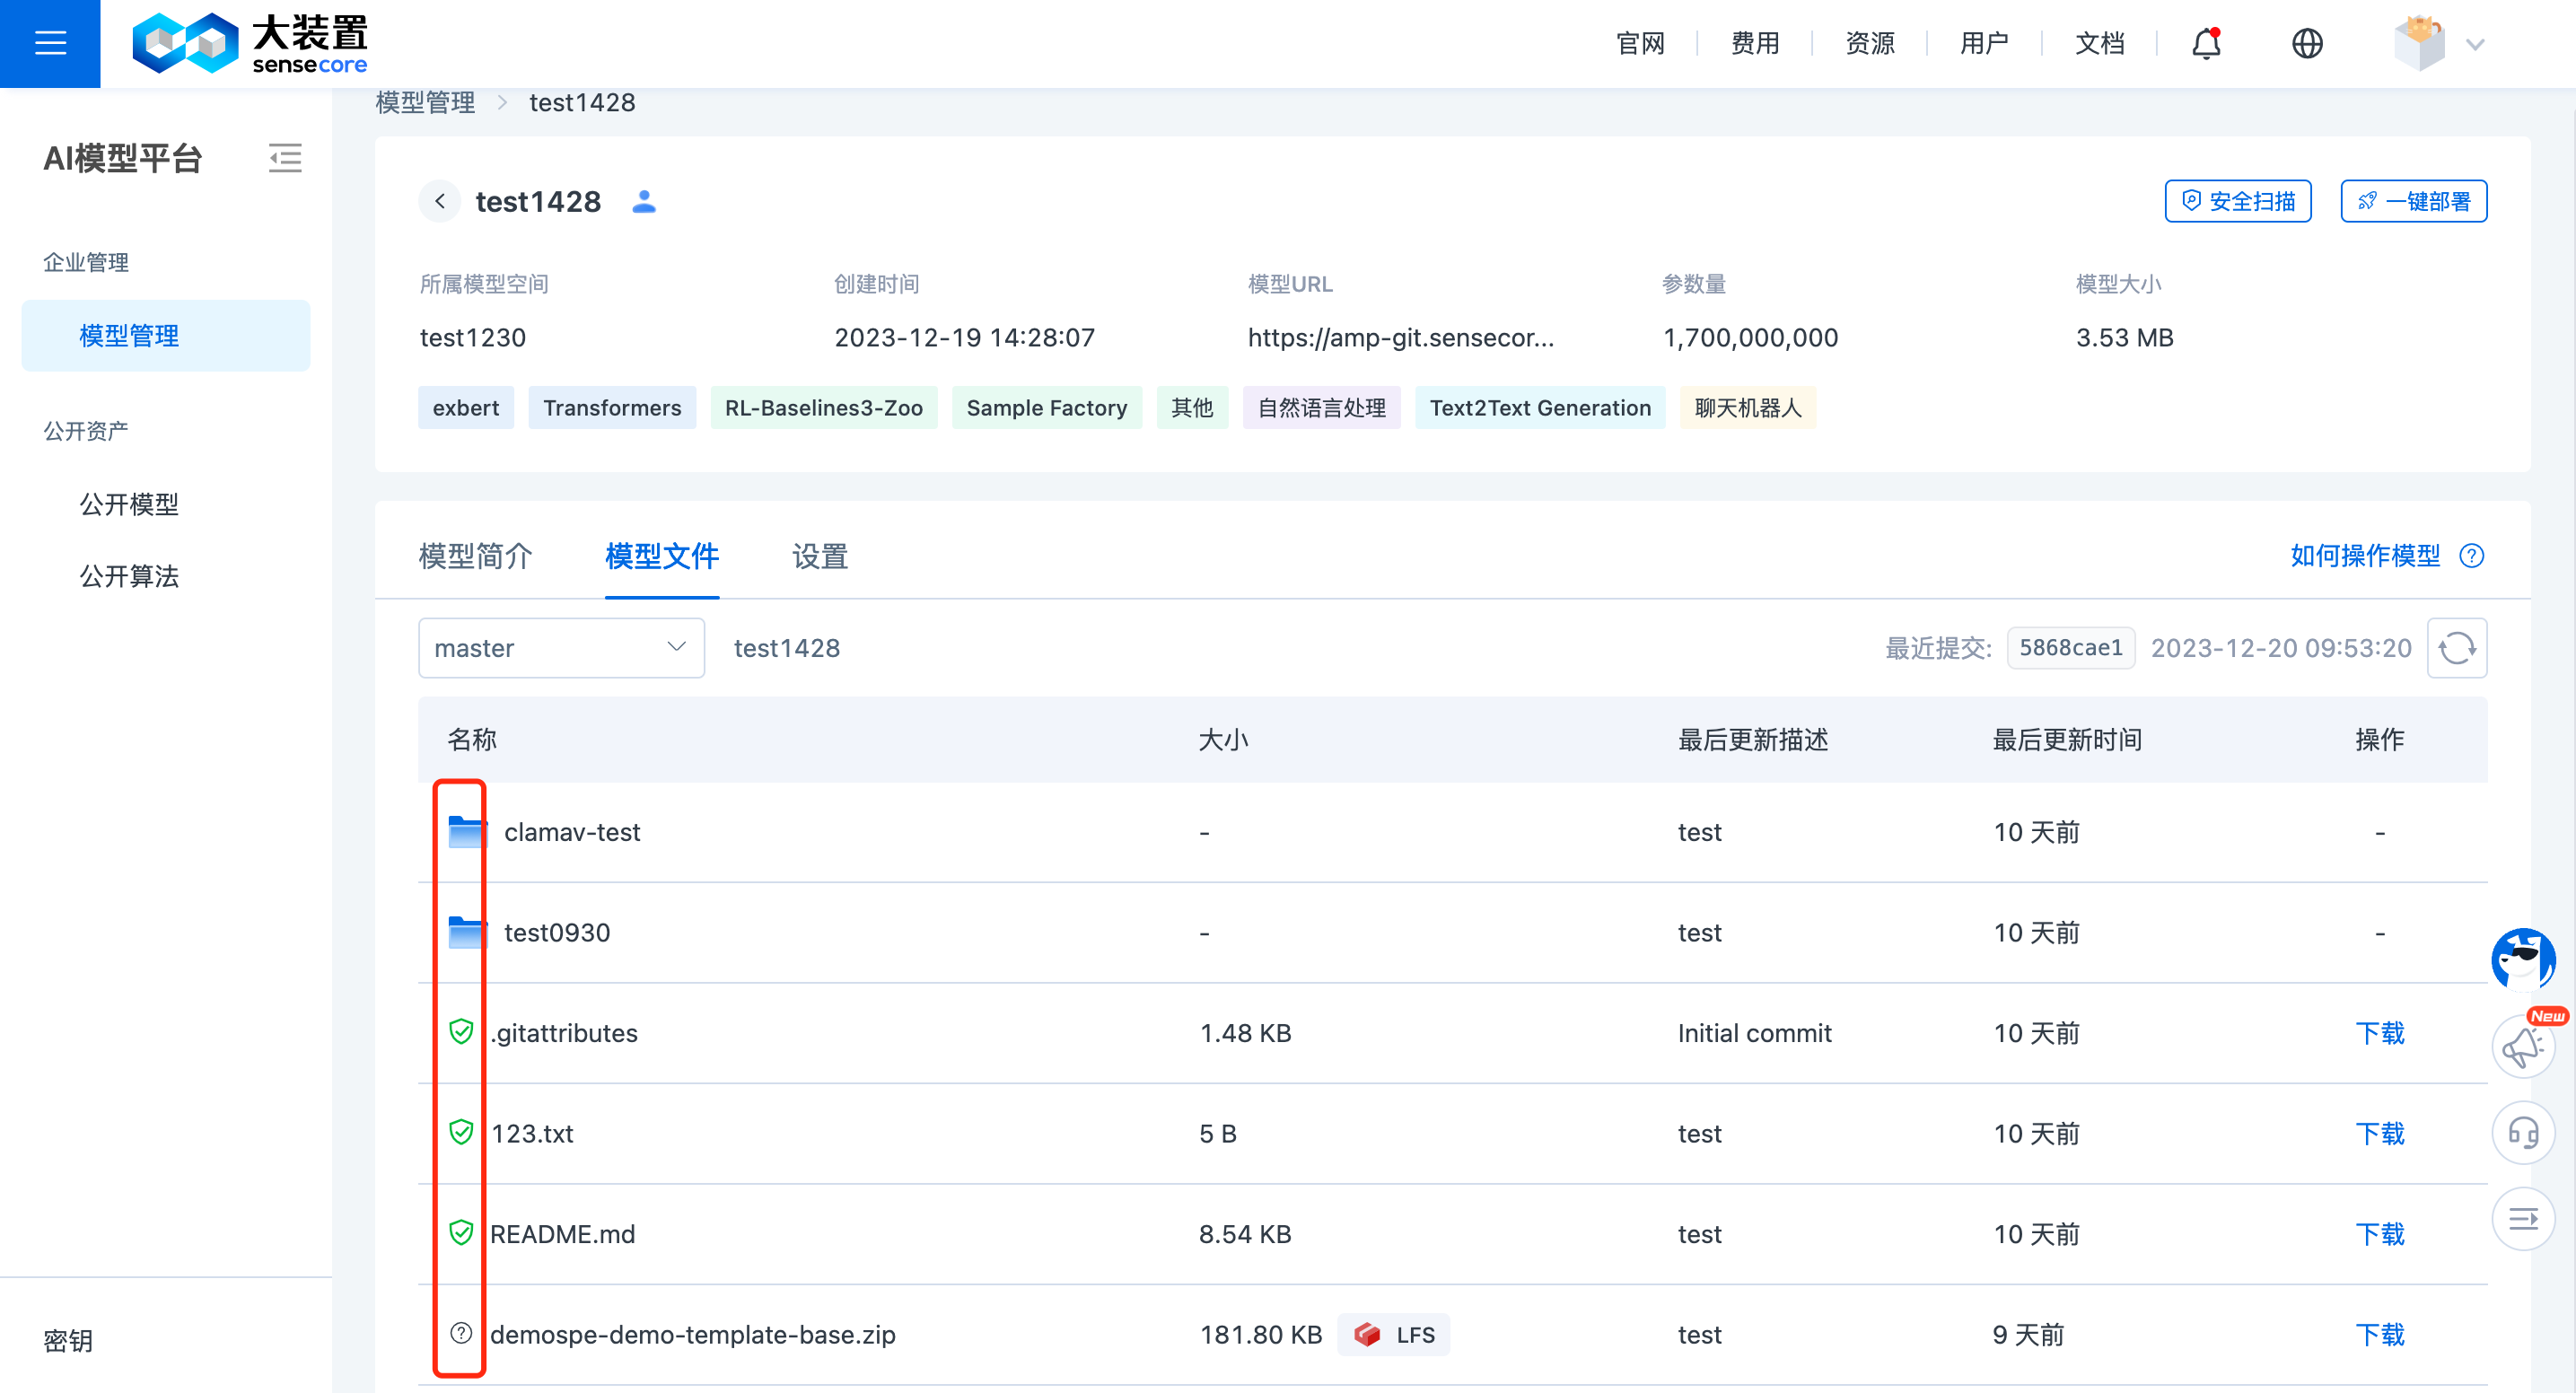
(2)Model Details
Click the card to enter the Model Details page, you can view three sections: Basic Model Information, Model Introduction, and Model Files.
- Basic Model Information: Displays the model space, creation time, model URL, and number of parameters.
- Model Introduction: Displays the model description section of master/README.md on the left, and displays the model performance section of master/README.md on the right.
- Model Files: You can switch between branches/versions to view the corresponding model file lists, where online code viewing is supported.
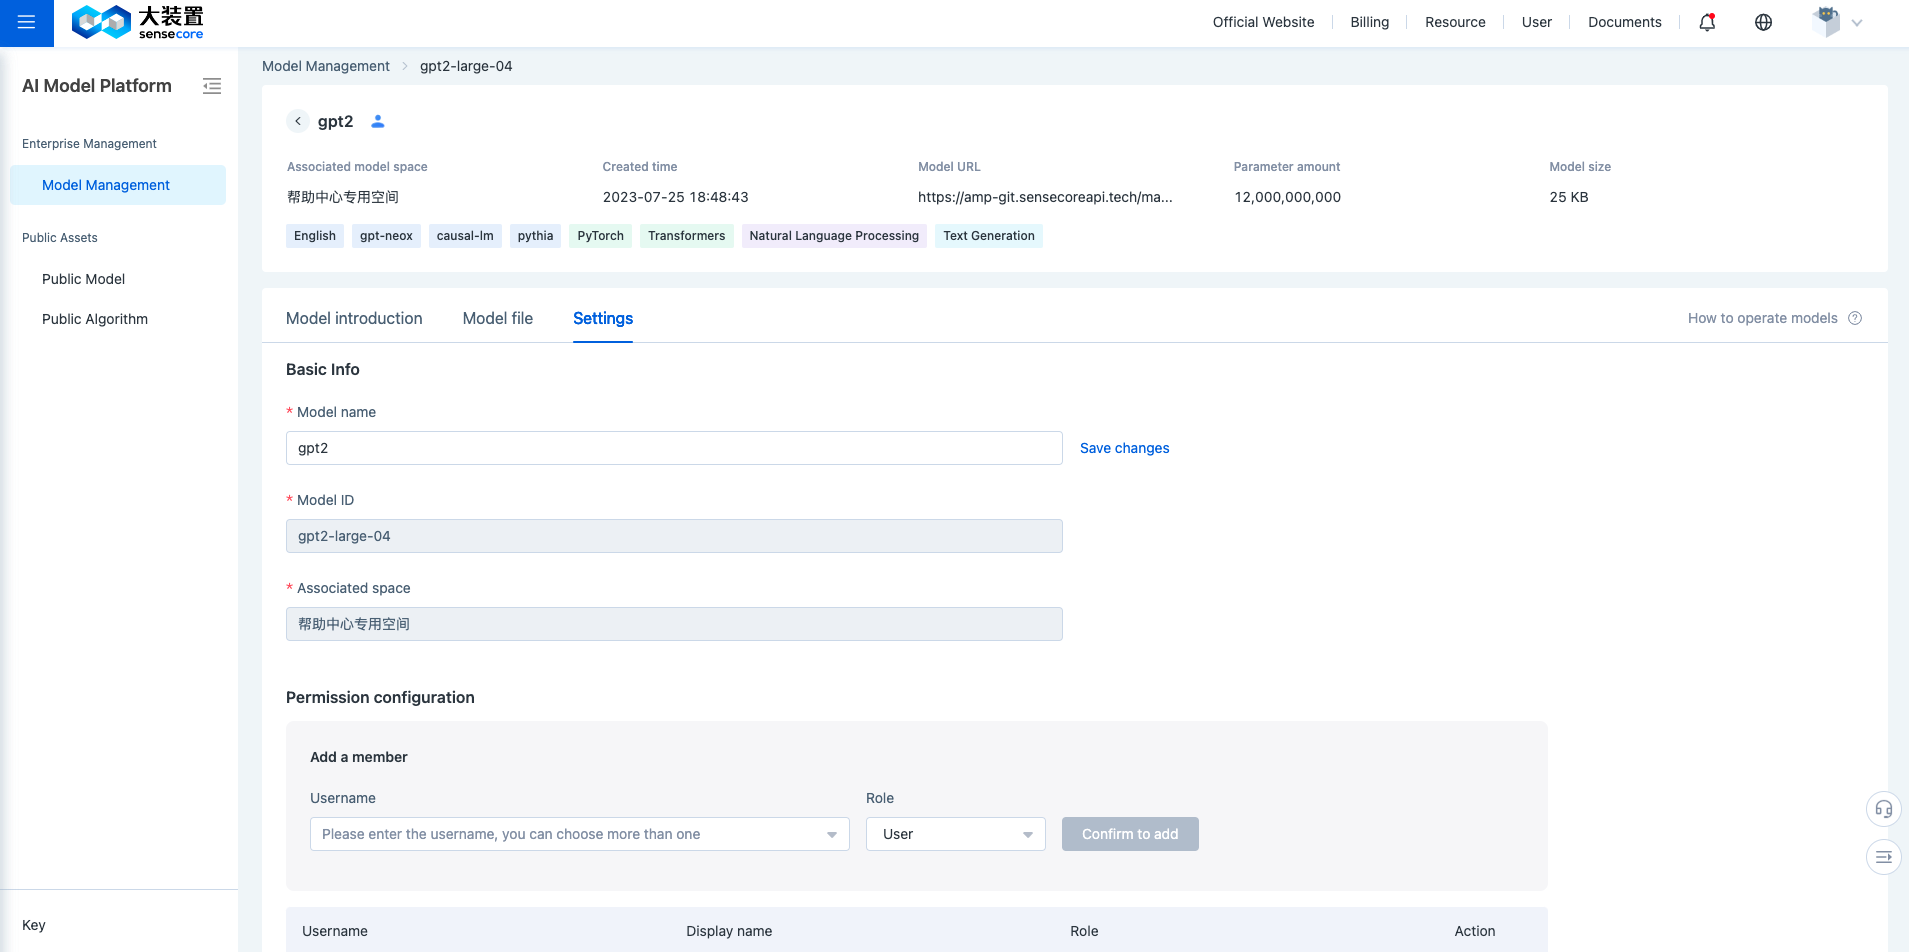
(3) Model Settings
Settings: You can modify model names, delete models, and configure model permissions. For detailed role descriptions, please refer to Model Role Introduction
| Tips: The owner and maintainer of a model space have full access to the models in the space by default, without the need of separate configuration. |
(4) Model Description File
The file is used to define the description information of the model. For special fields, the front end of the platform can automatically render the style and support special interactions such as retrieval and jumping.
The platform automatically parses specific fields from the master/README.md file of the model and displays the fields, and the retained fields and format templates supported by the platform are referred to as follows:
---
Training framework: #Filter
  - PyTorch
  - Transformers
Job type:
  Type: Natural language processing #Filter
  Algorithm: Text Generation  #Filter
  Industry: Intelligent assistant
Other tag:  #Search
  - exbert
  - en
Number of parameters: 1700000000
Open-source protocol: mit #Search
Performance information:
  - Dataset:
      Name: LAMBADA #Search
      Permission: Public
      Link:
    Performance metric:
      PPL: 35.13
      ACC: 45.99
  - Dataset:
      Name: CBT_CN
      Permission: Public
      Link:
    Performance metric:
      ACC: 87.65
Training data:
  - Dataset:
      Name: WebText #Search
      Permission: Public
      Link: https://github.com/openai/gpt-2/blob/master/domains.txt  #Jump
---
Other model descriptions...
Training framework: Supported configurations: PyTorch, TensorFlow, Keras, Caffe, Theano, CNTK, MXNet, PaddlePaddle, Deeplearning4j, ONNX, JAX, Transformers, Diffusers, Adapter Transformers, AllenNLP, Asteroid, docTR, ESPnet, fast.ai, Flair, ML-Agents, NeMo, PaddleNLP, PyAnnote, PyCTCDecode, Pythae, RL-Baselines3-Zoo, Sample Factory, Sentence Transformers, spaCy, Scikit Learn, SpeechBrain, Stable-Baselines3, TensorFlowTTS, Timm, and others
Task type: Only select and fill in the scope supported by the platform
| Type | Algorithm |
|---|---|
| Multimodal | Feature Extraction, Text-to-Image, Image-to-Text, Visual Question Answering, Document Question Answering, Graph Machine Learning, others |
| Computer Vision | Depth Estimation,Image Classification, Object Detection, Image Segmentation, Image-to-Image, Unconditional Image Generation, Video Classification, Zero-Shot Image Classification, others |
| Natural Language Processing | Text Classification, Token Classification,Table Question Answering, Question Answering, Zreo-Shot Classification, Translation, Summarization, Conversational, Text Generation, Text2Text Generation, Fill-Mask, Sentence Similarity, others |
| Audio | Text-to-Speech, Automatic Speech Recognition,Audio-to-Audio, Audio Classification, Voice Activity Detection, others |
| Table | Tabular Classification, Tabular Regression, others |
| Reinforcement Learning | Reinforcement Learning, Robotics, others |
| Tips:"---" is an important basis for the platform parsing the model description information: 1. It should be noted that no other characters can exist in the line of "---". 2. Only a space character can be present before the first "---". |
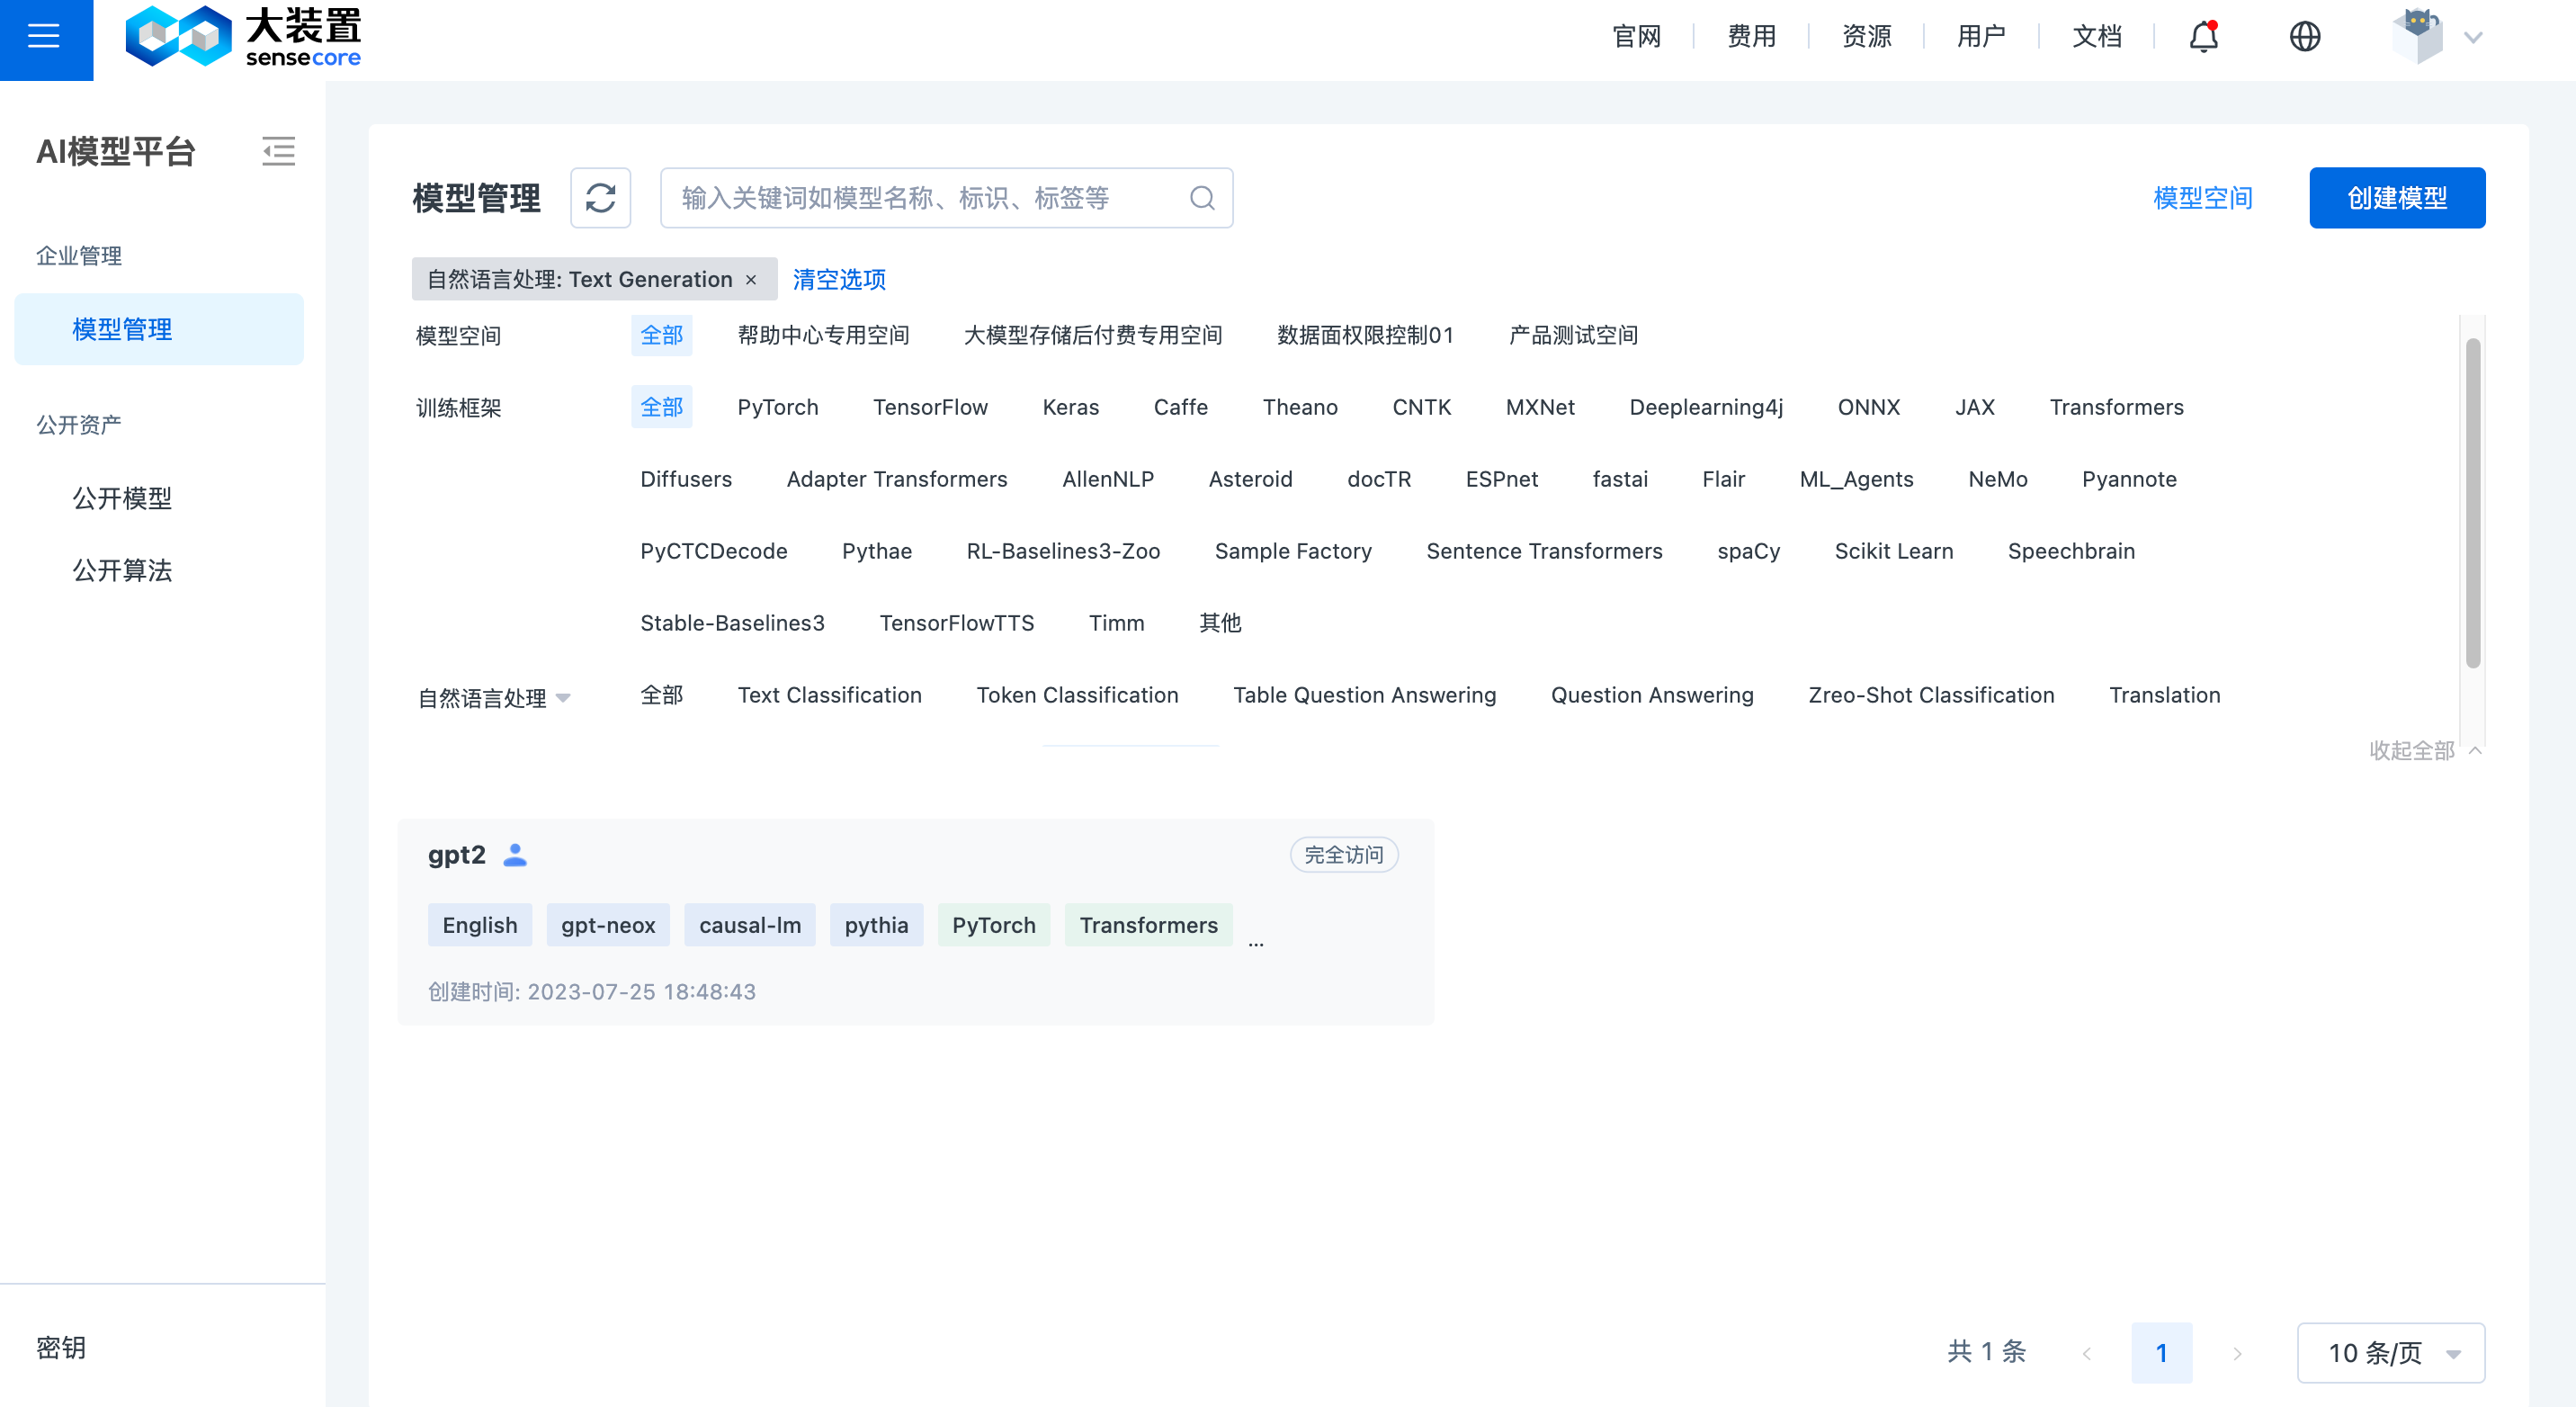
After parsing the retained fields according to the schema and filtering out the model, the rendering obtained is shown below:
6.Security Scanning Tools
The platform provides security scanning tools to identify common code vulnerabilities, key disclosure risks, etc. to ensure model security
(1) Model security scanning
Click the [Security Scanning] button in the upper right corner of the model Details page and select the branch/commit you want to scan.
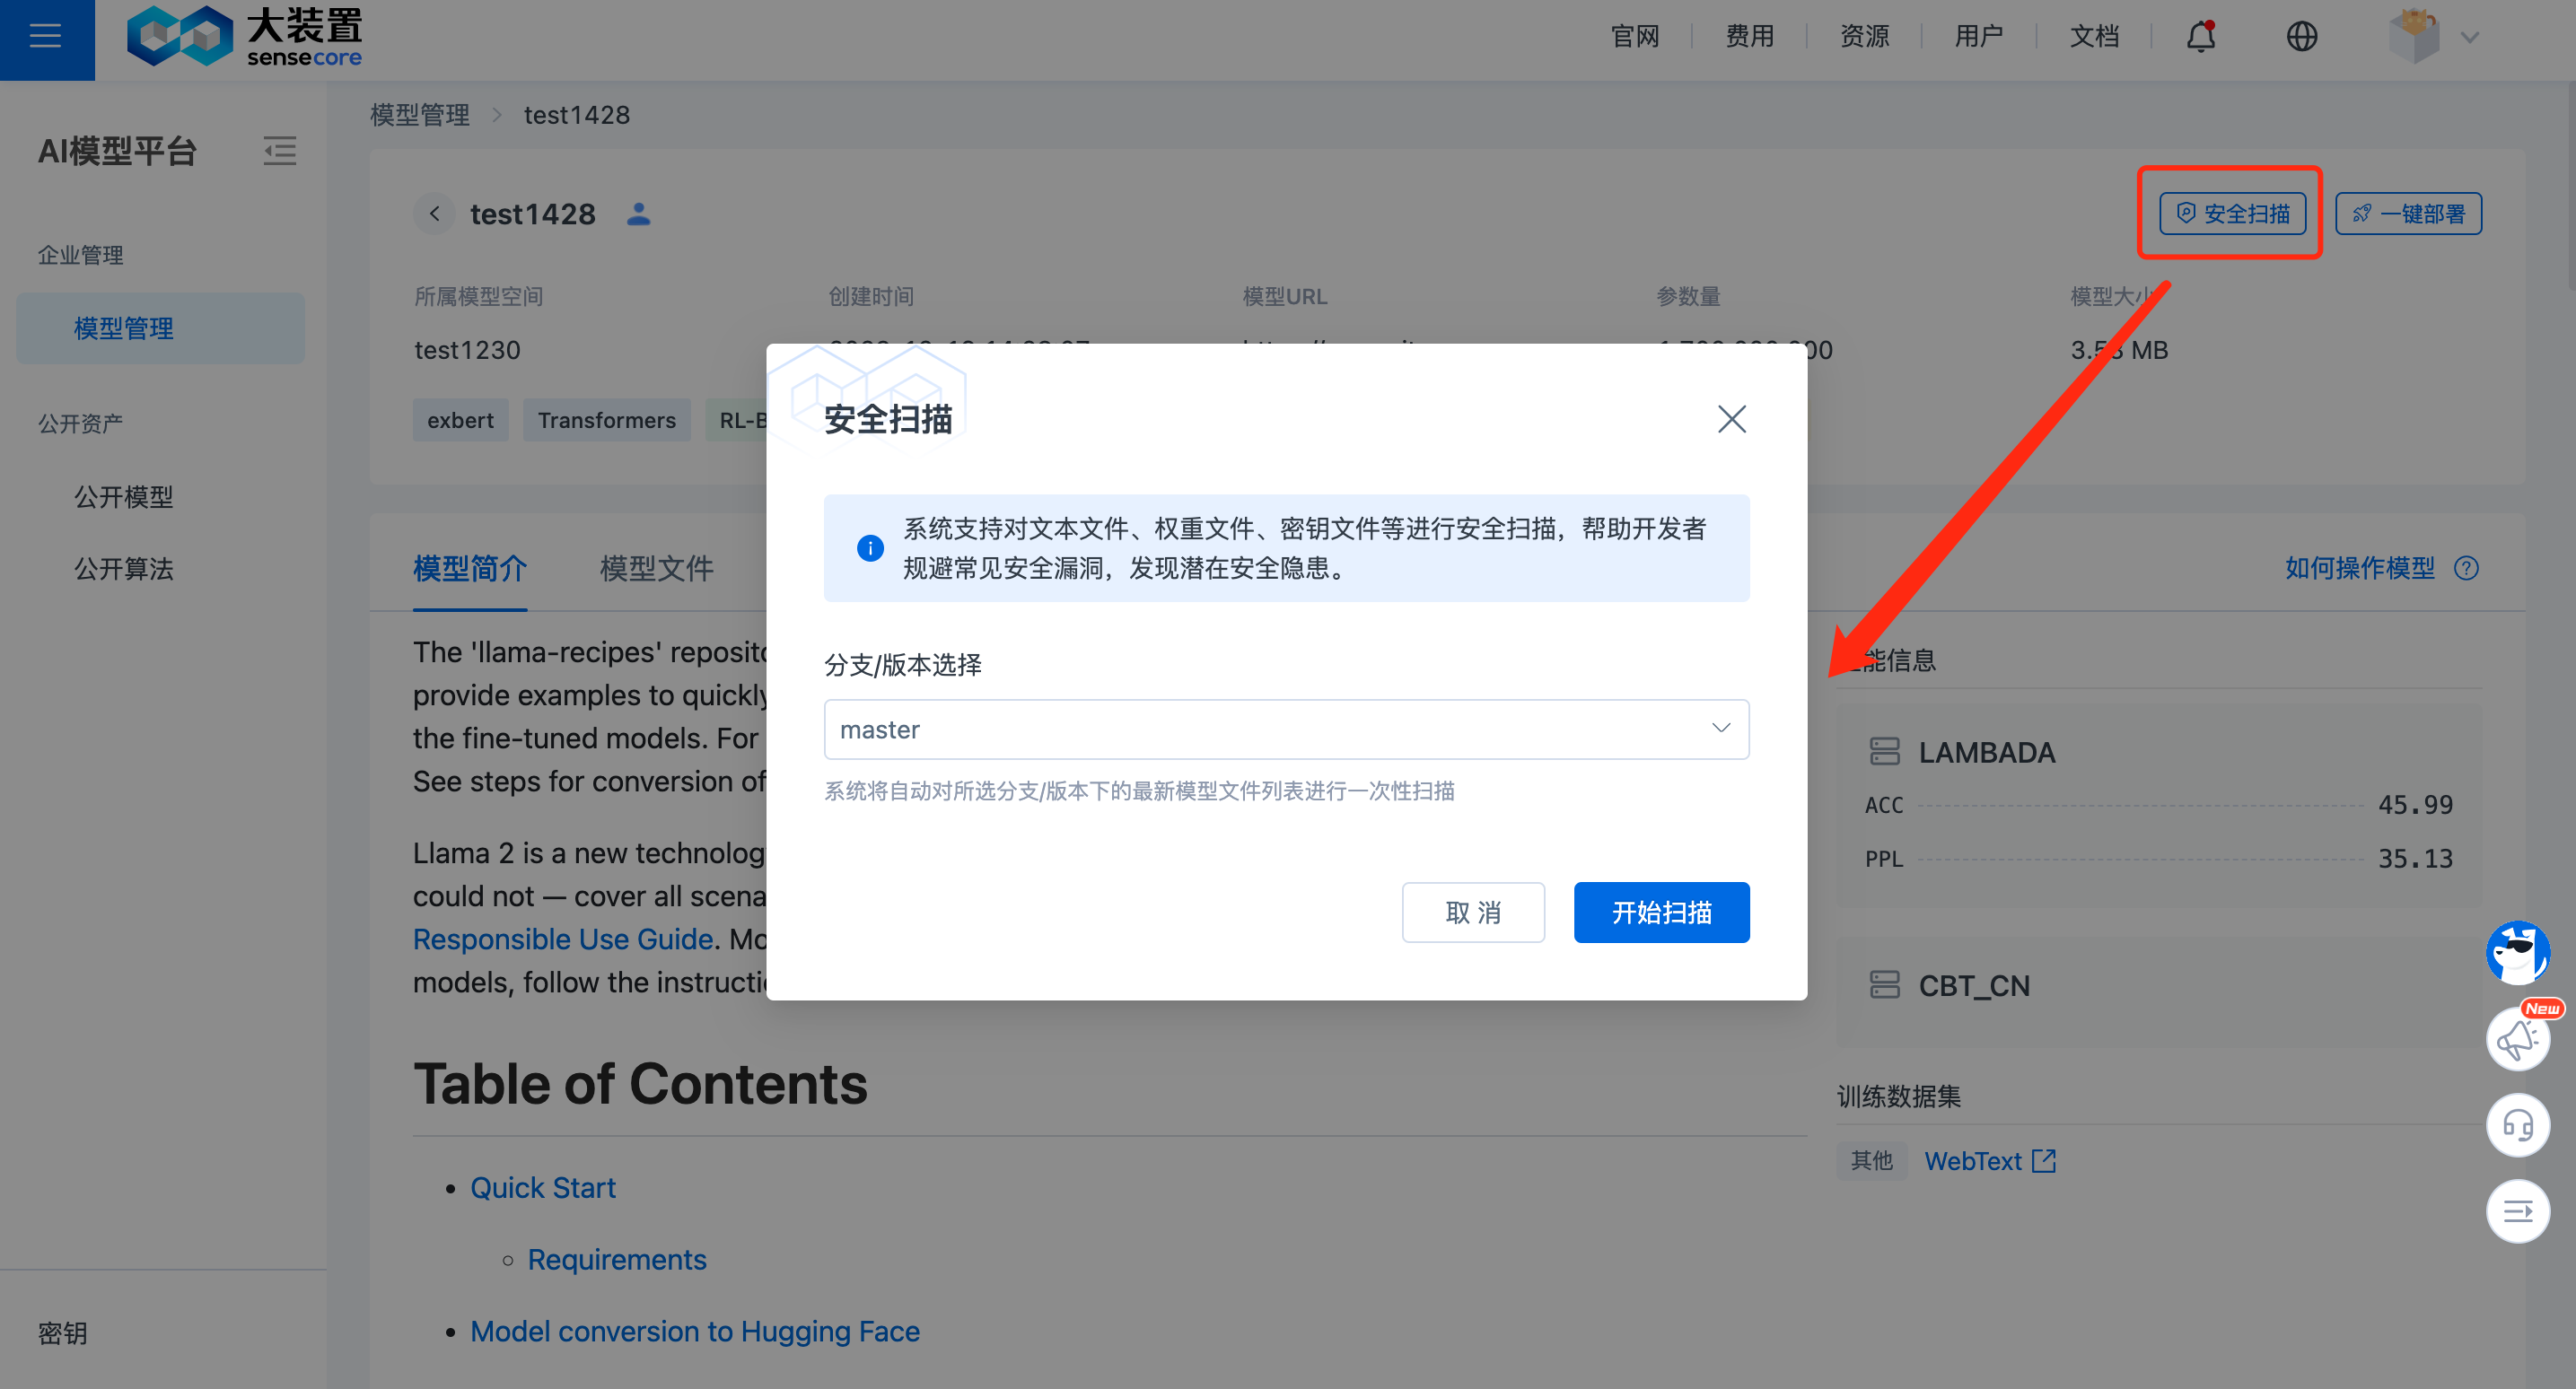
Click [Start Scanning] to start the scanning task and view the scanning results on the model File List page.
When the security scan is complete, you can view the scan results on the model file list page.
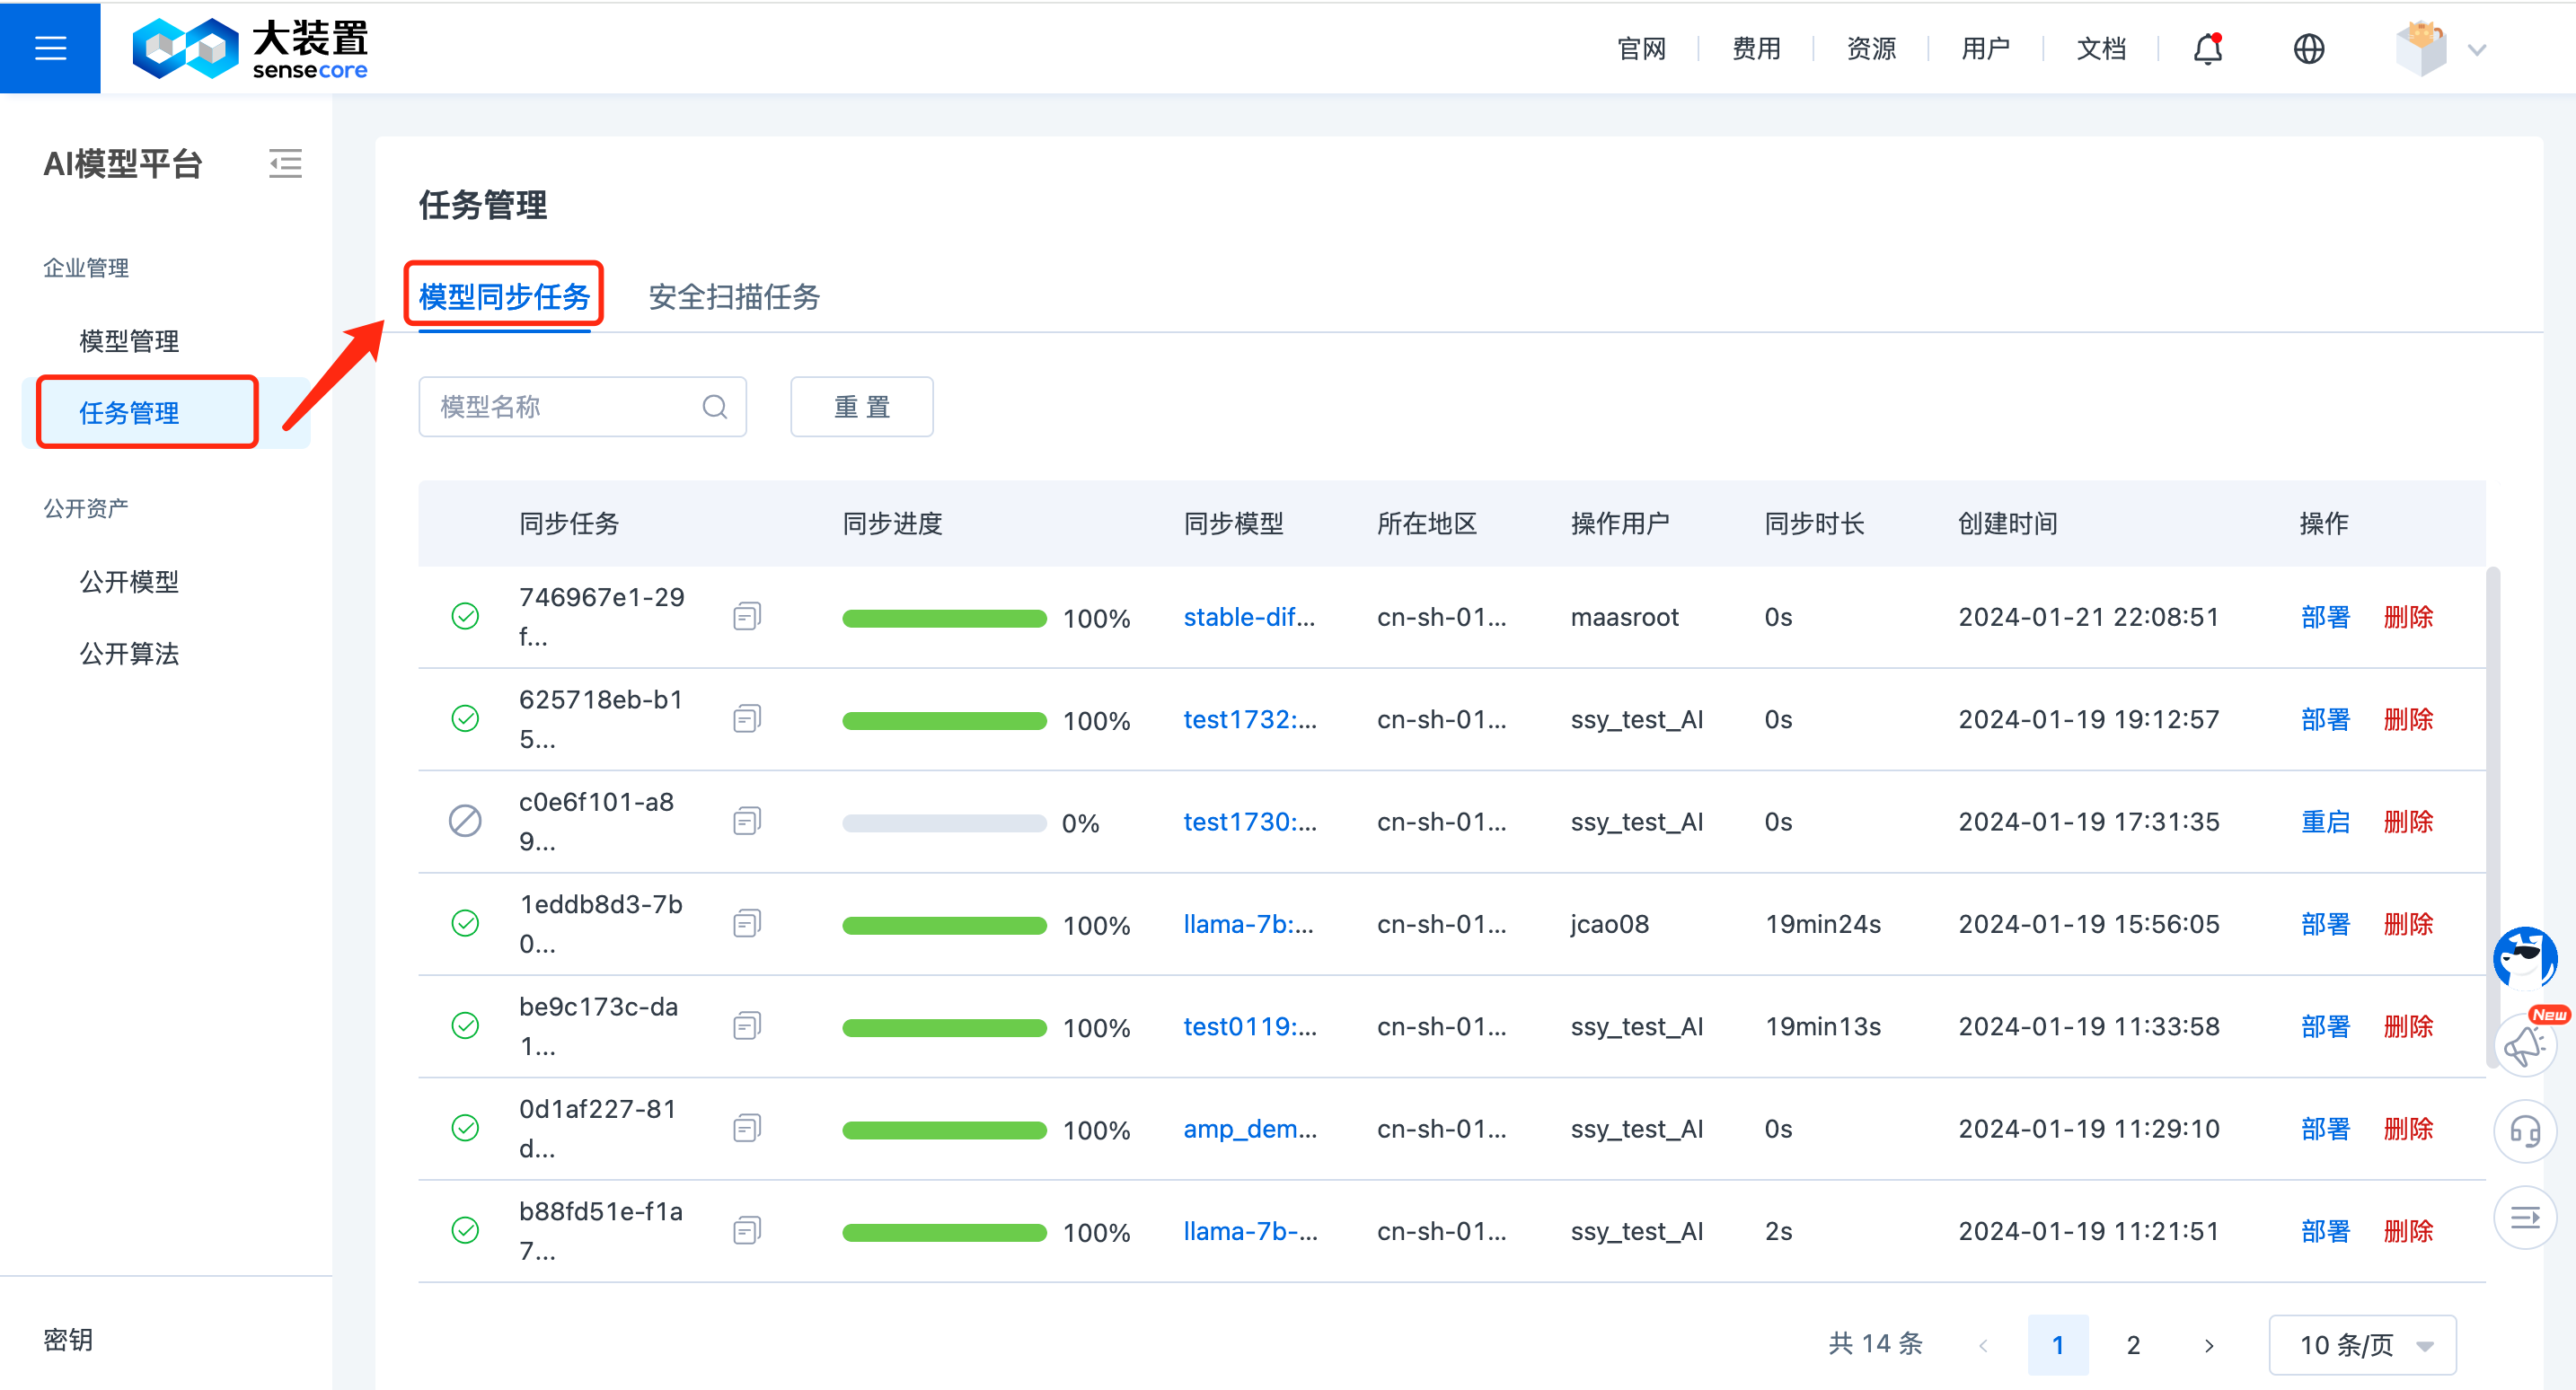
7.Model Synchronization Tool
The system supports synchronizing user models to other regions/availability zones, reducing model download speeds for subsequent use through other sub-products (such as AI Inference Services).
On the model details page, click the Model Sync button in the upper right corner. Select the destination availability zone for the model space and specify the synchronization branch/version/commitID.
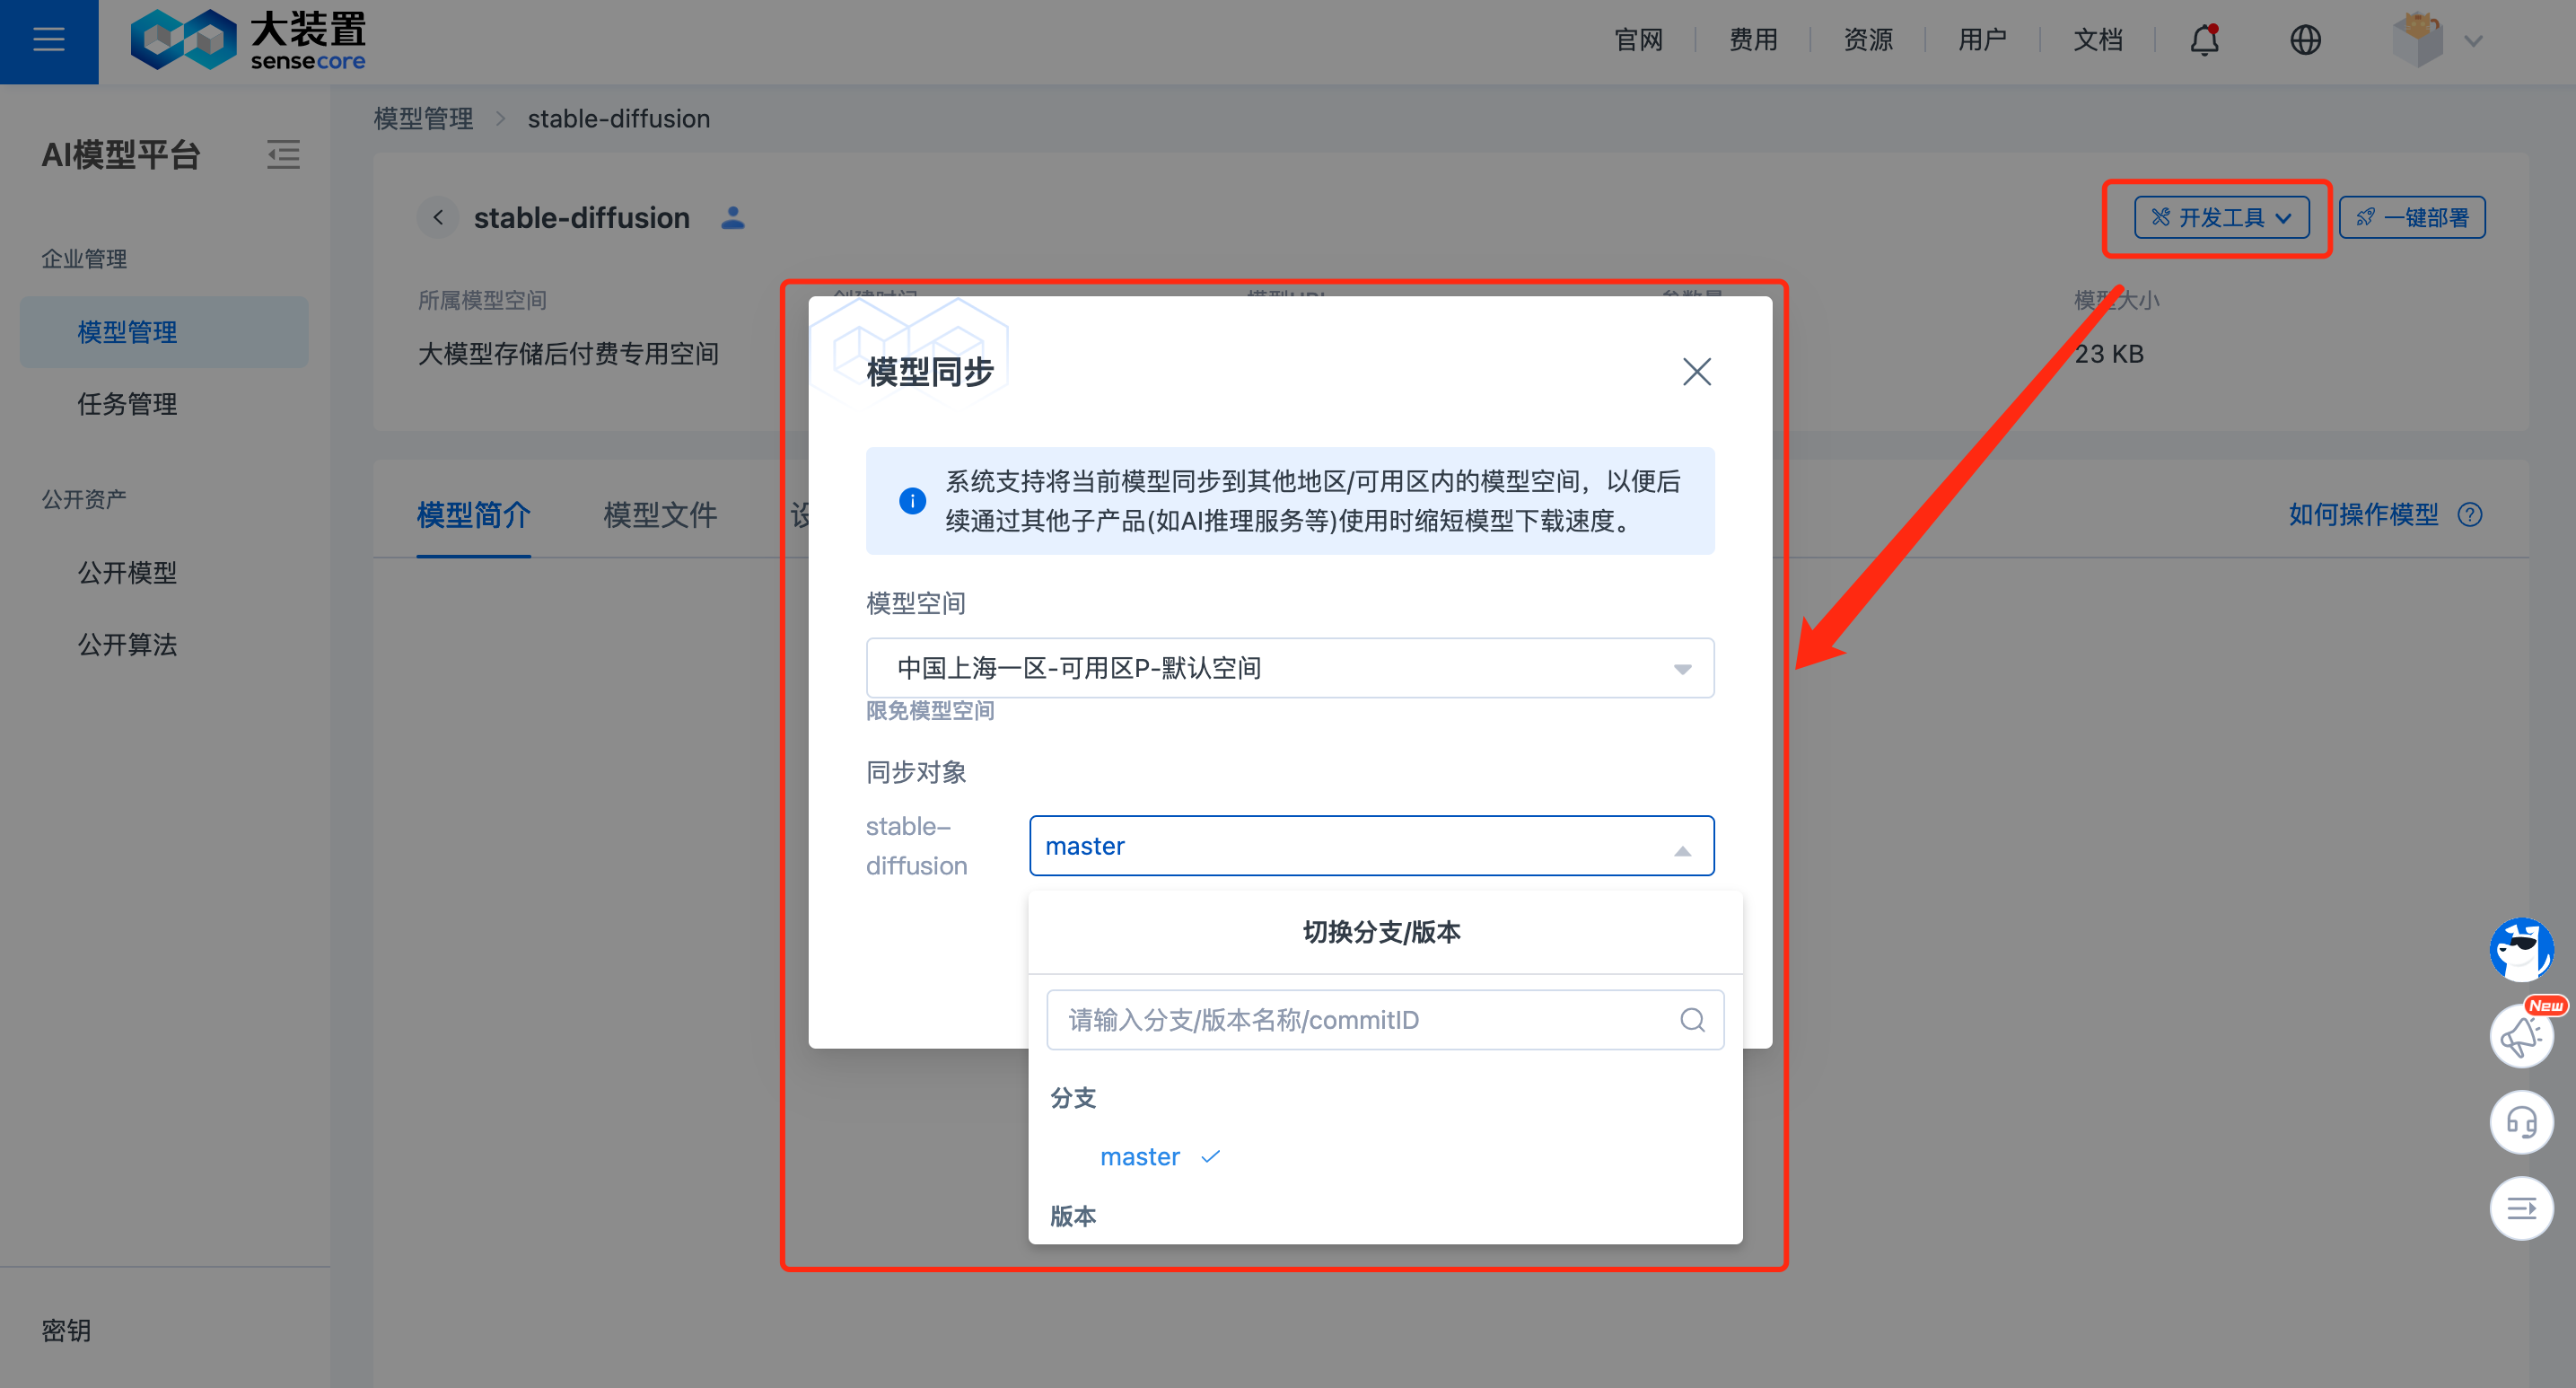
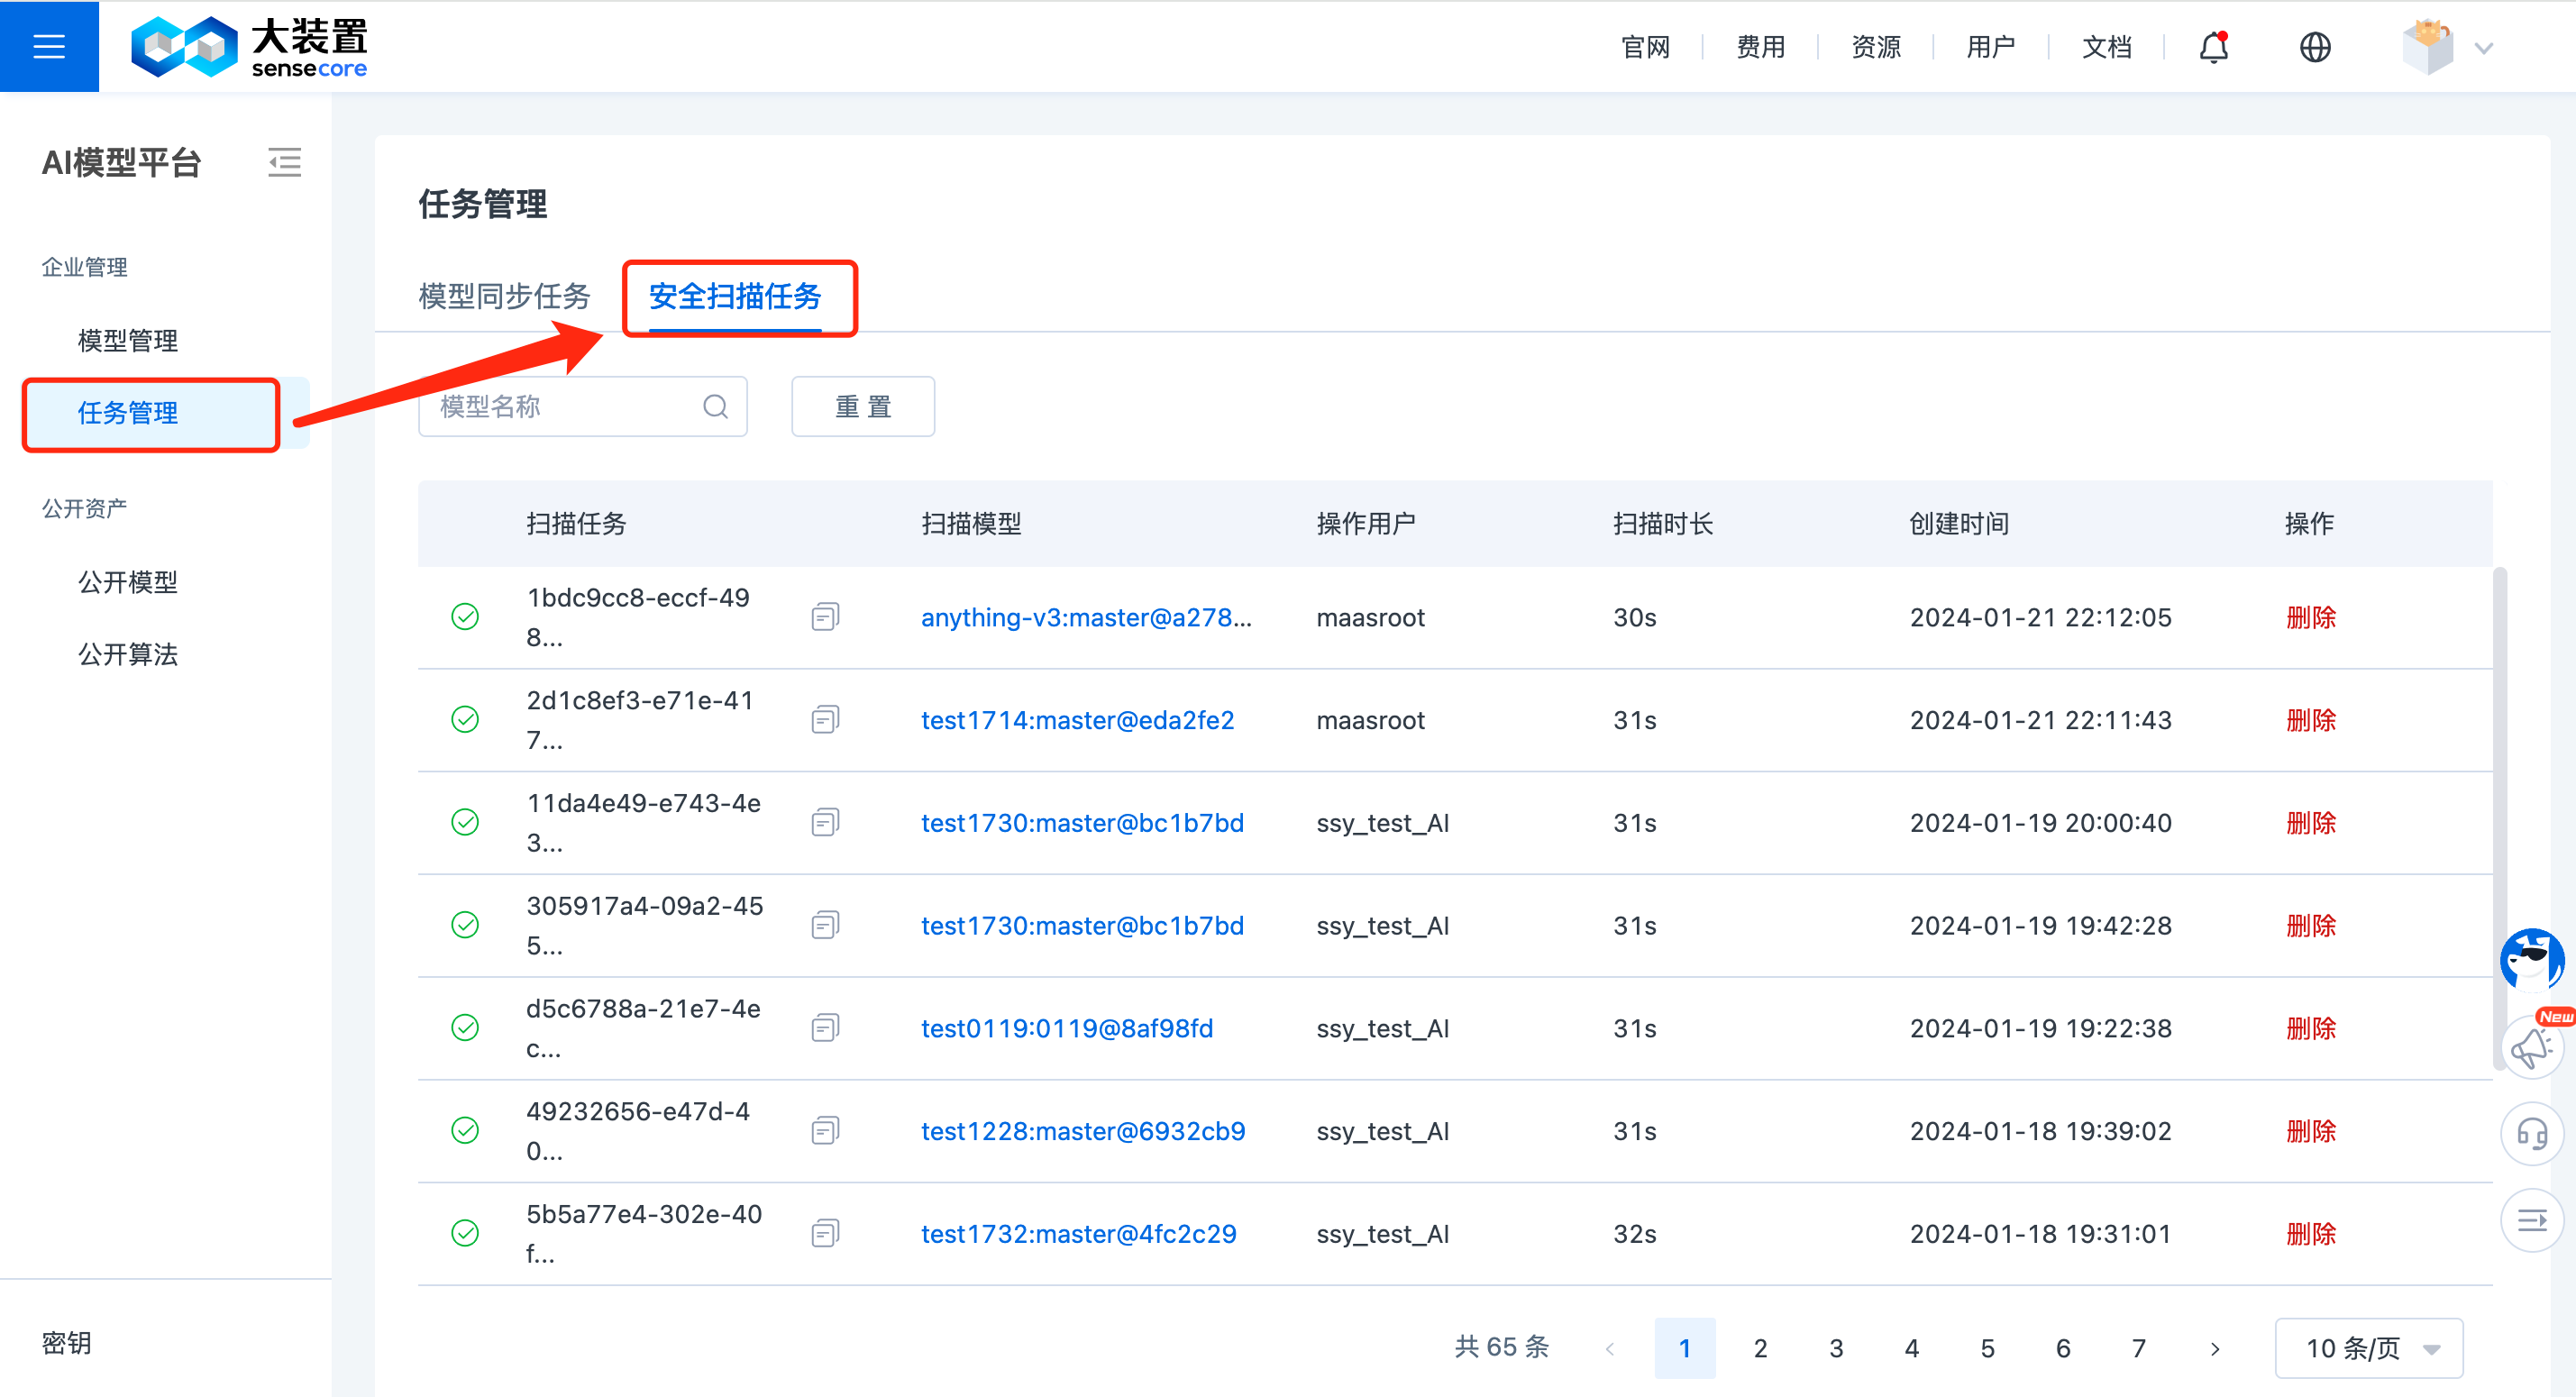
Click [Start Sync] to initiate the synchronization task, and monitor the progress in the Task Management / Model Sync Tasks list.
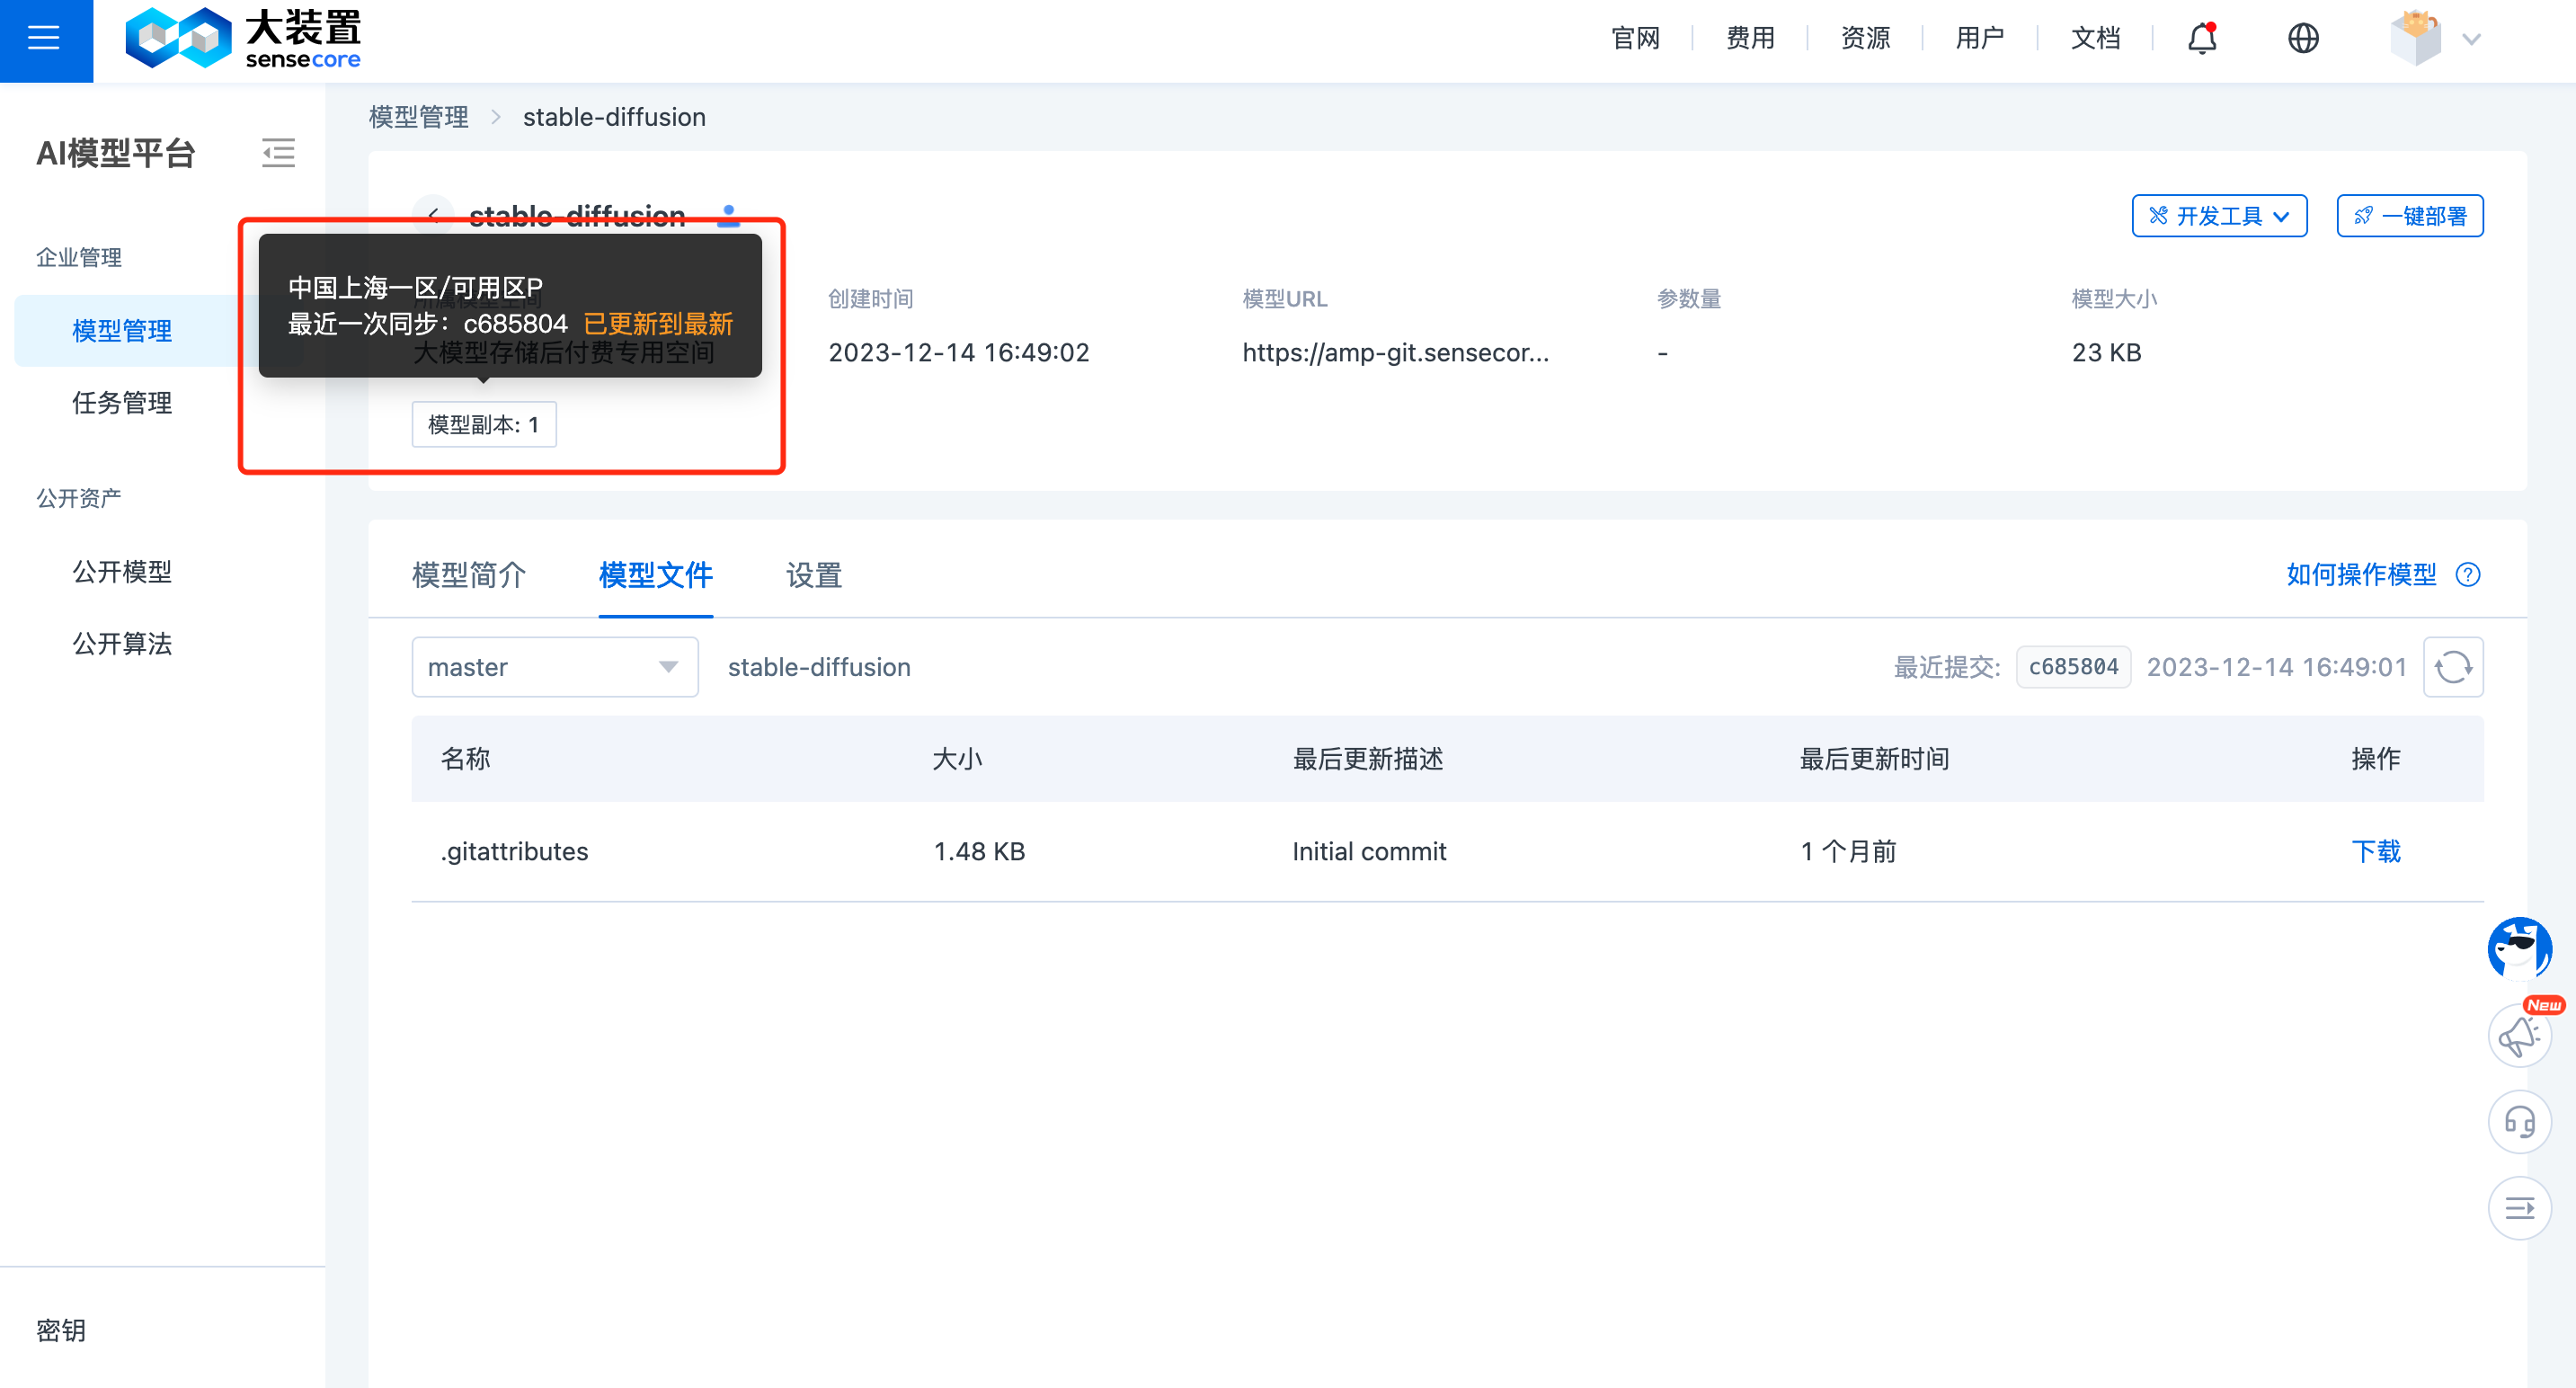
Furthermore, after successful model synchronization, the corresponding model replica tag will be displayed on the model details page.
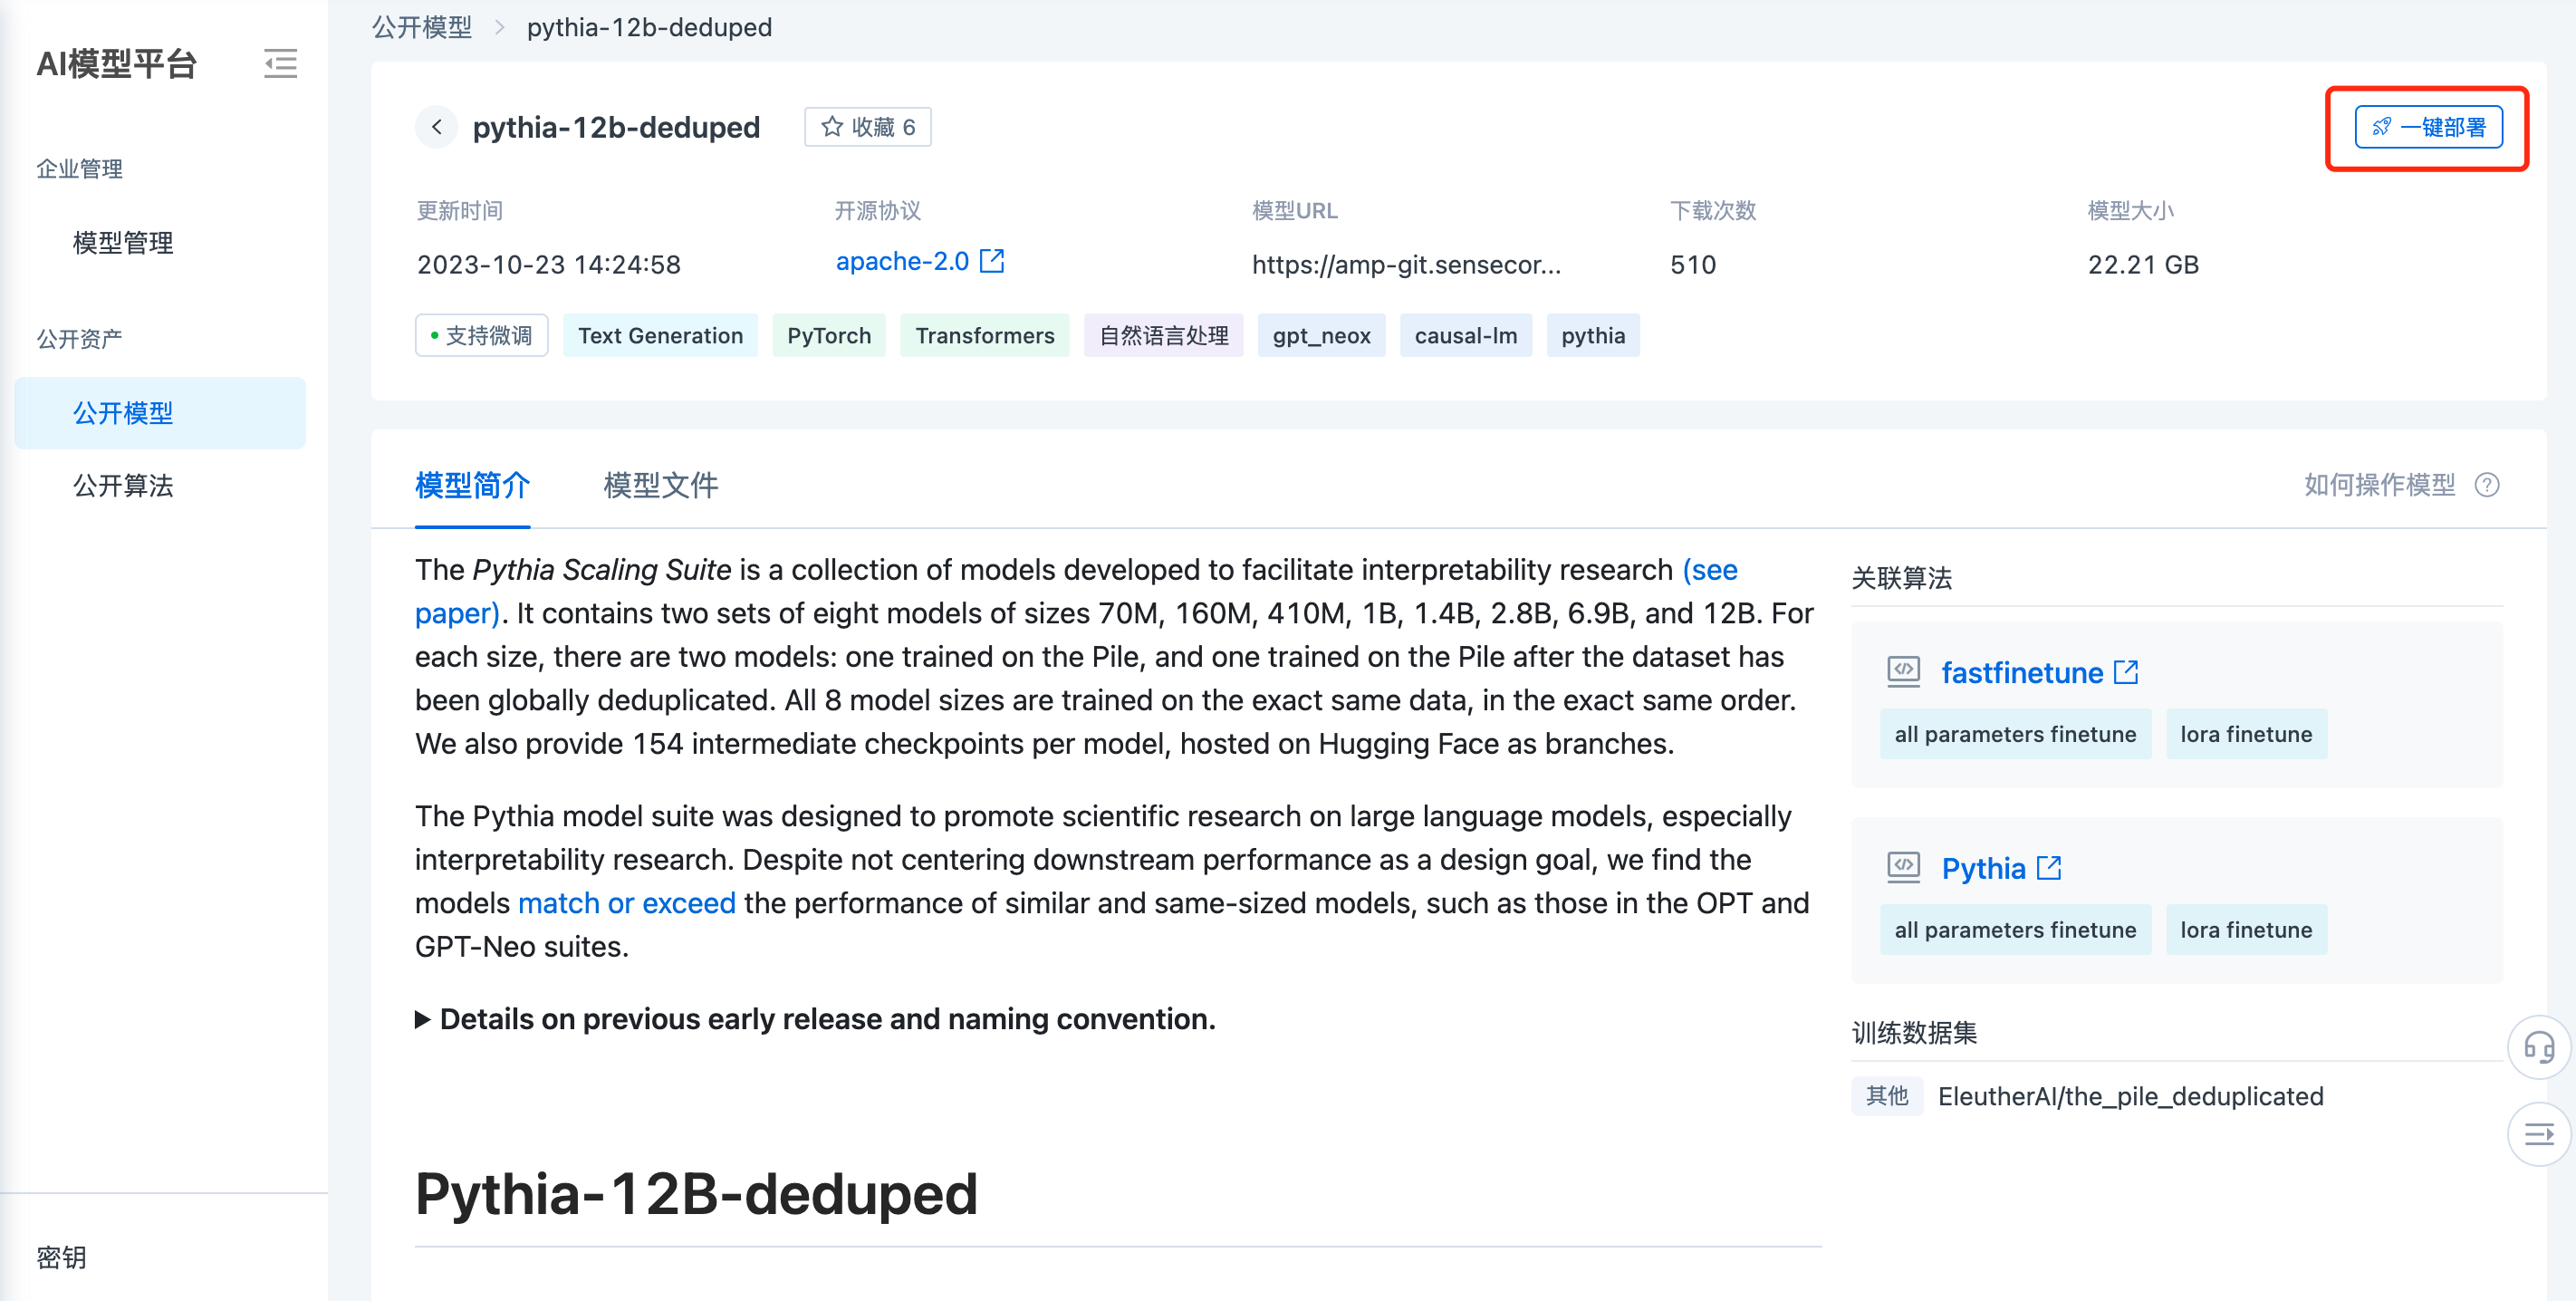
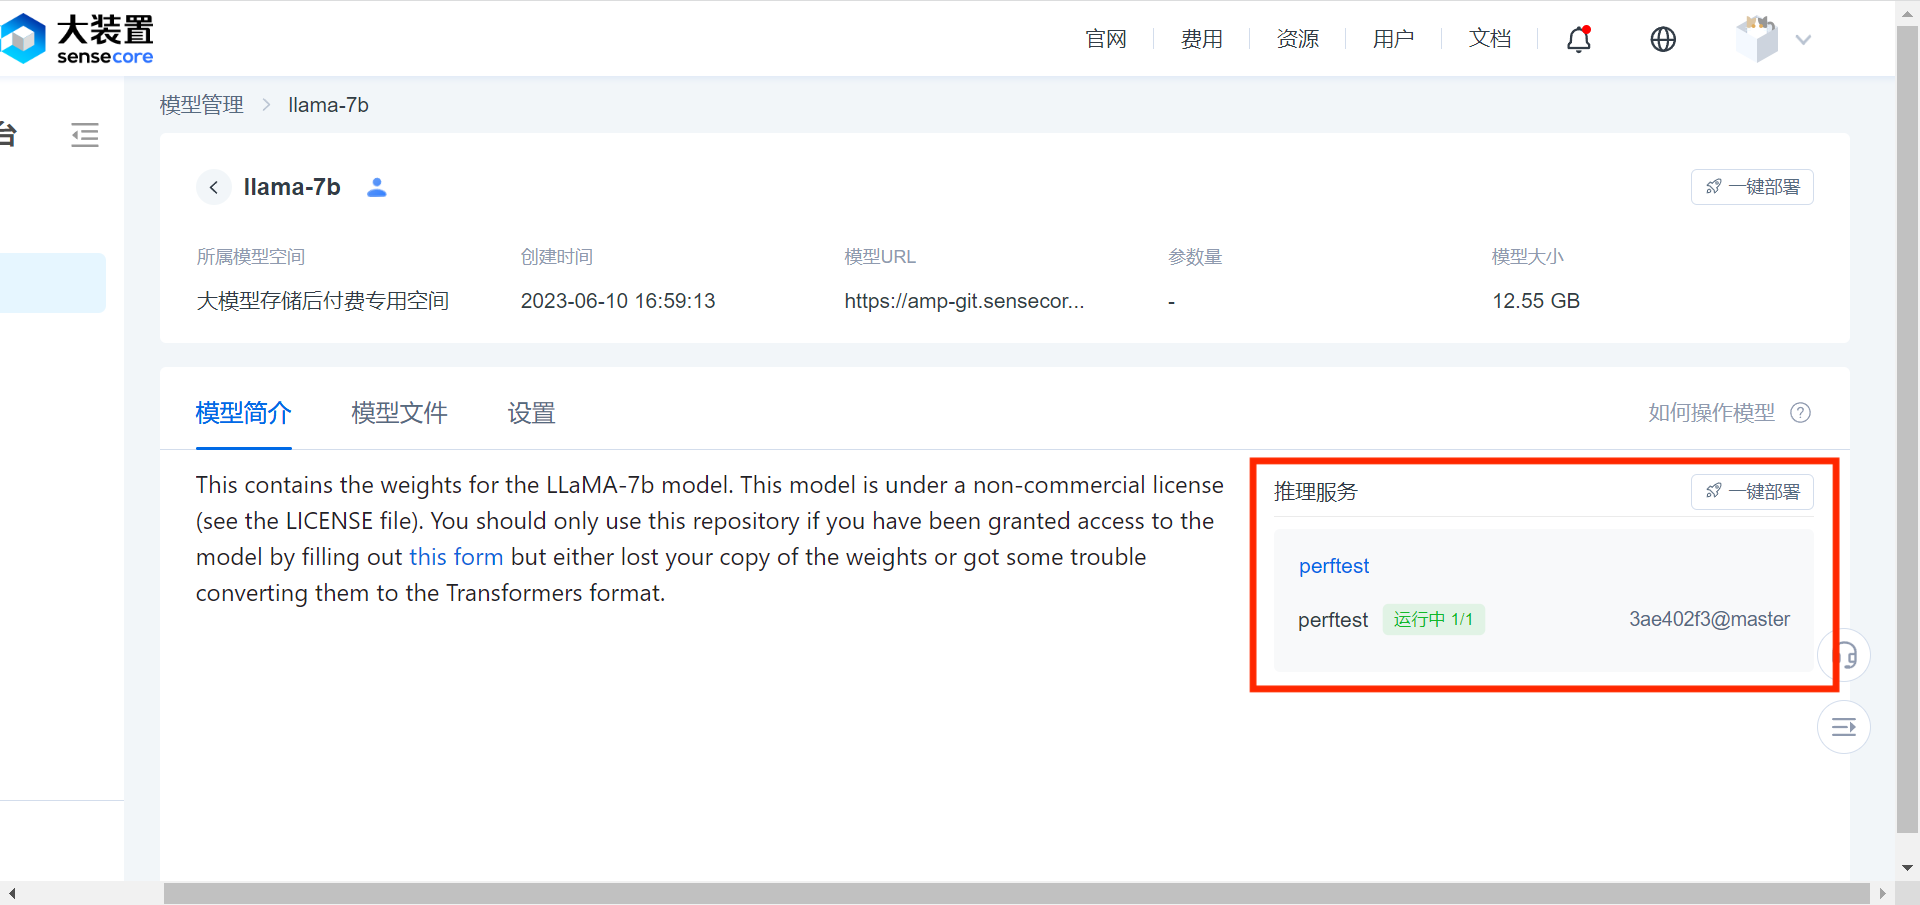
8.Connecting Inference Services
The Model Platform enables users to pull up Inference Services with one click for user models and public models to quickly verify the model effect.
Click to go to the Details page of the model to be deployed. Click the [Deploy with One Click] button in the upper right corner to go to the Create Inference Services page.
Configure the parameters of the Inference Service according to the requirements on the order page. This model is selected by default. Users can modify or adjust a specific branch/version.
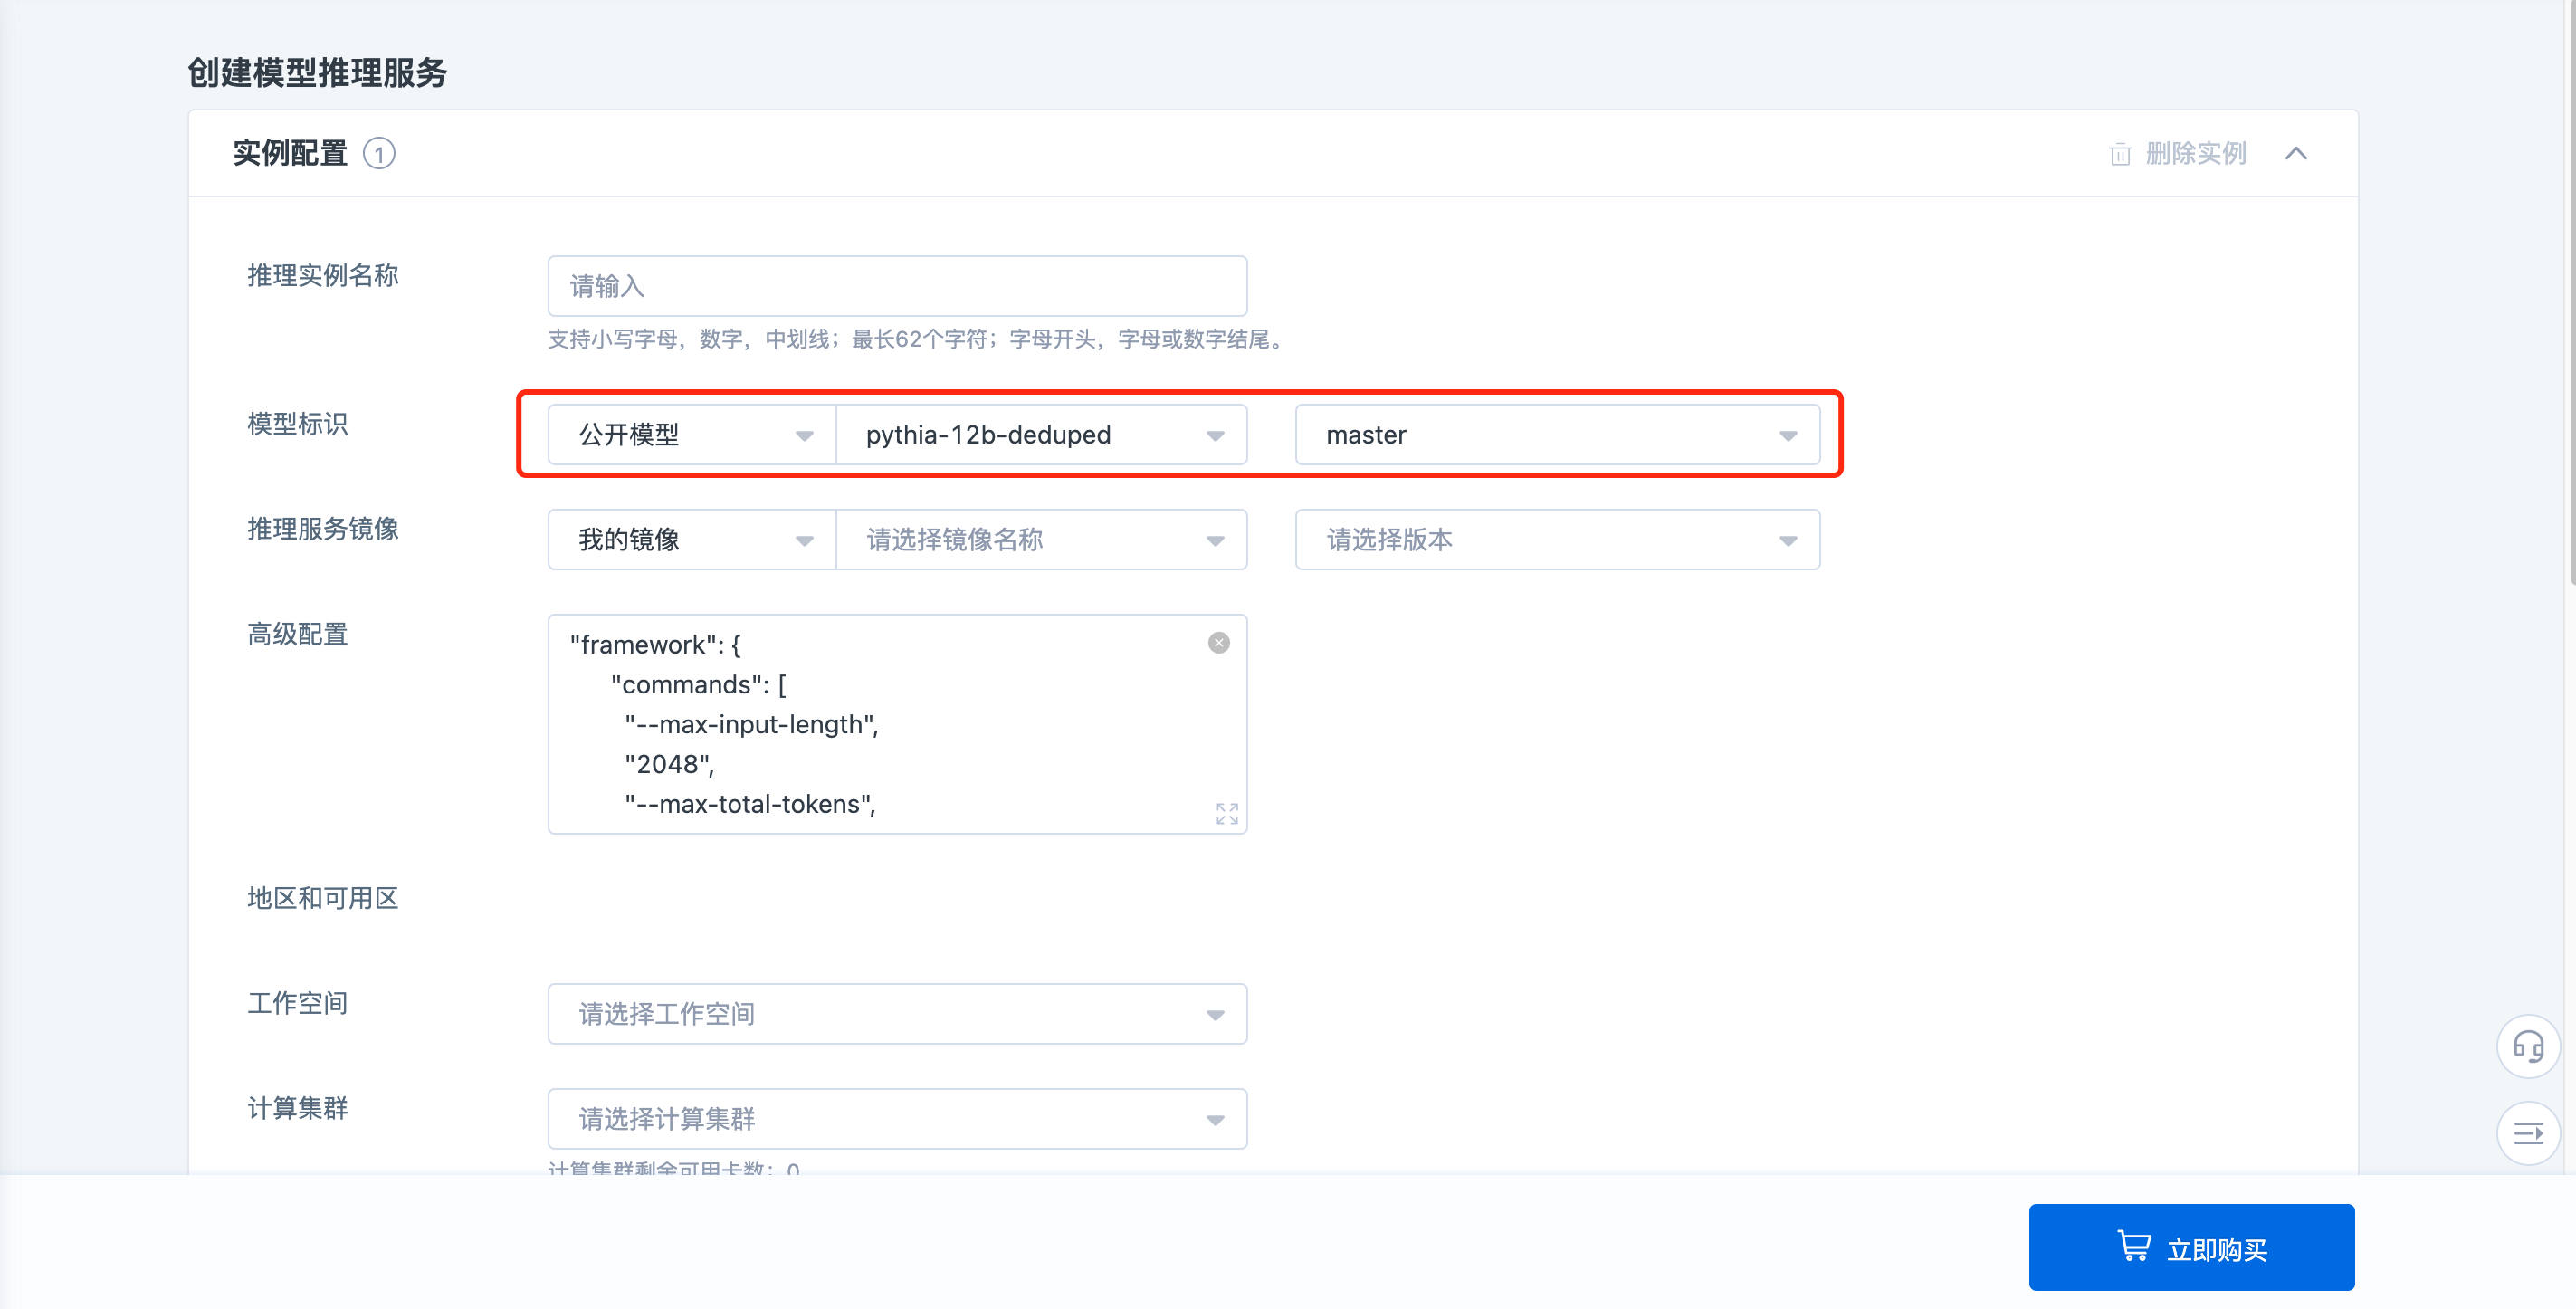
After an Inference Service is downloaded, the Model Details page will display its key information, including service name, instance name, status, number of copies, and used model commit ID, version/branch.
Permission settings
Model space-level permission control, specific roles and supported operation scope are listed below:
| Role | Role Description | Create Model Space | Use Model Space | Authorization/Authorization Canceled |
|---|---|---|---|---|
| Model Space Creator | Act on resources/resource groups/management groups, configurable | ✅ | - | - |
| Model Space Owner | Act on a model space instance, non-configurable, default to the user who creates the resource | - | ✅ | ✅ |
| Model Space Maintainer | Act on a model space instance, configurable | - | ✅ | ✅ |
| Model Space User | Act on a model space instance, configurable | - | ✅ | - |
Model-level permission control, specific roles and supported operation scope are listed below:
| Role | Role Description | View Model | Retrieve Model | Read Model File | Write Model File | Edit Model | Delete Model |
|---|---|---|---|---|---|---|---|
| Model Owner | Act on a model instance, non-configurable, default to the user who creates the model | ✅ | ✅ | ✅ | ✅ | ✅ | #x2705; |
| Model Maintainer | Act on a model instance, configurable | ✅ | ✅ | ✅ | ✅ | ✅ | ✅ |
| Model Developer | Act on a model instance, configurable | ✅ | ✅ | ✅ | ✅ | - | - |
| Model User | Act on a model instance, configurable | ✅ | ✅ | ✅ | - | - | - |
| Model Visitor | Act on a model instance, configurable | ✅ | ✅ | - | - | - | - |
FAQ
- It's cumbersome to enter a key every time I download a model, how can I cache it?
git config --global credential.helper 'store --file ~/.git-credentials' #cache secret